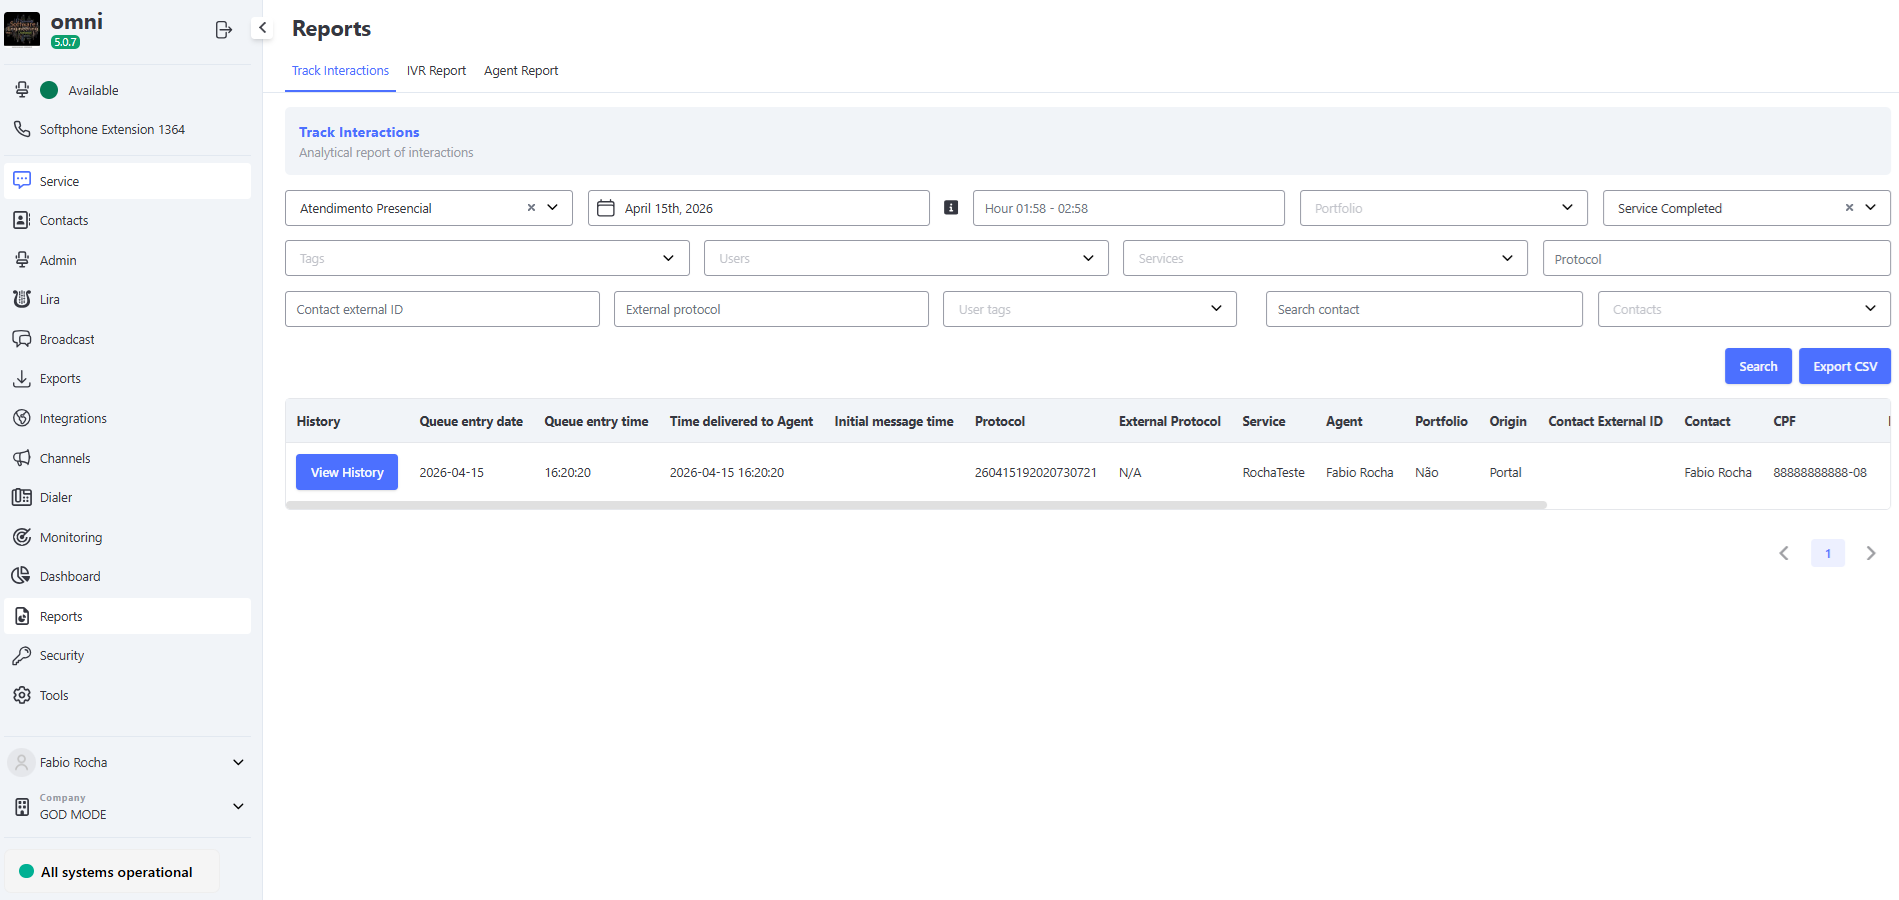
Attendance Screen
The Attendance screen is the operational heart of Omni, where agents manage customer interactions efficiently in an organized manner. Whether answering interactions, replying to messages, or tracking the status of Attendance requests, this screen is designed to provide an intuitive and productive experience.
🎯 In this documentation, you’ll explore the Customer Service Screen interface, understand how it’s organized, and learn how to use its key features.
Omni's Attendance screen overview
When you log in, you’ll be taken directly to the Service Screen, where you can:
- 📥 Check new Attendance requests as soon as they come in.
- 🗂️ Track existing Attendance requests, organized into cards for easy navigation.
- ⏱️ Prioritize interactions or messages based on criteria such as urgency, status, or wait time.
The Side Menu is always available to provide quick access to the system’s modules and features. It has been carefully organized to ensure that all necessary tools are easily accessible while using the Attendance Screen.
⚠️ Important: The content displayed in the side menu varies depending on the permissions assigned to the user. In other words, each agent sees only the menus they are authorized to access.
Attendance Screen on Cards
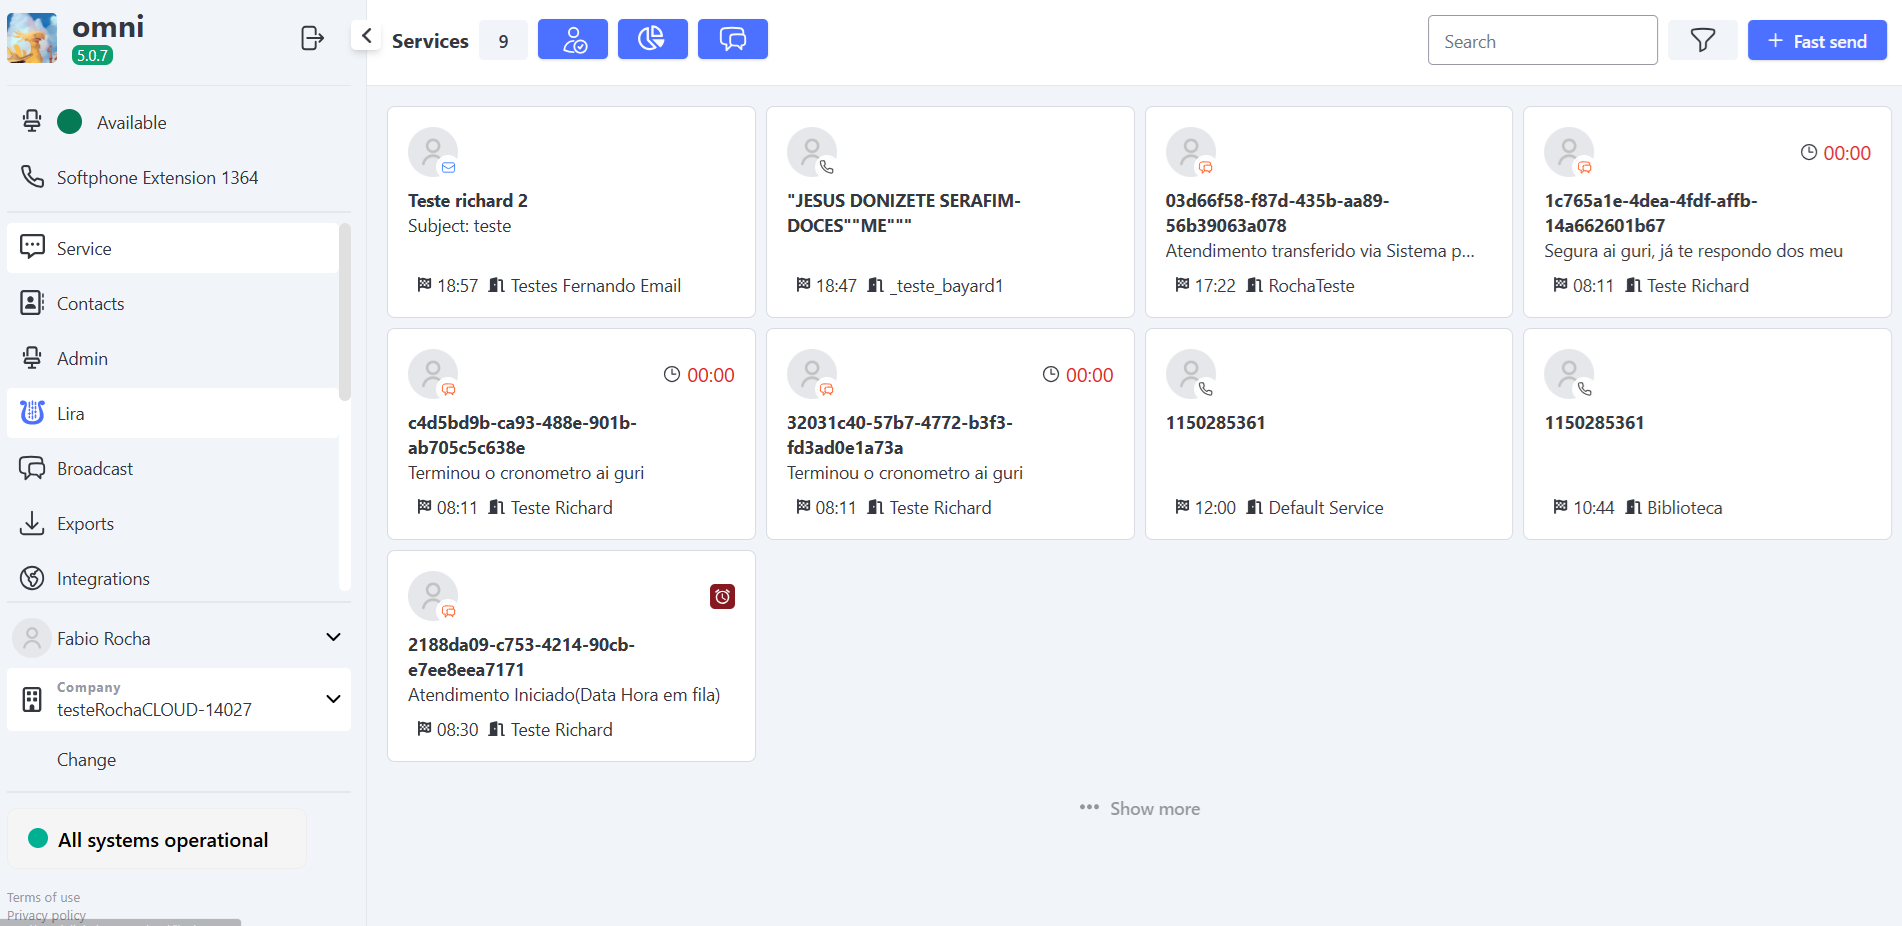
When you log in to the system or click on the attendance screen, you’ll see open Interactions displayed in card format.
This view presents Attendance Interactions in a summarized format, allowing for a quick, comparative overview of various interactions.
Each card contains the key information needed to identify the Attendance interaction before opening it for a detailed view.
On screen elements
This bar appears if the organization does not have the hold feature configured

This bar will appear if the organization has the “hold” feature enabled

- 🔢 Total Number of interactions: Shows the number of interactions handled by the agent.
- 🟢 Active: Total number of active interactions for the agent.
- ⏸️ On Hold: Total number of interactions on hold for the agent.
- 📝 In-Person Record: allows you to manually log a Attendance interaction conducted in person with the customer.
- 📊 My View: statistics dashboard showing interactions by type (Chat, Email, Voice), filtered by time period (day, week, month, or year).
- 📂 Completed Interactions: access to the history of interactions already closed by the agent.
- 🔍 Search: search for interactions by customer, Attendance, or ticket number.
- ⚙️ Filters: Refine the list by Attendance, media, sorting, maximum view limit, and offline interactions (Hold).
- 🚀 Quick Send: Immediately create an active interaction.
- ➕ Load More: Loads 20 new interactions at a time.
Visible elements on each card
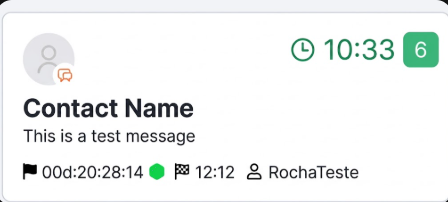
- 🏷️ Name/ID: the customer’s name or ID.
- 💬 Last Message / Email Subject: displays the last message received or the subject of the interaction.
- ⏰ Timer: shows the customer’s wait time for a response or the agent’s response deadline.
- 🔔 Green Counter: number of unread messages in the interaction.
- ℹ️ Information Icons:
- 👤 Contact photo (if available)
- 🕒 Total time in queue/open (TTA)
- 🏳️ Associated service
- 💻 Media used (e.g., email, chat, voice)
- ⌛ Time of the last message sent
Attendance screen on a list
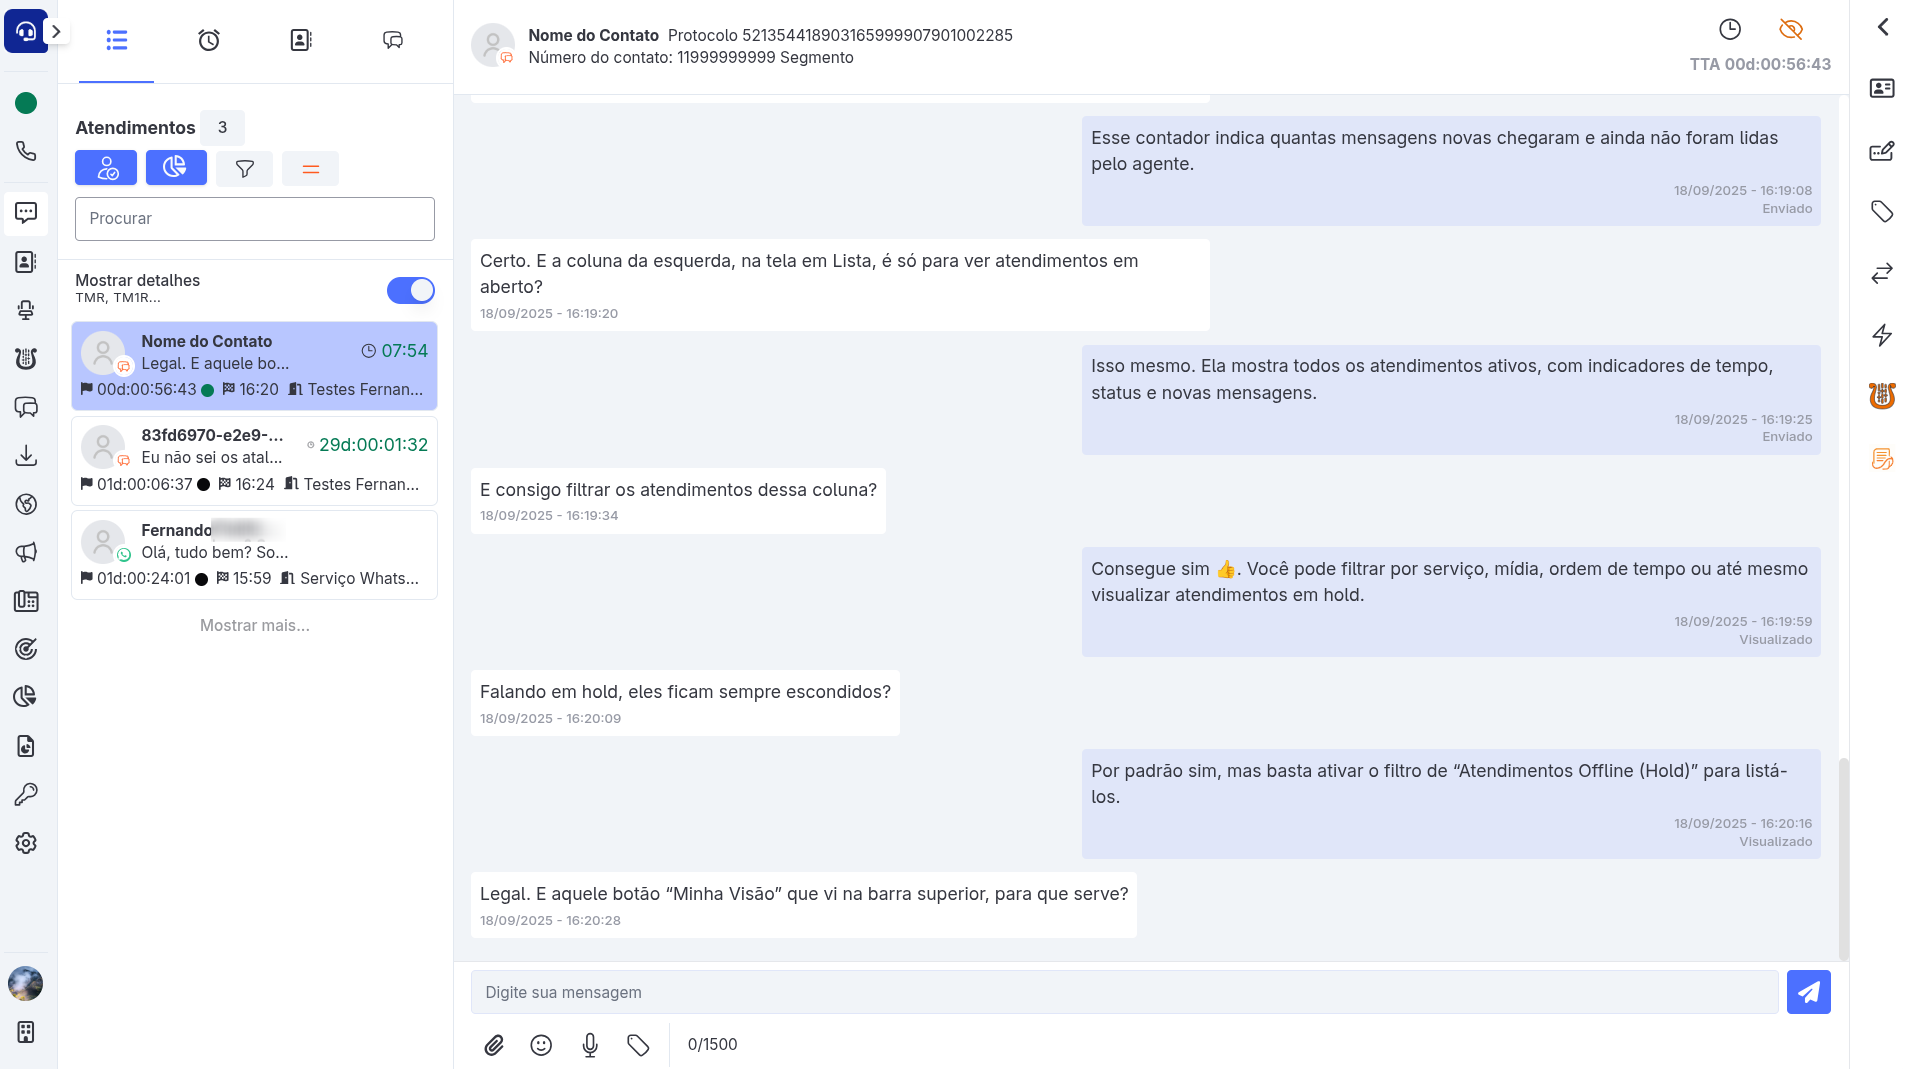
The Attendance List is where the agent monitors and interacts directly with the customer.
While Cards provide an overview and comparison, the list focuses on the details of the conversation, allowing agents to perform complete Attendance actions.
The Attendance List screen is organized into three main areas, each with a well-defined function in the agent’s workflow:
-
📋 Attendance Column (left): functions as a quick control panel, displaying all ongoing Attendances with visual indicators for status, time, and new messages. This is the starting point for selecting which interaction to open.
-
💬 Interaction Area (center): This is the heart of the screen, where direct interaction with the customer takes place. Here, the agent can reply to messages, attach files, record internal notes, and track the entire interaction history in real time.
-
🛠️ Side Toolbar (right): brings together support features for handling Interactions, such as editing and linking contacts, closing Interactions, transferring Interactions, and accessing shortcuts. It can be expanded or collapsed as needed, freeing up space on the main screen.
Attendance column
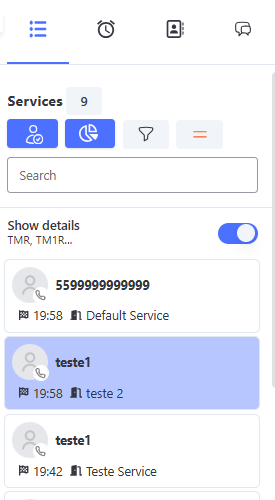
Navigation elements
At the top of the column, you can access the following options:
- 🟢 In Progress: Displays all interactions the agent is currently handling in real time.
- 🟢 Active: Indicator in the Attendance Column showing the total number of active Attendance interactions for the agent (displayed only when the hold feature is enabled in the organization).
- ⏸️ On Hold: Indicator in the Attendance Column showing the total number of the agent’s interactions on Hold (displayed only when the hold feature is enabled in the organization).
- 📅 Scheduled Interactions: Shows interactions scheduled to occur on specific dates or times.
- 🚀 Quick Send: Allows for the immediate creation of a new active interaction.
- 📂 Completed Interactions: Access to the history of interactions already closed by the agent.
Viewing and Actions
The following viewing and support features are available below:
- 📝 In-Person Record: allows you to manually log a attendance interaction that took place in person with the customer.
- 📊 My View: statistics dashboard showing interactions by type (Chat, Email, Voice), filtered by time period (day, week, month, or year).
- ⚙️ Filters: refine the list by attendance, media, sorting, maximum number of views, and offline interactions (Hold).
- 🧹 Clear Filters: removes all applied filters, returning to the default view.
- 🔍 Search: searches for interactions by customer, attendance, or protocol.
- 👁️ Show Details: expands additional metrics such as TTA, TMR, and TM1R.
Attendance list
This section displays all ongoing interactions, showing:
- 🏷️ Contact Name/ID.
- 👤 Photo/Profile (when available).
- 💬 Last Message Received.
- 🕒 Metrics: TTA, time of last interaction, service, and media.
- ⏰ Timer: shows the customer’s response wait time or the agent’s response deadline.
- └ Unread Messages: indicates the number of unread messages.
- ➕ Show More: loads 20 new interactions at a time.
Attendance area
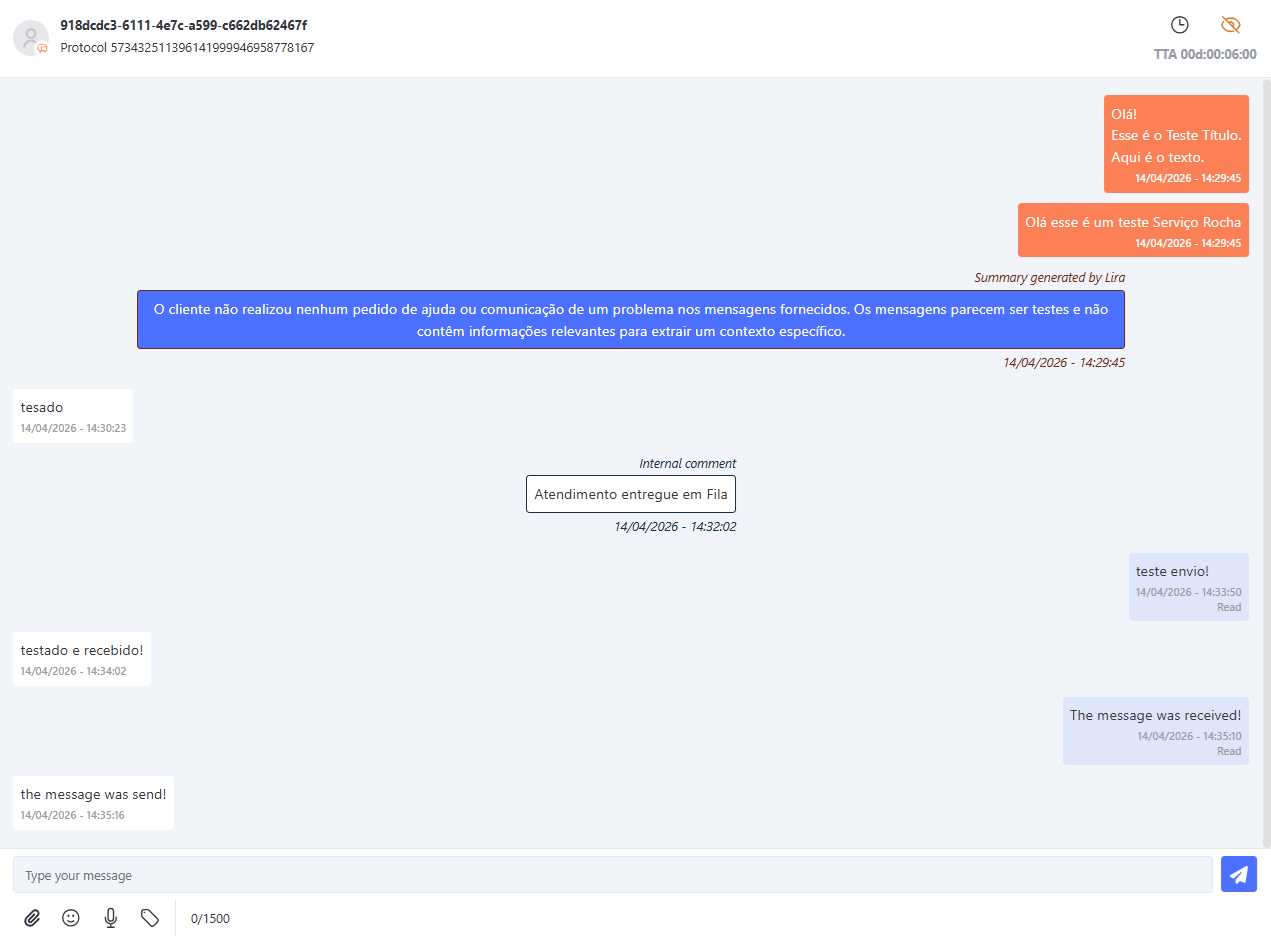
This is the central hub where agents manage customer interactions, log messages, track history, and access essential service information.
📋 Attendance Header
The header of the area displays additional information to provide context for the current interaction:
- 👤 Contact Name/ID: The primary identifier of the customer being assisted.
- 🆔 Interaction ID: A unique code for the interaction; clicking it automatically copies it to the clipboard.
- 📜 Service History: allows you to view previous interactions with the same contact, providing additional context for continuing the service.
- 🕒 Total Service Time: shows the total time the customer has been in service, regardless of transfers between agents or departments.
💬 Interaction Area
In central section, the agent can perform various actions:
- ✍️ Type messages in real time to the customer.
- 📎 Attach files in formats supported by the system.
- 😀 Select emojis to personalize the conversation.
- 🎙️ Record audio and send it directly through the conversation.
- ✅ Tabulate/Close Interactions: allows you to record the conclusion of the interaction with tags and an appropriate closure.
In addition, message types present in the conversation are displayed:
- 📝 Internal comment: visible only to agents, not sent to the customer.
- 💬 Message sent to the customer: direct communication with the contact.
- ⚙️ Automatic system messages: generated by rules, such as expiration or internal notifications.
Tools sidebar
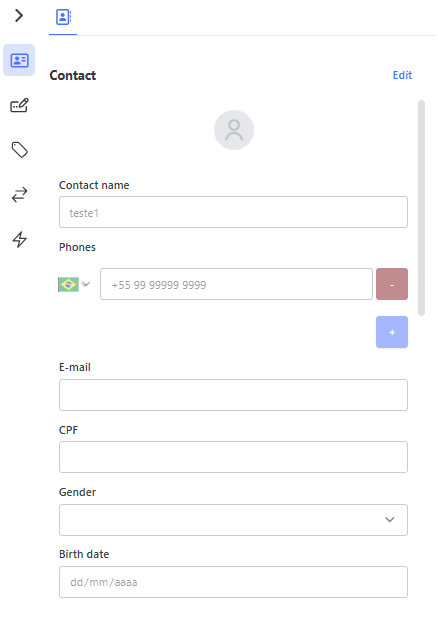
When expanding the sidebar, the agent will find:
- ➕ Add/Link Contact: allows you to link the interaction to an existing contact or add a new contact.
- ✏️ Edit Contact: allows you to edit or update information for an existing contact.
- ✅ Interaction Tagging & Closure: allows you to log the completion of the interaction with tags and the appropriate closure.
- 🔄 Transfer Interaction: allows you to transfer the conversation to another agent or to a different service, while retaining the customer’s history.
- ⌨️ Shortcut Lists: quick access to pre-configured message shortcuts, streamlining recurring responses.
- 🤖 Lira: access to Omni’s artificial intelligence, which assists the agent with suggestions and automations based on the context of the conversation.
- 🧩 Help Me: a button that uses Lira to automatically generate a summary of the conversation between the agent and the customer, as well as suggest useful questions for searching the knowledge base.
To collapse the bar, simply click the → button.
⚠️ Important: The Lira and Help Me buttons will only be available if Ligo has enabled this feature for use within your company's environment.
Filters and Show More
Omni offers a set of filters that allow you to refine the view of support Interactions, both on the Card view and the List view.
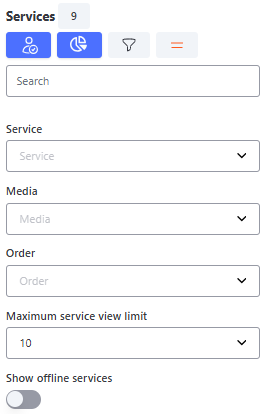
Filters
The filters are available on the top bar of the service screen and allow adjustments based on the agent’s needs:
- 🏳️ Service: filters services by the name of the registered service.
- 💻 Media: selects the service media (e.g., WhatsApp, Chat, Email...).
- ⏱️ Sorting: sets whether interactions are displayed in ascending or descending order by time.
- ┢ Maximum Number of Views: adjusts the number of interactions displayed on the screen at a time (10, 30, 50, 70, 90, or 110).
- 📴 Offline Interactions (On Hold): displays interactions that are on hold. By default, this option is unchecked.
Show More
The Show More button complements the filters by loading additional service records onto the screen.
- The system initially displays 10 service records.
- When you click Show More, 20 additional service records are loaded.
- The system maintains this setting throughout the session until the user logs out or changes the number of records displayed directly in the filters.
📌 Example: If the filters are set to display 30 Interactions and the user clicks Show More, the screen will display 50 Interactions until the next logout or manual change.
Attendance Shortcuts
To streamline your work, here are some keyboard and text shortcuts:
- @ : Transfer by User.
- # : Transfer by Service.
- / : List registered shortcuts.
- ! : Internal comment (not visible to the customer).
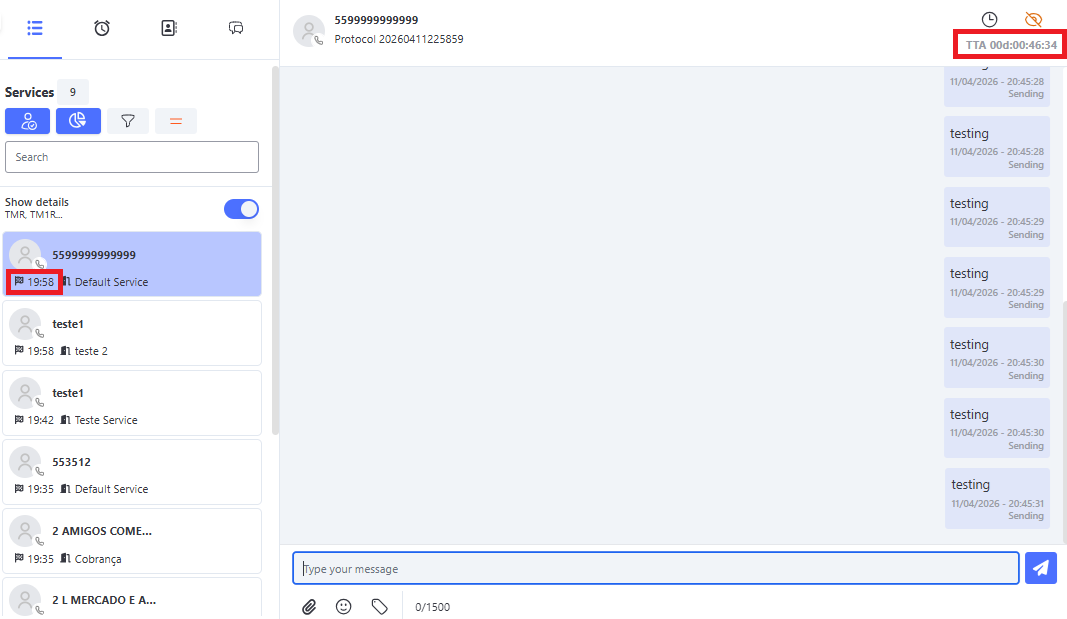
Total Attendance Time Indicator - TTA
Omni displays the TTA (Total Attendance Time) within service interactions, which shows the agent how long the customer has been on the interaction.
- The counter is not reset in the event of a transfer to another service or agent.
- Even after the interaction ends, the TTA remains updated.
Total Service Time - TTA
Response Timer in a Interaction
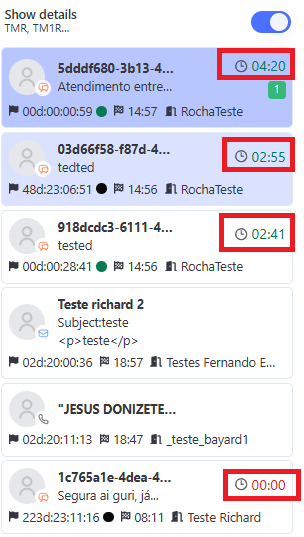
The Response Timer is a useful tool available on the Omni interaction screen that helps agents track the time remaining to respond to or receive a response in a interaction. It appears directly on the interaction card, located in the center of the screen, and counts down in the format MM:SS (minutes and seconds).
Where the Timer Appears
The timer is located in the upper-right corner of the ticket card, next to the customer’s ID and the ticket status. Here’s how it looks:
- Position: In the upper-right corner of the ticket card.
- Format: Displayed in the format DD:HH:MM:SS (for example:
29:07for 29 minutes and 07 seconds).
If the configured time exceeds 24 hours, the timer will be displayed in the format 01d 23:59:59 (days, hours, minutes, and seconds).
As the time decreases, the digits are automatically adjusted:- Below 24 hours: displays 23:59:59
- Below 1 hour: displays 59:59
Enabling and Configuring Response Times
To configure response times, follow the steps below:
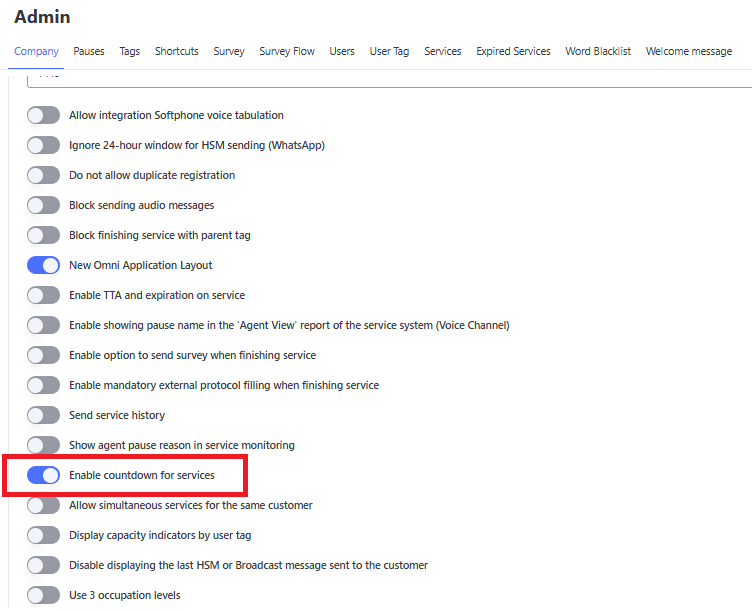
1. Enable the Countdown Timer for Service Requests:
⚠️ Important: This setting must be enabled before configuring response times in the service. Without this setting enabled, the time fields will not be available.
- Go to Organization Settings.
- Locate the option “Enable Countdown for Service Requests”.
- Check the box to enable the feature.
💡 Tip: After enabling the countdown, log out and log back in to the system to load the new settings.
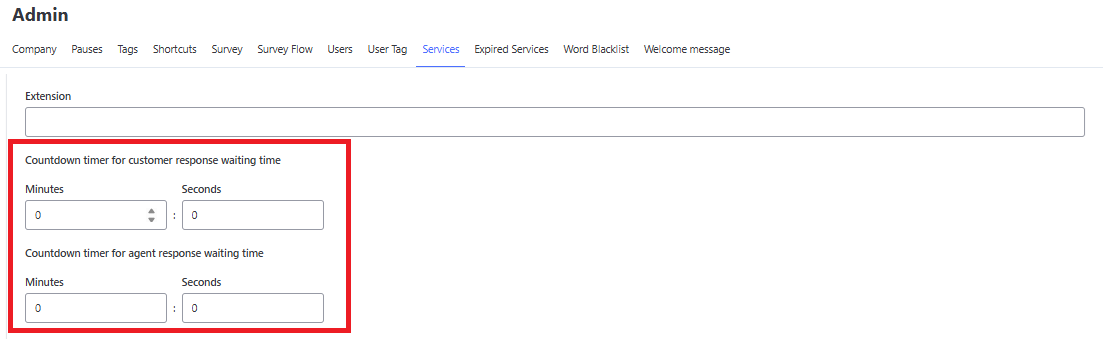
2. Configure Service Timers:
- Go to Service Settings.
- Locate the following fields:
- Agent Response Wait Timer (minutes and seconds):
- Sets the time limit for the agent to respond to the customer after a message.
- Sets the additional seconds beyond the configured minutes.
- Maximum allowed value: 43,200 minutes (equivalent to 30 days).
- Customer Response Wait Timer (minutes and seconds):
- Sets the time limit for the customer to respond to the agent after a message.
- Sets the additional seconds beyond the configured minutes.
- Maximum allowed value: 43,200 minutes (equivalent to 30 days).
- Agent Response Wait Timer (minutes and seconds):
⚠️ Important: If the organization disables the feature later, existing Interactions will continue to follow the previously configured times. However, the time fields in the service will be automatically deleted.
How Does It Work?
🔄 When Is the Timer Reset?
The timer automatically updates based on the last interaction:
| Last Action | Timer Starts at |
|---|---|
| Agent Message | Timer Countdown for Customer Response |
| Customer Message | Timer Countdown for Agent Response |
💡 Tip: Each new message exchanged resets the timer to the time configured in the service.
Time Expired
When the time expires:
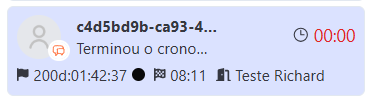
- The timer displays 00:00.
- The time is highlighted in red, indicating that the deadline has been exceeded.
When the Timer Doesn't Appear
- If the service does not have any times entered (Agent Response Wait Timer or Customer Response Wait Timer), the timer will not be displayed on the card.
- If the organization has not enabled the feature, the functionality will also not be available.
Important Rules
🔄 Initial Behavior and Transfers
- When you receive a new ticket or a transferred ticket, the timer starts counting based on the time configured as “Agent Response Wait Timer” in the linked service.
👤 Internal Comments
- If the agent enters an internal comment, the timer is not reset—it only changes when there is direct interaction with the customer.
🧑💻 Attendance on Hold or in Personal Queue
When a attendance is on Hold or in the Personal Queue, the timer behaves as follows:
- While the attendance is on Hold, the timer remains at zero.
- As soon as the attendance returns to the active state, the timer automatically restarts based on the Agent Response Wait Timer.
⚠️ Important: The timer only starts counting after an actual interaction between the customer and the agent. If there is no exchange of messages, it will remain at zero.
Benefits of the Timer
The response timer offers significant benefits for day-to-day customer service:
- 🕒 You know exactly how much time you have to respond or wait for a response from the customer.
- 💼 It makes it easier to manage multiple interactions, keeping the remaining time visible on each card.
- 🚀 It improves the agent and customer experience, encouraging faster and more organized responses.
Automatic Messages After the Timer Expires
- Available only for Chat and WhatsApp interactions.
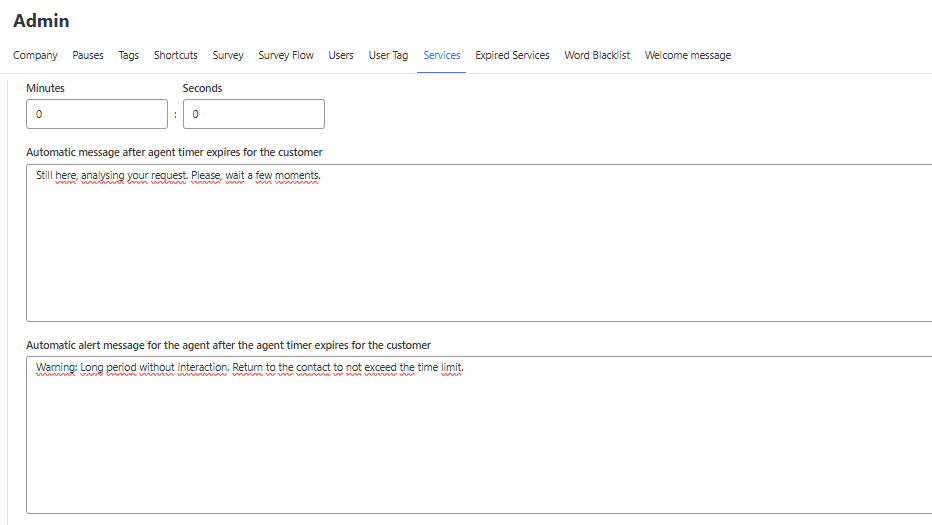
You can now configure automatic system responses whenever the Agent Response Timer expires. There are two separate configuration fields directly below the time setting:
1. Message to the Customer 🗣️
- Field Name:
Automatic message to the customer after the agent’s timer expires - Function: Defines the text that will be automatically sent to the customer in the chat. The goal is to keep the conversation active and inform the customer that the request is being reviewed.
- Who sees it: The customer as a message and the agent as an internal comment.
2. Alert for the Agent 🚨
- Field Name:
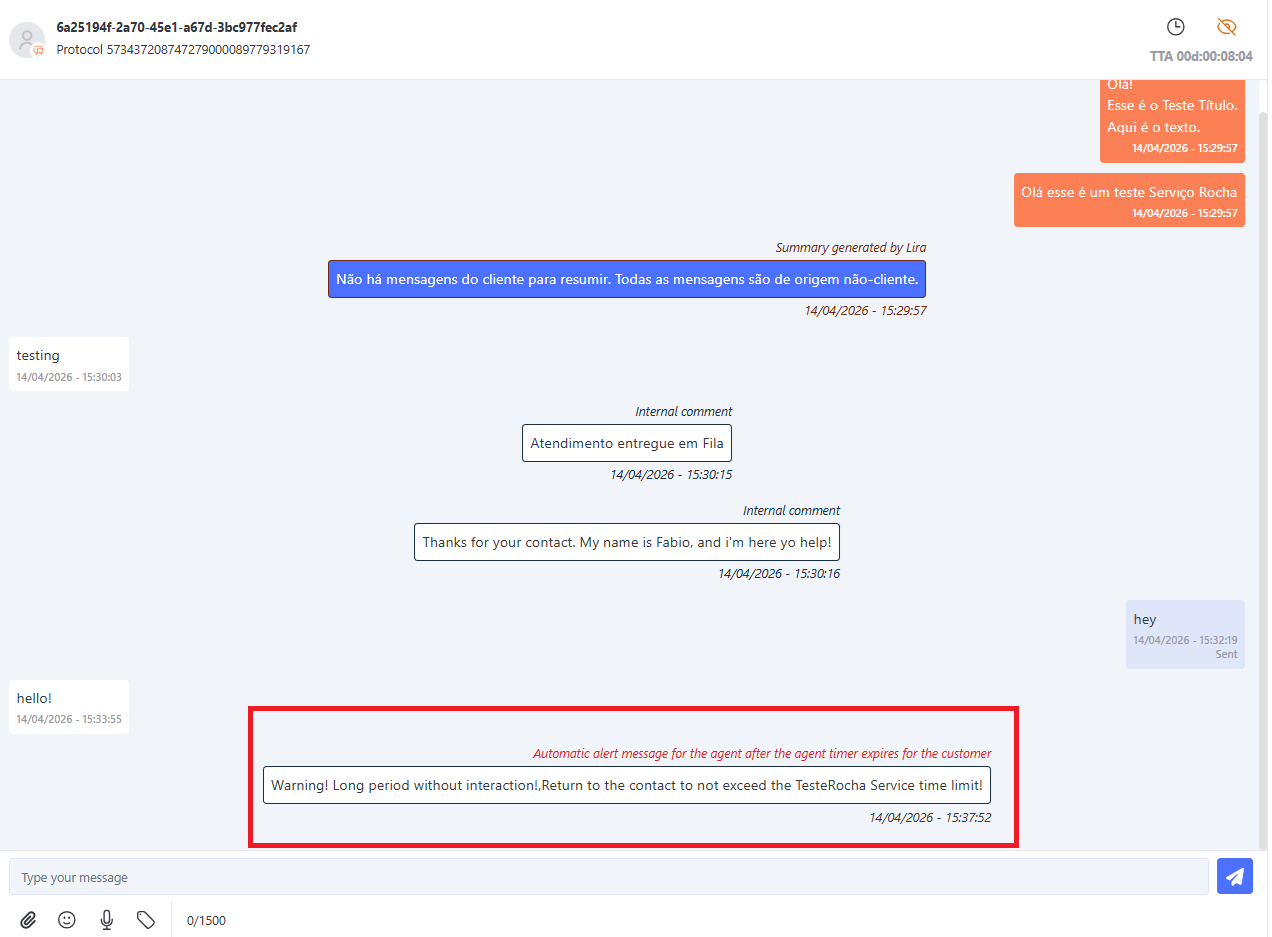
Automatic alert message to the agent after the agent’s timer expires for the customer - Function: Defines the visual alert that will appear exclusively on the agent’s screen. It serves to alert the agent that the idle time limit has been exceeded.
- Who sees it: Only the Agent, as an internal comment.
📊 Impact on Key Performance Indicators (KPIs)
It is important to note that these automations are treated as system events. Therefore, for both configurations:
- They do not count toward the TM1R (Average Time to First Response) and TMR (Average Response Time) metrics.
- They do not affect TMI and TMP calculations in reports and exports.
- They do not trigger the holding function (personal queue).
⚙️ Trigger Rules
The message will be triggered only once per due cycle. If the agent interacts before the time expires, the automatic sending is canceled.
📱 Display on the Service Screen
On the attendance screen, triggered messages are displayed as follows:
Welcome Messages
When a customer contacts your company, it’s important to make a positive first impression.
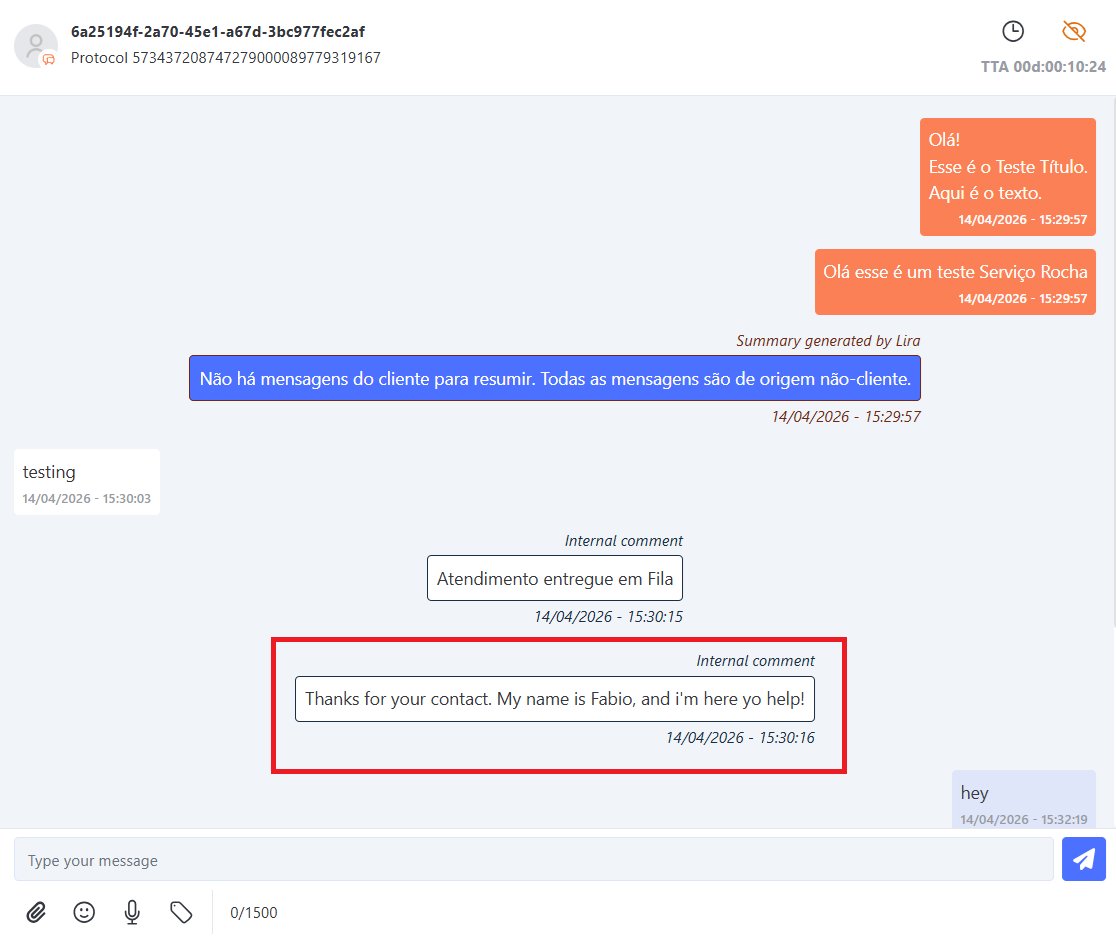
The Welcome Messages feature allows you to set up an automatic message that will be sent to the customer as soon as they initiate a service request for a specific service.
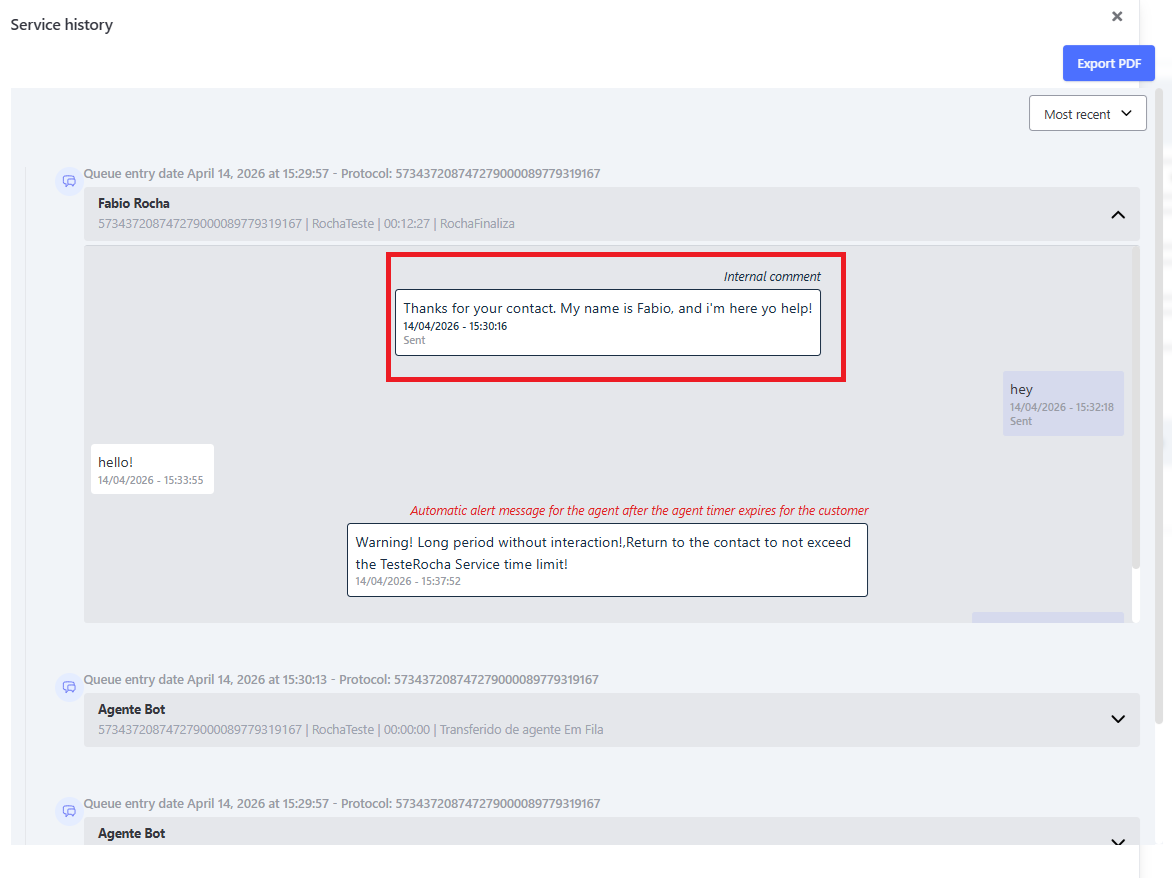
This message appears as a system-type internal comment, meaning it does not count toward the TMR1 and TMR metrics in reports and exports.
💡 Quick Tip: The message is sent automatically by the system and helps inform the customer that their service has already begun.
Required Permissions
In order for users to access and use the Welcome Messages feature, the following permissions must be enabled in the user’s profile:
Permission Location:
Security > Profile Management > Select the desired profile > Administrative Menu Functions
List of Available Permissions:
-
Create Welcome Message
Allows the user to create new welcome messages. -
Edit Welcome Message
Enables editing of messages that have already been created. -
Delete Welcome Messages
Enables the deletion of previously registered messages. -
List Welcome Messages
Allows you to view all messages configured in the system. -
Welcome Message Menu
Enables access to the feature’s configuration screen in the Administrative menu.
⚠️ Important: Permissions for this feature are independent of one another; that is, you can grant access only for reading, to the menu, or to specific actions such as editing or deleting.
This means that you don’t need to enable all permissions at the same time. For example, you can:
- Allow access only to the menu, without permitting registration or editing.
- Allow viewing of messages, but do not allow deletion.
If a specific permission is not enabled, the user will not have access to that action or screen in the system.
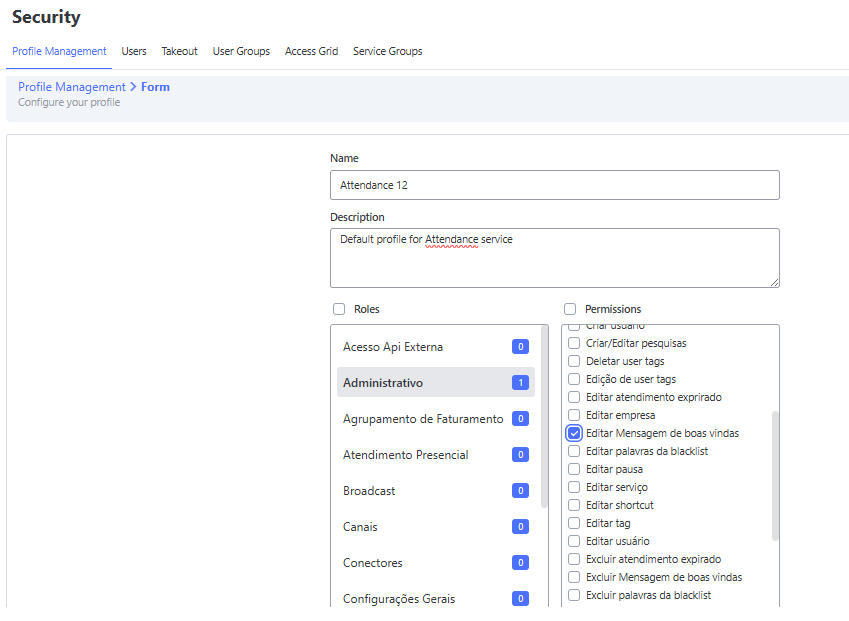
⚠️ Important: The permissions listed below the Description field do not appear on the screen. They have been added for illustrative purposes only.
How to Set Up
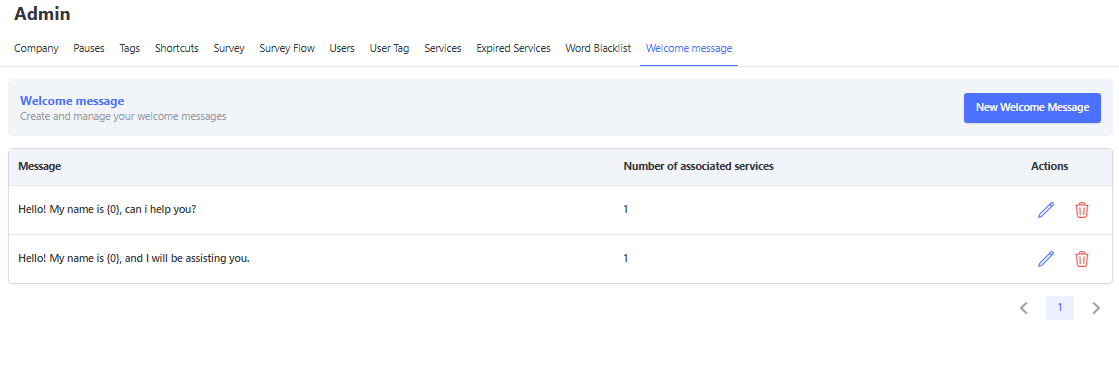
- Go to the Administration > Welcome Message menu.
- Click the New Welcome Message button.
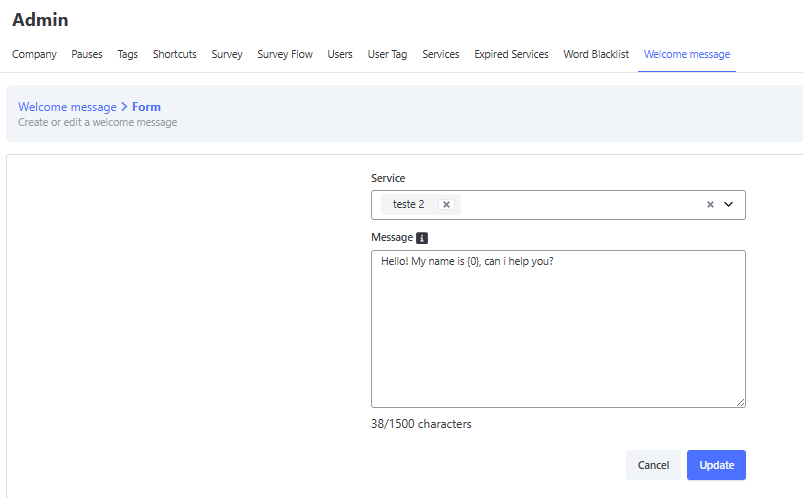
- Select one or more services for which you want to configure the message.
- Enter the message text, which can include the variable
{0}to represent the agent’s name or alias:- Example:
"Hello! My name is {0} and I’m here to help." - If the agent does not have a registered alias, the system will use the agent’s first name, as recorded in the Administrative > Users menu.
- Example:
- Save the configuration.
Automatic Operation
When a new interaction is initiated in a service with a configured welcome message:
- The system automatically sends the message to the customer.
- The variable
{0}is replaced with the current agent’s alias. - The message is displayed as an internal system comment, both on the service screen and in the customer’s history.
⚠️ Important: If the service is configured with expired sessions, the welcome message will be used as the start of the session. If the customer does not respond within the defined time, the system will initiate the automatic expiration process according to the rules configured on the Expired Sessions screen.
Message Example
| Field | Example Value |
|---|---|
| Service | Service Name |
| Configured Message | “Hello! My name is {0} and I'm here to help.” |
| Alias | Carlos |
| Result | “Hello! My name is Carlos and I'm here to help.” |
Sending Rules
The message is sent only once, when the service begins. It is not resent after any type of transfer.
| Situation | Sending the Welcome Message |
|---|---|
| New service | ✅ Yes |
| Transfer by agent | ❌ No |
| Transfer by service | ❌ No |
| Bulk transfer | ❌ No |
TMR1 and TMR Metrics
The welcome message is considered a system message; therefore:
- The time between the message being sent and the customer’s response is not counted in the following metrics:
- Average Individual Response Time (TMR1)
- Overall Average Response Time (TMR)
Benefits of the Welcome Message
Using the automatic welcome message offers several benefits for both agents and the customer experience:
- 📬 Professional first contact: Provides the customer with an immediate response, showing that their service has already begun.
- ⏱️ Saves the agent time: Eliminates the need to type repetitive messages at the start of each conversation.
- 🧹 Standardized communication: Maintains consistent language across all interactions.
- 📊 Does not affect metrics: Since it is marked as a system message, it does not count toward TMR1 and TMR, ensuring accurate reporting.
- 🔄 Smart integration: Works in conjunction with other features, such as Expired Interactions, ensuring a continuous and automated workflow.
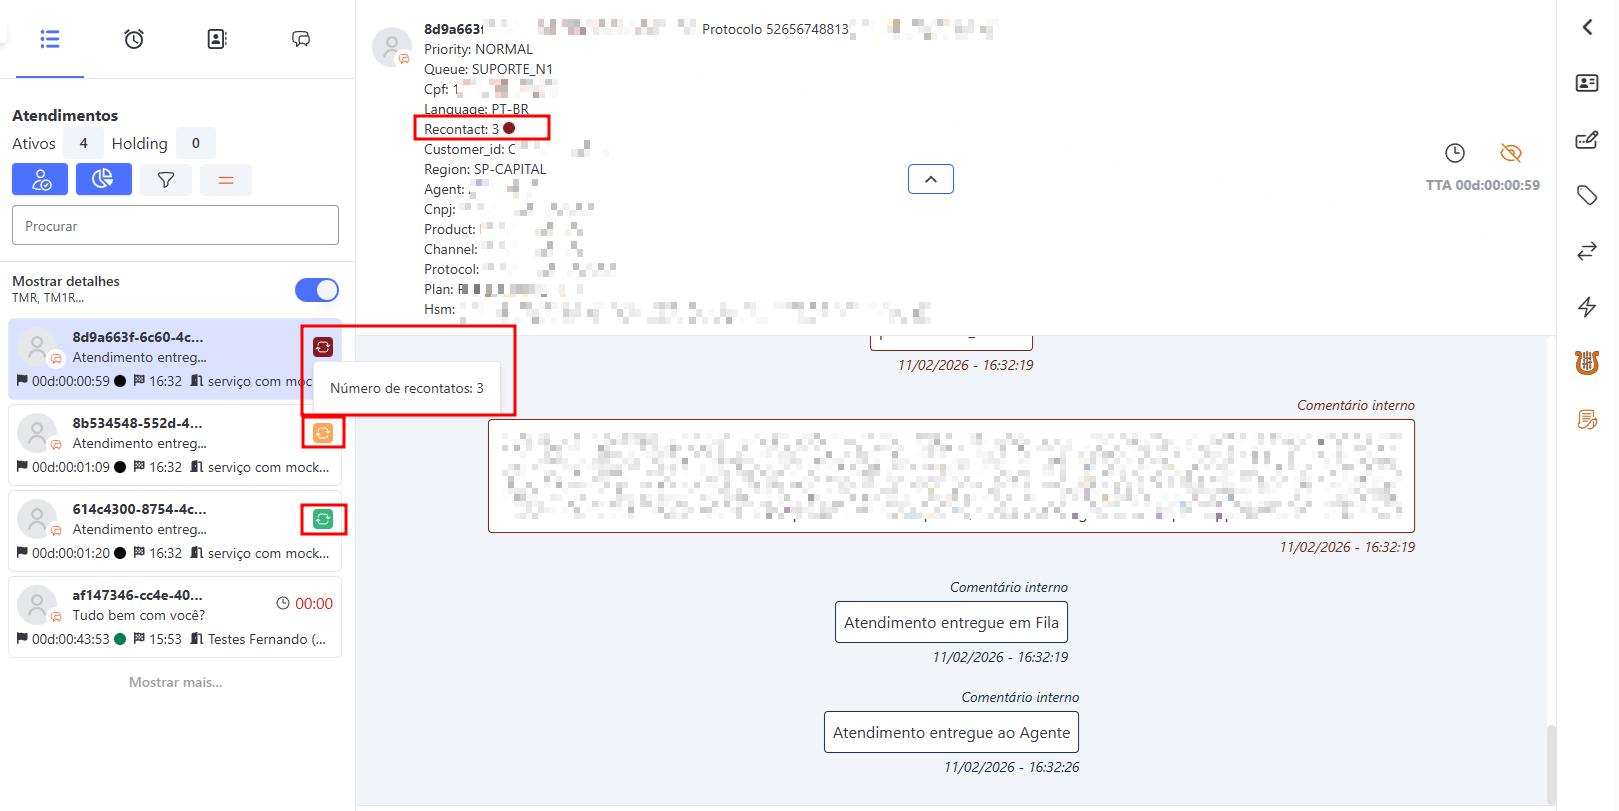
Recontact Indicator (Recurrence)
The Recontact Indicator is a visual feature designed to help agents immediately identify how many times the same customer has contacted the service on the same day.
This indicator allows the agent to adopt differentiated service strategies, prioritizing critical Interactions where the customer has already attempted to contact multiple times without a resolution, thereby improving the experience and retention.
How the Indicator Works
When receiving a new service request, the system displays a colored icon (badge) on the card and in the service header. The color indicates the frequency of that customer’s contacts on the current day:
- 🟢 Green (1st Contact): Indicates that this is the customer’s first interaction of the day. Standard service.
- 🟡 Yellow (2nd Contact): Indicates a repeat contact. The customer has already contacted us once today. Requires attention.
- 🔴 Red (3rd Contact or More): Indicates high recurrence. The customer is contacting us for the third time (or more) on the same day. Highest priority and critical analysis of the interaction recommended.
System Display
The follow-up indicator is displayed in strategic locations to ensure that the agent notices the information quickly:
- Interaction List: Visible on the preview card (in both List and Grid views).
- Header: When opening the service, the icon appears next to the customer’s data.
- History and Tracking: The indicator remains recorded in the conversation history, in Interaction Tracking (Screen and CSV), and in the Observe Conversation feature.
⚠️ Technical Limitation: Currently, the visual indicator (colored badge) is not displayed in the PDF history export.
Prerequisites and Configuration
This feature is not enabled automatically for all interactions. It depends on a specific variable sent by the Bot flow (Boteria).
For the indicator to appear:
- The organization must have the Boteria integration configured.
- The bot flow must be configured to send the
recontactvariable containing the day’s interaction count.
If this variable is not sent by the bot, the interaction will follow the normal flow without displaying any visual indicator.
WhatsApp Message Status in Omni
To help agents better understand the flow of WhatsApp messages, below is a list of the official status used by Meta/WhatsApp, as they appear on the Omni platform, along with their corresponding confirmation icons (✓).
This information helps correctly interpret what happened to each message during the sending and delivery process.
| Official Status | Platform Status | Correspondence with “Checkmarks” (✓) | Detailed Explanation |
|---|---|---|---|
| queued | Waiting for processing in Broker | ⏱️ (Clock icon or pending send) | Your send request was successfully accepted by the API provider. The message is now in a queue, waiting to be processed and sent to Meta/WhatsApp servers. |
| sending | Sending | ⏱️ (Clock icon or pending send) | The API provider took the message from the queue and is actively in the process of sending it to Meta’s API. This is a very quick transitional state. |
| sent | Sent | ✓ (One gray check mark) | Official Meta status. The message was successfully delivered to WhatsApp servers. At this point, WhatsApp will attempt to deliver the message to the recipient. |
| delivered | Delivered | ✓✓ (Two gray check marks) | Official Meta status. The message was successfully delivered to the client’s device. This confirms that the recipient’s phone is on and connected to the internet. |
| read | Read | ✓✓ (Two blue check marks) | Official Meta status. The recipient opened the conversation and viewed your message. (Note: this depends on the user’s privacy settings). |
| failed | Delivery Failed | ❗️ (Red exclamation icon) | Official Meta status. Message delivery failed. The notification usually includes an error code explaining the reason (e.g., invalid number, client outside the 24h window, etc.). |
| undelivered | Not Delivered | ✓ (One gray check mark) | This status is used by many providers to indicate that the message was sent (sent) but not delivered (delivered) after a certain period. This usually happens if the recipient’s phone is off or without internet for a long time, or if the message was blocked by Meta for some other reason. |
Commenting on Images in WhatsApp
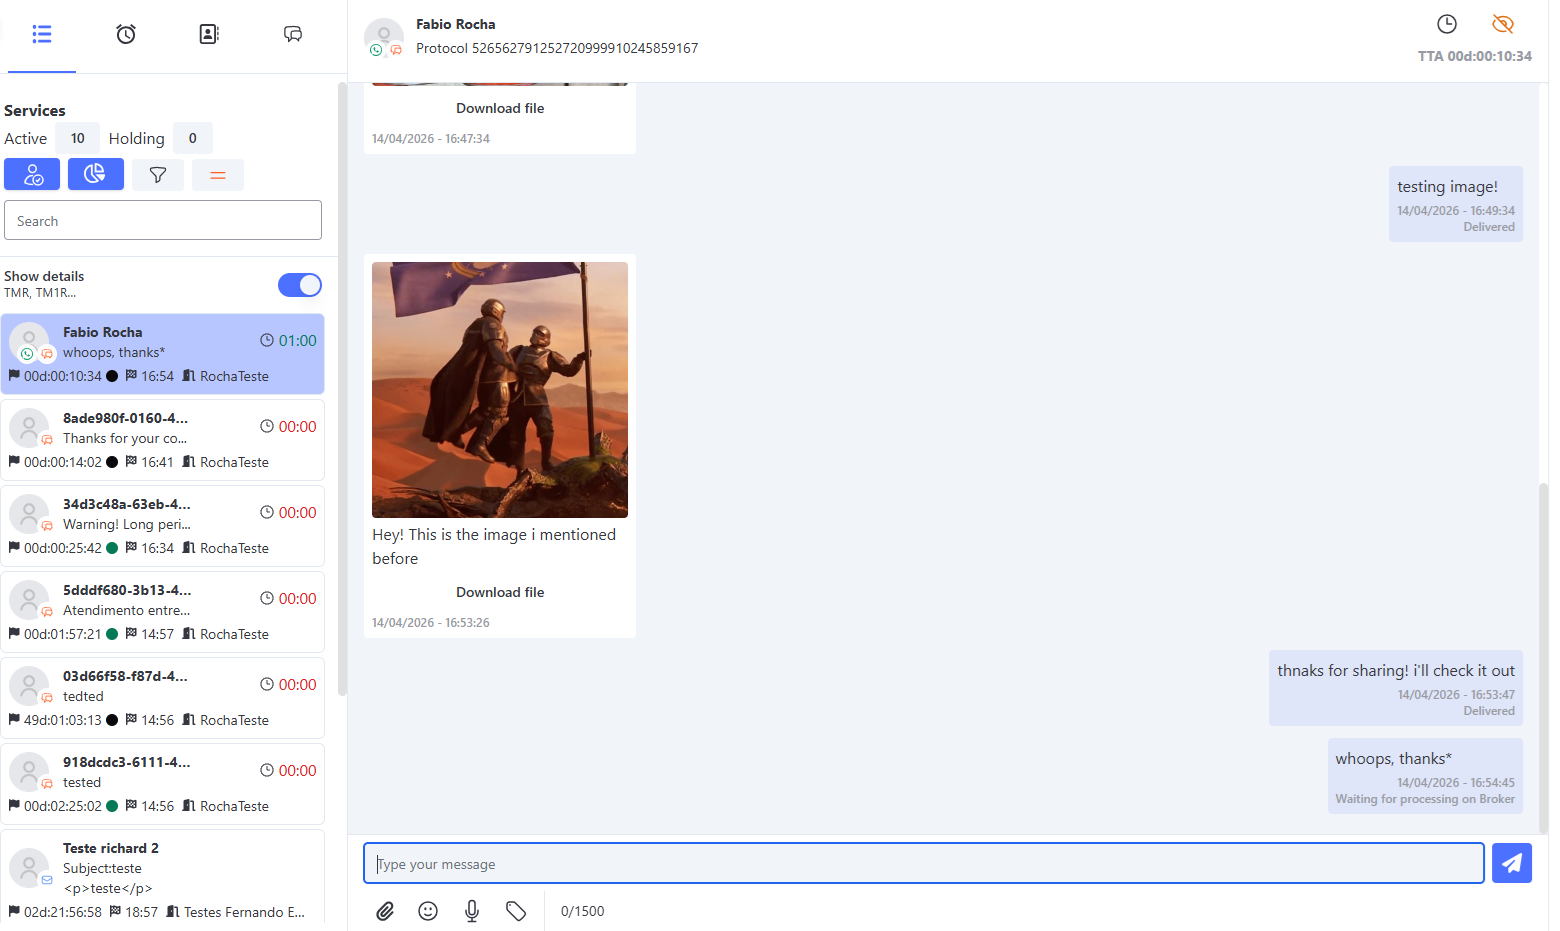
In WhatsApp, you can send images accompanied by a comment or caption. When a customer sends an image with a comment via WhatsApp, this information is displayed on the Omni platform in an organized manner, making it easier to understand the context of the message.
How It Works
When a customer sends an image with a comment via WhatsApp (without a bot):
- 📷 The image is displayed normally on the service screen
- 💬 The comment/caption sent by the customer appears right below the image
Exemplo prático
Quoting Messages on WhatsApp - How to Quote Messages
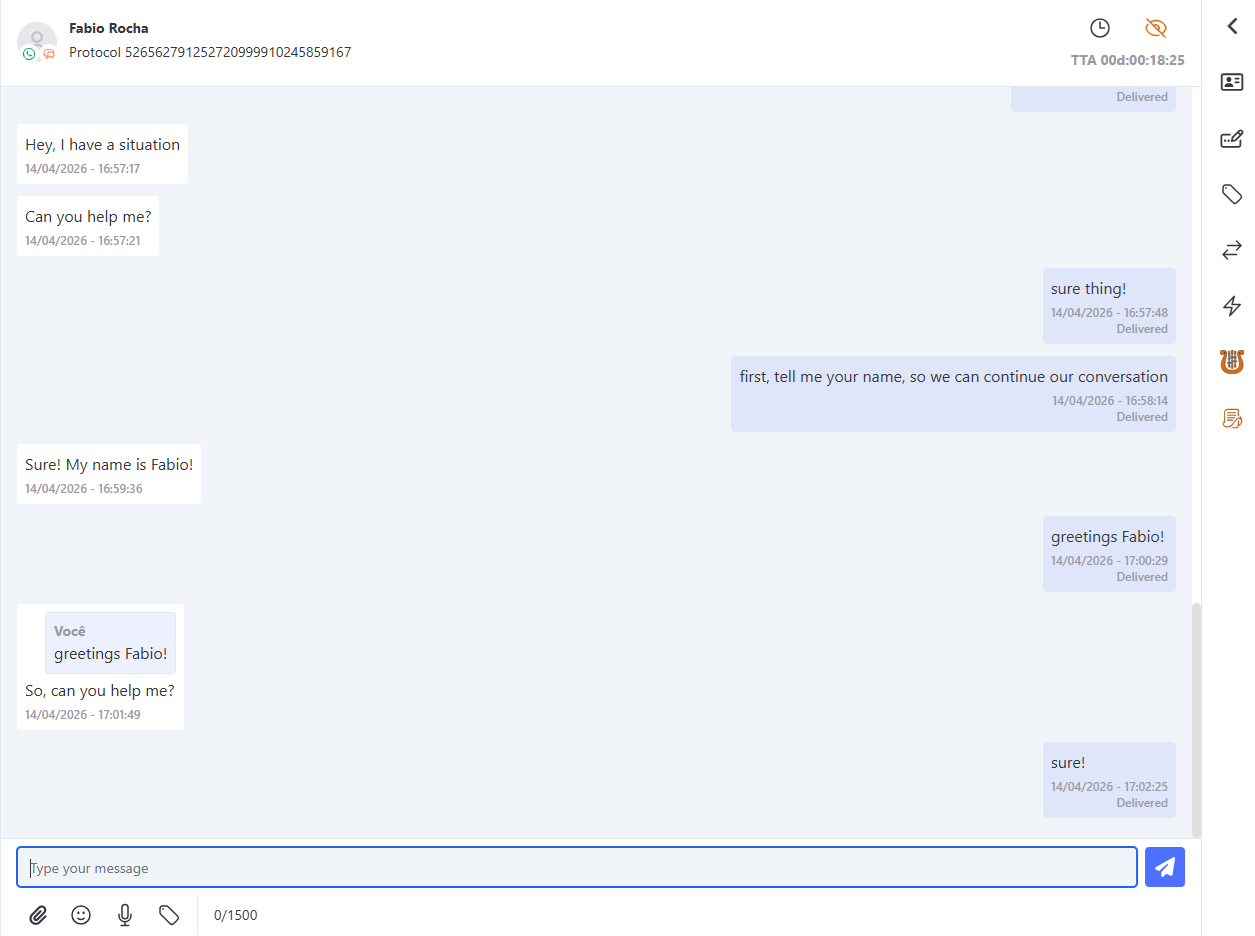
On WhatsApp, you can select a message and reply to it. Omni now recognizes that this message was a reply.
Due to the API used, Omni only shows replies to messages sent by the agent. If the customer replies to a message they sent themselves, Omni will not show it as a reply. The agent cannot select a message and reply to it directly.
Quoting Messages on WhatsApp
Emoji Reactions on WhatsApp
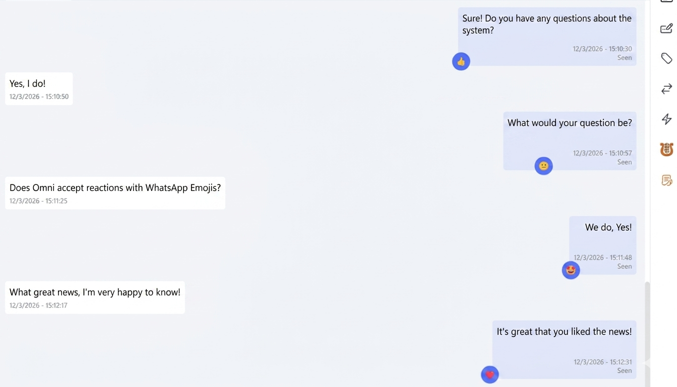
To make customer service even more dynamic and true to the app’s native experience, Omni supports the display of Emoji Reactions. This allows agents to identify expressions of satisfaction, uncertainty, or confirmation directly in the message bubble, preserving the emotional context of the conversation. 💬✨
How It Works
The integration allows the service history to accurately reflect what happens in the customer’s app, following specific display rules:
- Channel Fidelity: This feature is exclusive to interactions via WhatsApp. 📱
- Agent Focus: The system displays the reactions the customer sends in response to messages sent by the agent. This helps measure the immediate impact of your communication. 🎯
- Display Limitation: Due to technical limitations of the API, if the customer reacts to a message that they sent themselves, that reaction will not be displayed on the Omni service screen.
Receiving WhatsApp Contacts
On WhatsApp, you can send or receive contacts. Omni now detects when a contact is received and displays it on the screen for the agent.
How It Works
When the platform detects that the received message is a contact, it is identified on the screen as a contact, and the contact’s name appears alongside the information.
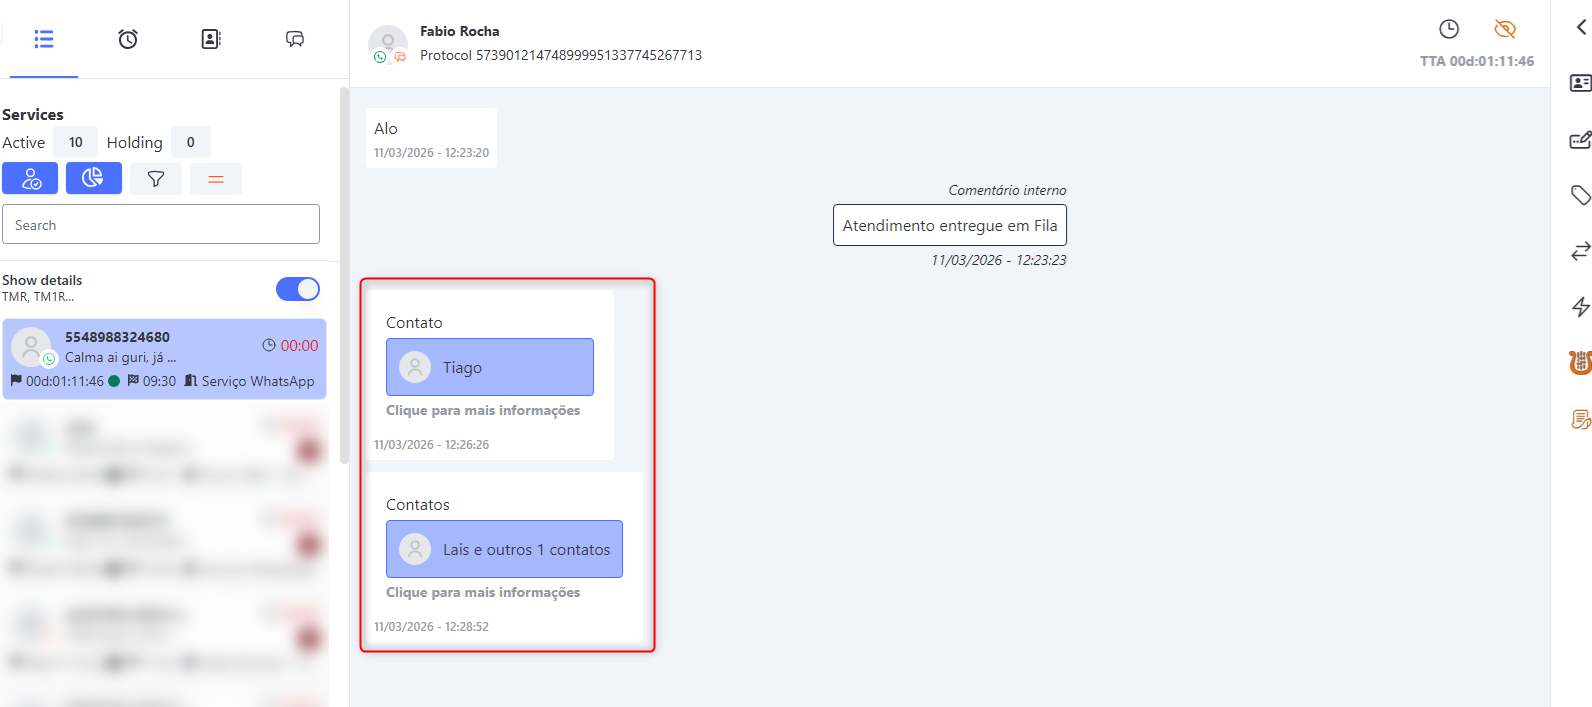
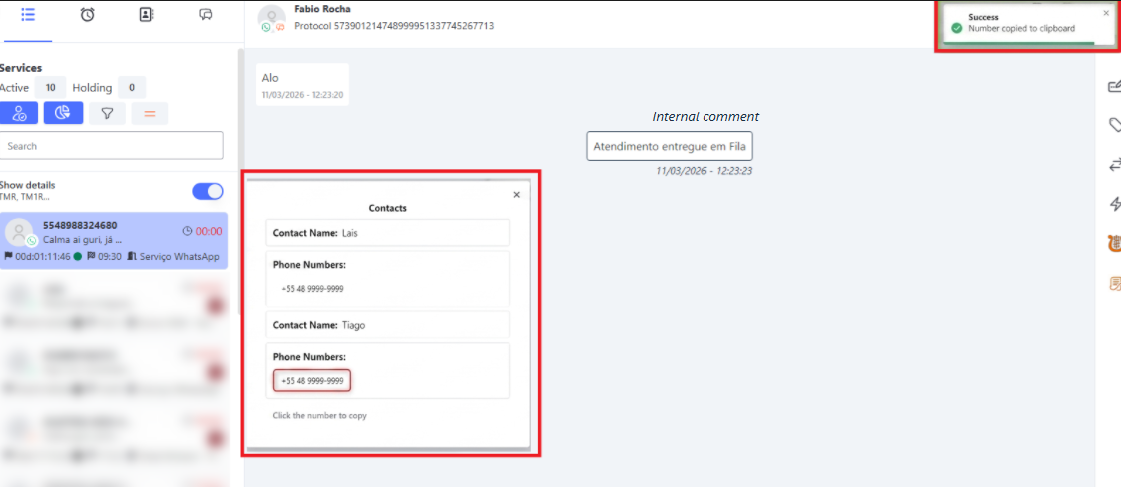
When you click on a contact received in the service, their name and phone number are displayed, allowing you to copy the phone number directly by clicking on it:
WhatsApp and Boteria Support Session Expiration Status
When a support session is conducted via WhatsApp or Boteria, you can enable the display of the session’s expiration status on the Companies screen in the admin menu.
Enable WhatsApp Expiration Status
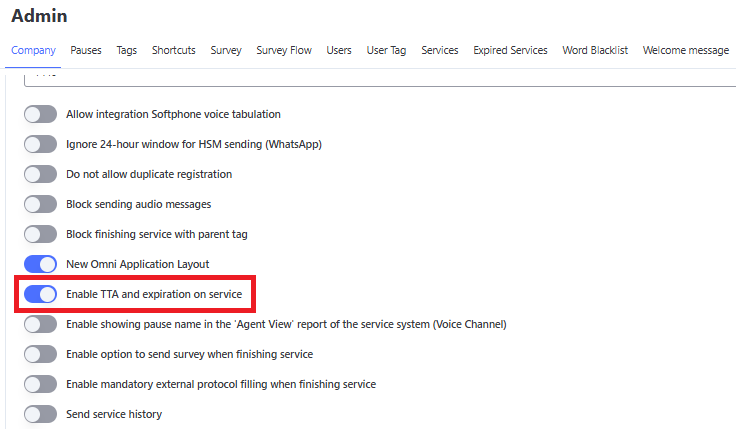
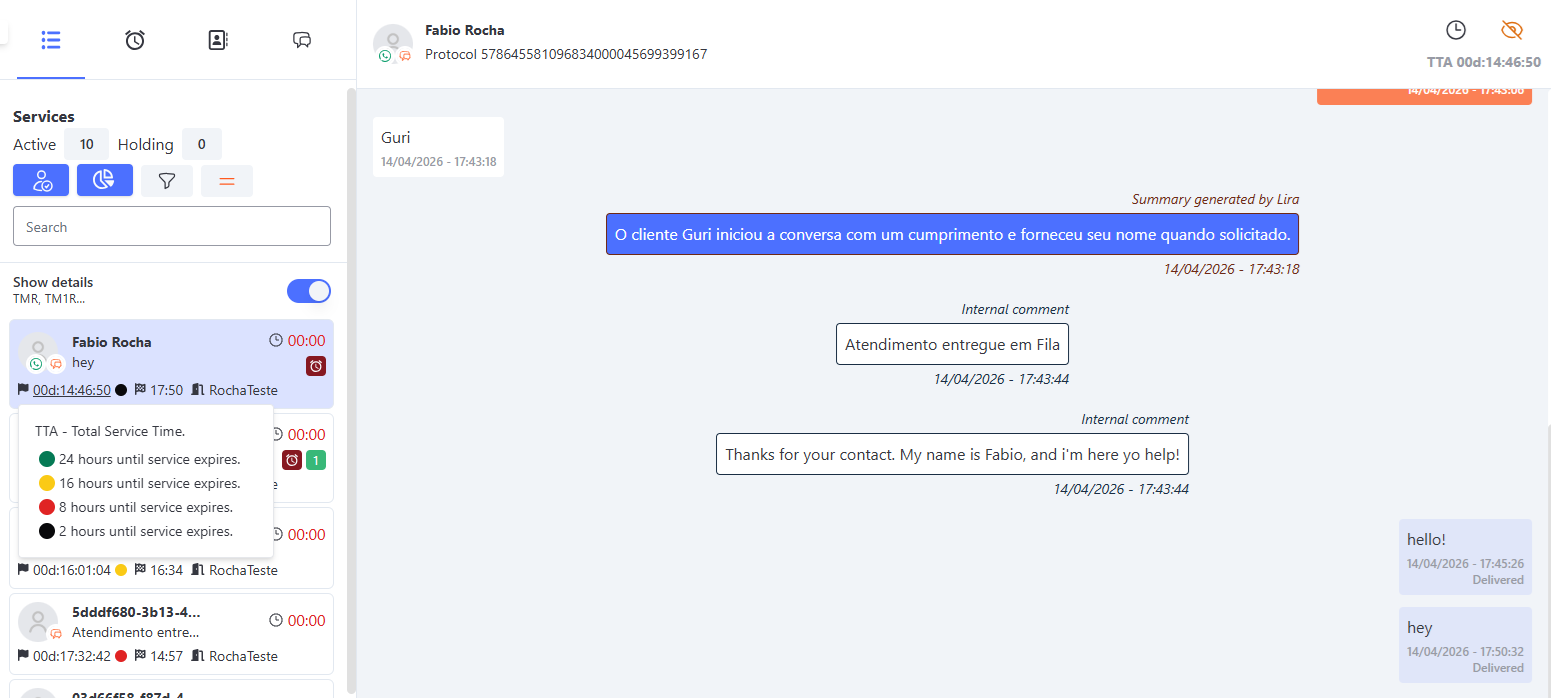
When you enable these options, the following status will be displayed on the Attendance screen:
- Green: 24 hours until expiration
- Yellow: 16 hours until expiration
- Red: 8 hours until expiration
- Black: 2 hours until expiration
WhatsApp Expiration Status
NOTE: The default expiration time for WhatsApp is 24 hours, while the expiration time for Boteria must be configured directly in each bot.
Receiving Geolocation via Boteria with WhatsApp Integration
In attendance via Boteria with WhatsApp integration, it is now possible to receive the geographic location sent by the customer. Omni identifies this submission and displays the map directly on the agent's screen, making address identification easier.
⚠️ Important: At the moment, this feature is available exclusively for attendances carried out through the Boteria with WhatsApp integration medium. The pure (native) WhatsApp medium is not yet supported for this functionality.
How it works
When the customer sends their location through the application, Omni processes the information and displays it on the agent's attendance panel as a map with geolocation coordinates.
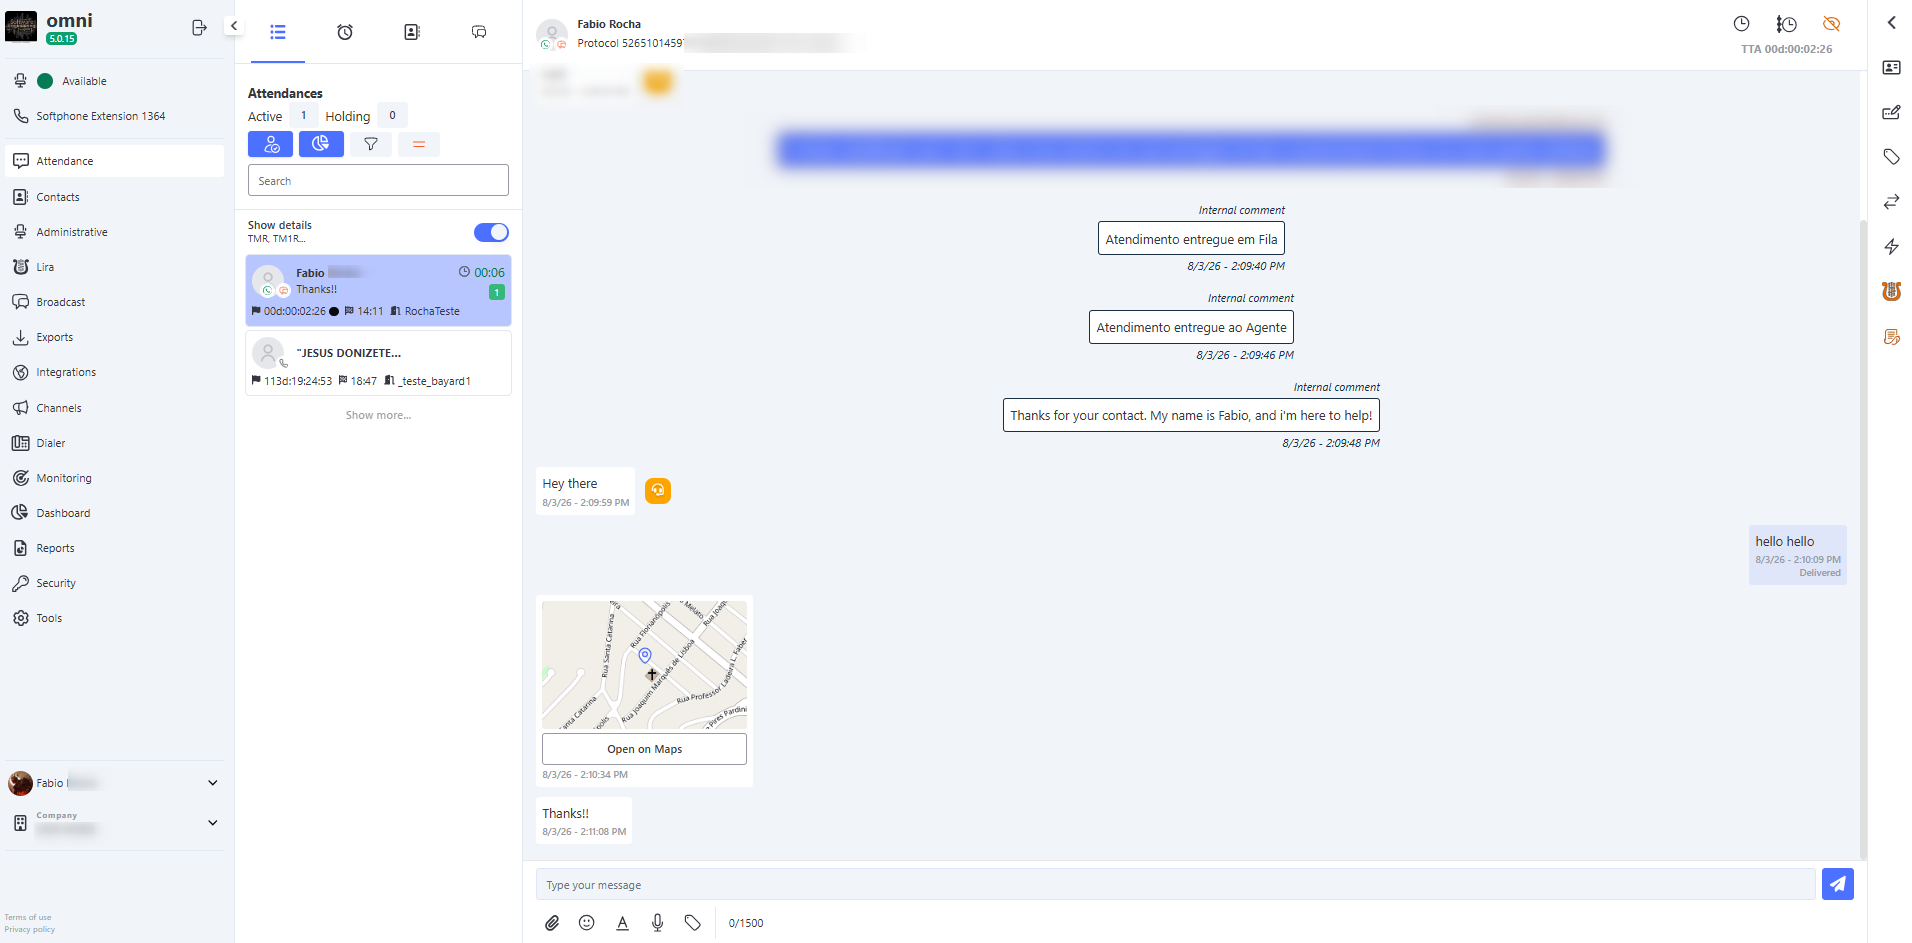
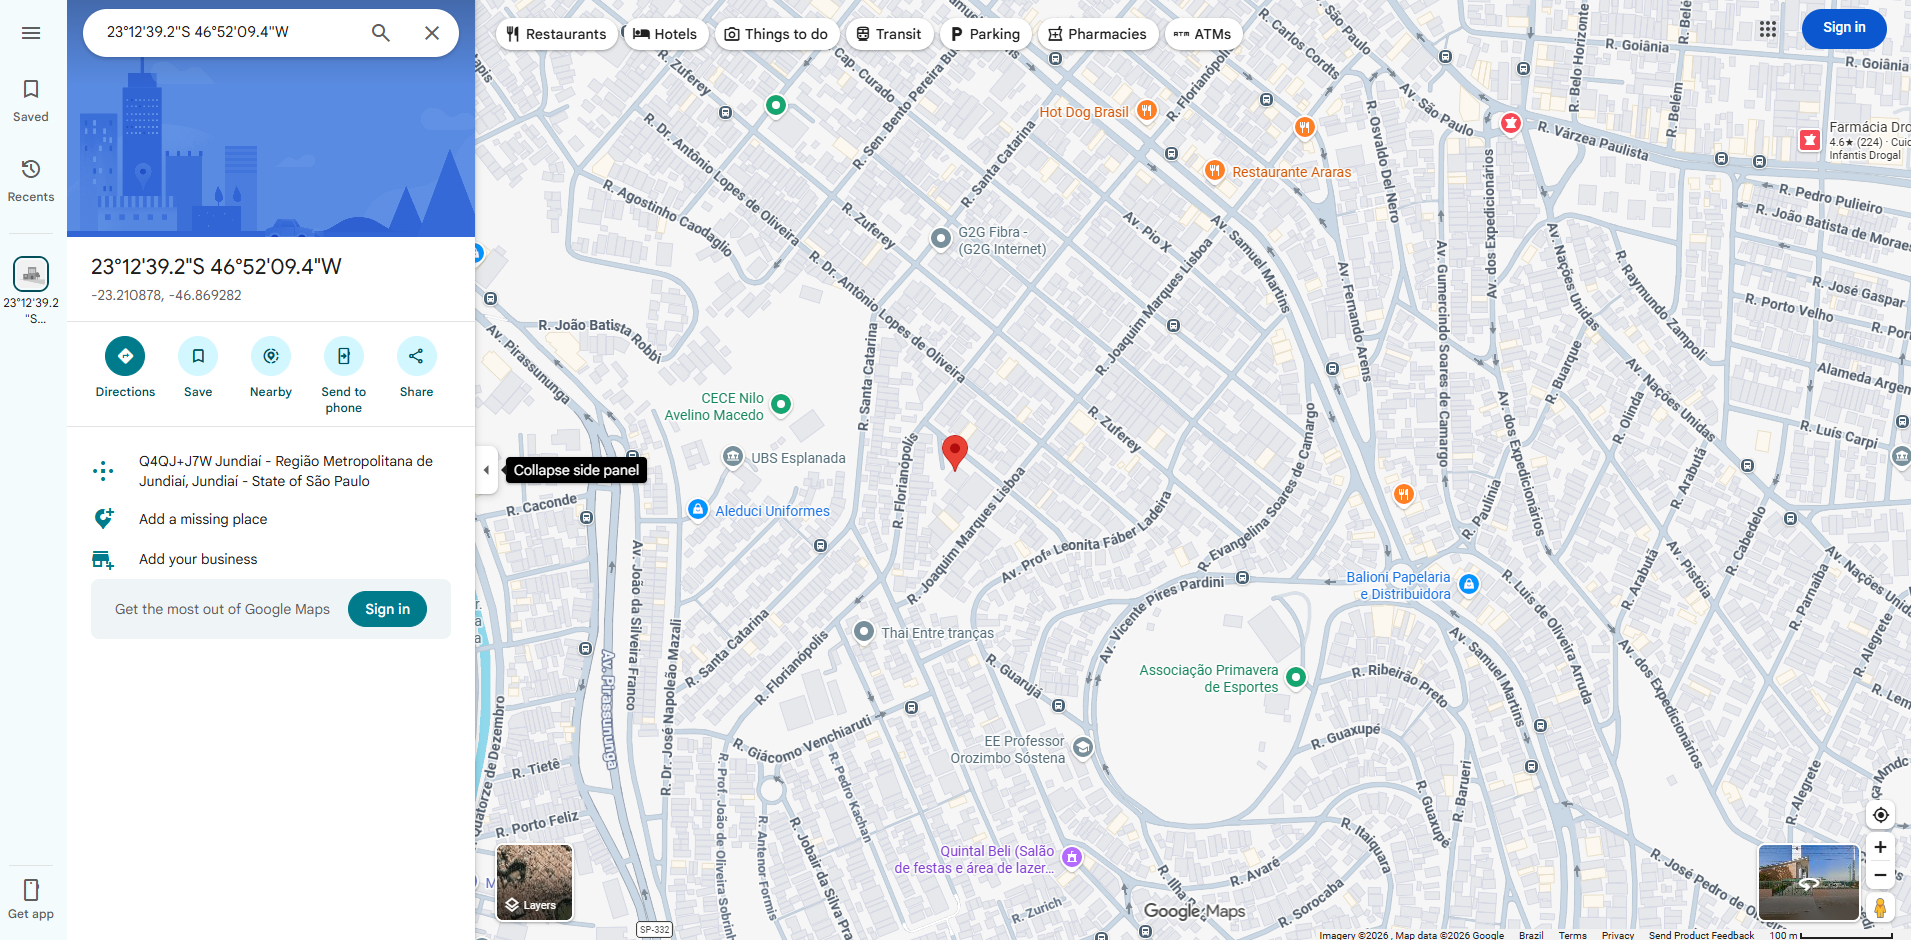
By clicking the "Open in map" button, the agent will be redirected in a new tab to Google Maps, already with the exact geographic point configured and marked on the screen.
WhatsApp and Boteria Attendance Expiration Status
When an attendance is from WhatsApp or Boteria, it is possible to enable the visualization of the attendance expiration status on the companies screen in the administrative menu.
WhatsApp Attendance Expiration Status Activation
When enabling this option, the attendance screen will display the status:
- Green: 24 hours until expiration
- Yellow: 16 hours until expiration
- Red: 8 hours until expiration
- Black: 2 hours until expiration
WhatsApp Attendance Expiration Status
Note: The default expiration for WhatsApp is 24 hours, while for Boteria it must be configured directly in each bot.
Displaying the Last HSM or Broadcast Message
The setting “Disable display of the last HSM or Broadcast message sent to the customer” allows you to control how the system handles the original message from automated triggers (HSM or Broadcast) when the customer replies.
By default, Omni attaches the last HSM message to the received reply, helping the agent understand the context of the conversation.
With this new option, you can disable this behavior, ensuring that only the customer’s response is recorded in the interaction.
How it works
-
✅ When this feature is enabled, the system will not retrieve or attach the last HSM or Broadcast message to the interaction.
Only the customer’s message will be recorded. -
🔄 When disabled, the system maintains the default behavior—that is, the original HSM message will be displayed alongside the customer’s response.
⚠️ Important:
This setting applies only at the time the service is assigned.
Changes made afterward do not affect services that have already been created, since previous messages were not recorded during the initial processing.
Enabling HSM Message Blocking
To enable this setting, follow this path:
Menu → Company → General Settings
- Locate the option “Disable display of the last HSM or Broadcast message sent to the customer”
- Toggle the button to enable blocking
- Click Save to apply the changes
💡 Tip: Remember that only users with access permission to the Company menu can make this change.
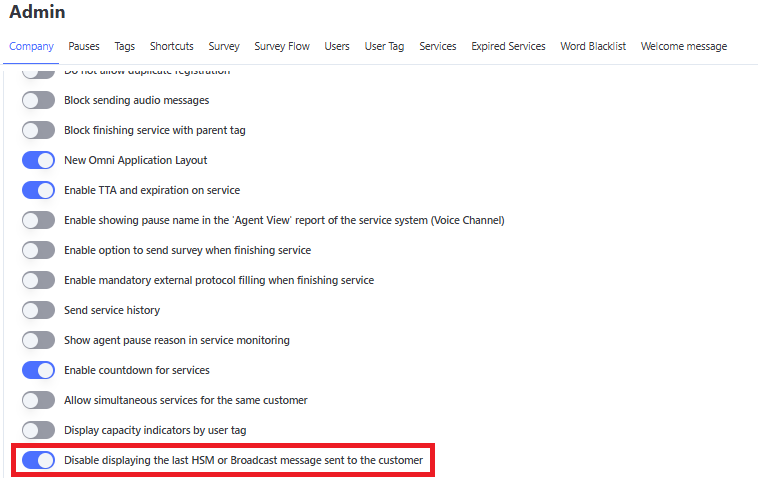
📘 Quick Summary:
This setting determines whether the last message from HSM will be appended to the conversation when the customer replies.
If this setting is enabled, the system completely ignores that message, retaining only the actual content of the customer’s reply.
Message Drafts
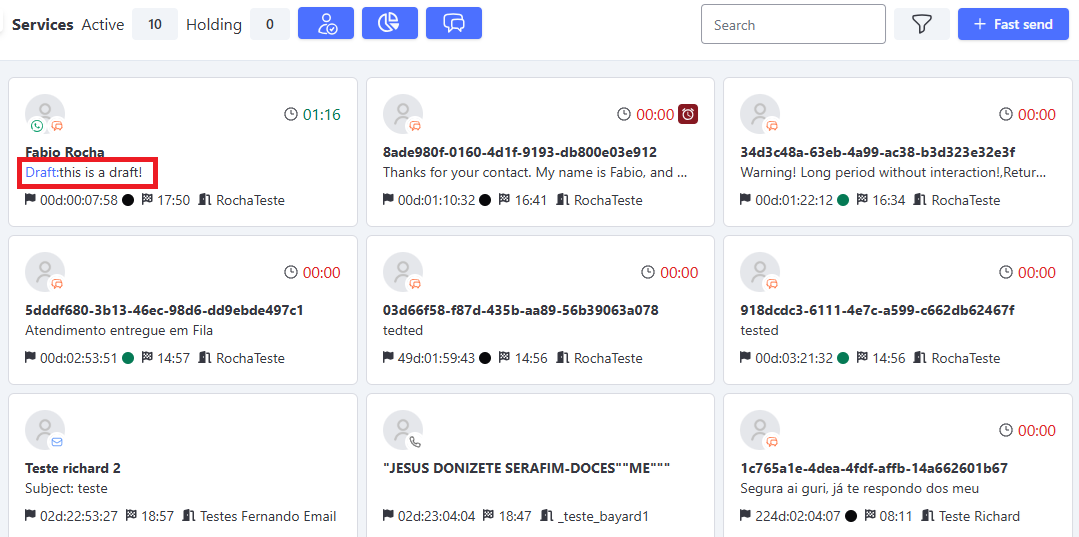
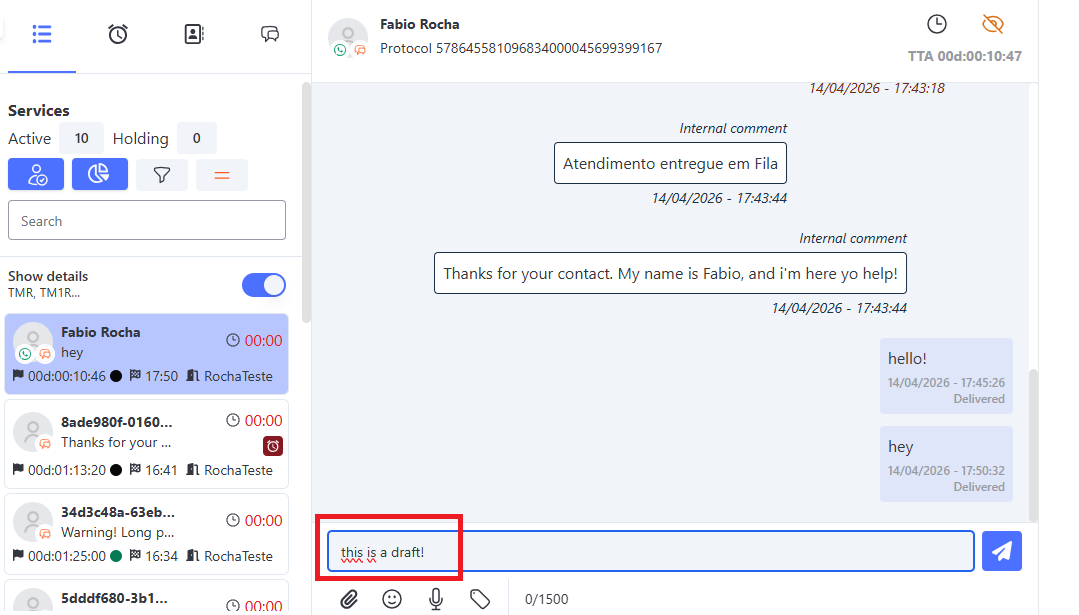
The system features an automatic draft-saving function. When you start typing a message, if you need to navigate to another screen or the interaction is closed before sending, the text content remains saved on the platform for later continuation.
When you return to the service list, you can visually identify which services have unsent messages by the “Draft:” label on the card preview.
Identifying Drafts in Card View
Restoring Text on the Attendance Screen
📧 Particularity for Email
For the Email channel, there are specific behaviors due to the nature of the format:
- 🏷️ HTML Tags: Since email allows rich formatting, the draft saves the code structure. Therefore, in the summary view of the Cards, it is normal for the text to appear between paragraph tags, such as
<p> Your text here </p>. - 📎Attachments: The draft feature saves only the body text. If you have inserted files or images as attachments and exit the screen without sending, these files will be discarded by the system and will need to be attached again before the final send.
Mark Message as Unread
In Omni, you can mark a message as unread. This way, if you accidentally clicked on a service request but are unable to continue with it and need the received message notification to remain visible, you can mark it as unread.
Mark as Unread button
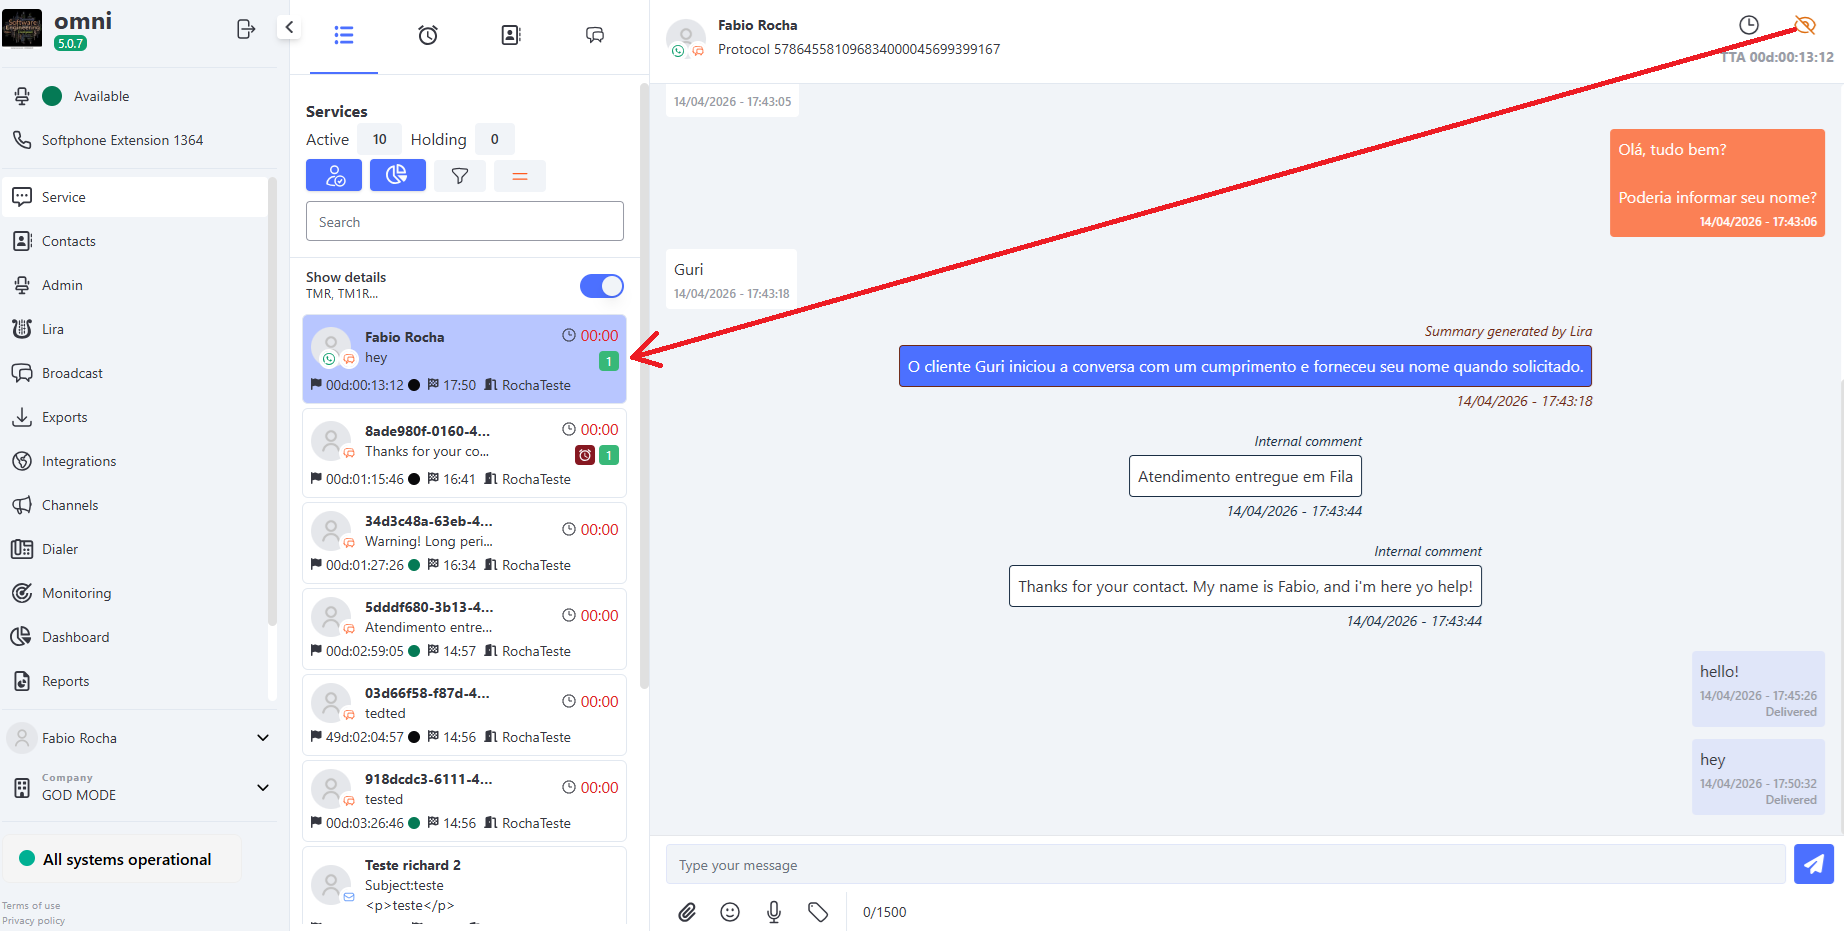
NOTE: This option only marks the last received message as unread.
Internal Comments in Customer Service
Internal Comments are automatic or manual entries added during a service interaction, used to document actions, status, and important events. These comments aid in tracking and auditing service interactions, ensuring greater transparency in the interaction history.
Previously, all Internal Comments had the same visual style. With the new update, each type of comment is now identified by distinct colors, making it easier to understand the context and source of the information:
- Manually entered comments (such as those made by agents or supervisors) use the system default color. In the examples, they will be displayed in blue.
- Automatic comments generated by the system (such as service start, transfers, and expirations) have a black border to highlight their automated nature.
- Navigation comments (such as bot interactions and IVR events) are displayed with a brown border, distinguishing them from other entries.
These changes ensure better organization and readability of the history, allowing agents and supervisors to quickly identify the source of each internal comment.
Types of Internal Comments
The following types of Internal Comments can be generated within the system:
📌 Service Monitoring
- Entering an internal comment via the Service Monitoring screen.
- Used by supervisors and managers to track and record observations about ongoing interactions.
- The comment automatically includes the name of the agent who entered it, ensuring traceability and transparency in the service history.

📝 Agent Notes
- Internal notes made by the agent during the interaction using the ! command.
- Can be used to record important information about the contact or actions taken during the conversation.
- The note automatically includes the name of the agent who entered it, making it easy to identify the author within the interaction history.

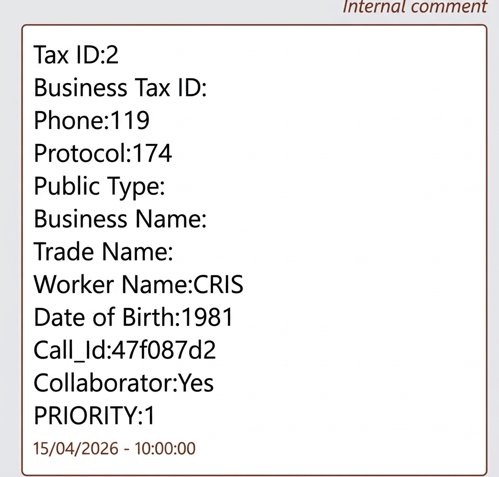
📞 Interaction Start
- An automatic note is added when a interaction is initiated and the system is configured to generate internal notes.
💬 Start of Attendance
-
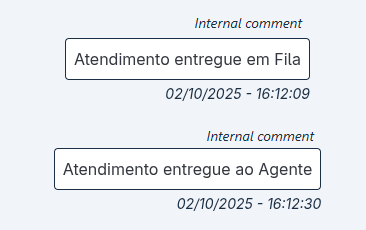
The system generates automatic internal notes to record key milestones in a Attendance interaction.
These records are visible within the interaction itself, ensuring full traceability in the history. -
The following moments are logged:
-
Attendance Delivered to Queue
- Marks the moment the interaction entered the queue.
- Format:
DD/MM/YYYY HH:MM:SS
-
Attendance Delivered to Agent
- Marks when the interaction was assigned to an agent.
- Format:
DD/MM/YYYY HH:MM:SS
🧭 Interactions where the comment is displayed
These internal notes are generated in the following situations:
- On the first distribution of the interaction, recording its delivery to the queue and to the agent.
- During service transfers, again recording the moments when the interaction is delivered to the new queue and the new agent.
⚠️ Important: These notes are not created for transfers between agents.
🤖 Bot
- When the conversation involves a Bot, and internal notes are configured, automatic records are added to the history.
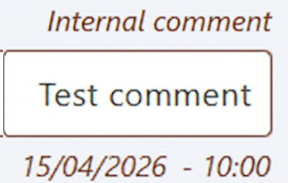
🔄 Service Transfer
- When a service interaction is transferred, an internal note is generated indicating:
- Who performed the transfer
- Where it was transferred to (another agent or service).

⏳ Expiration
- The system generates expiration alerts as internal notes according to the defined configuration.
- These notes indicate that the interaction is close to expiring, allowing the agent to take action before automatic closure.
- If the time limit is reached without a customer response, a new internal note is added recording that the interaction was closed due to expiration.

Advantages of Color Identification
✅ Easy reading of the history: Each type of note now has its own visual identification, allowing quick differentiation between them.
✅ Better auditing and traceability: More organized internal notes help supervisors and agents quickly understand the service flow.
✅ Efficient monitoring: Agents, bots, and automated actions are easily identifiable in the history.
Update or Page Close Alert
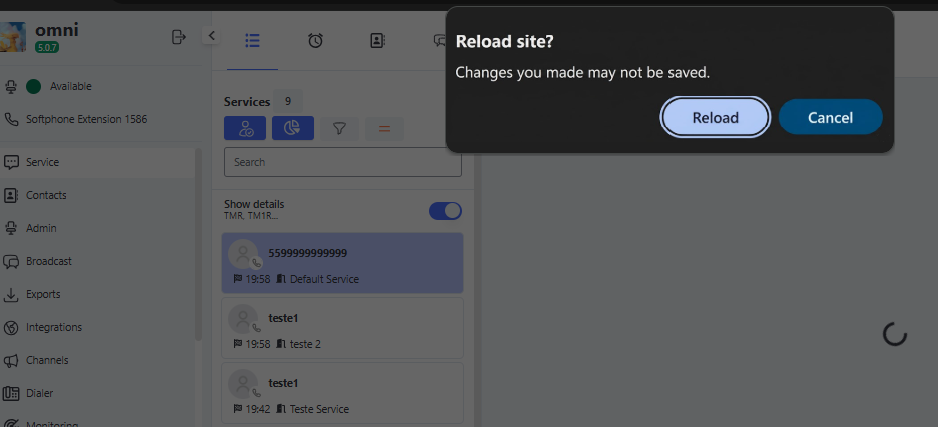
When the user is on the service screen, whether in list or card view, attempting to use the page refresh function (F5) or close the page, the system will display an alert informing that some changes have not been saved.
When this alert is shown, the user cannot perform any action in the browser until it is answered:
Reload/Exit: Executes the action of refreshing or closing the site.
Cancel: Cancels the action and the user can continue browsing the site normally.
Note: This alert is a standard browser message and cannot be modified.
Quick Send
The Quick Send functionality in Omni was developed to boost the proactivity of your operation. It enables the company to initiate active and individualized communications with its clients quickly, using the exact medium (WhatsApp, Email, SMS, Voice...) that is properly approved and registered in the contact’s record.
How to Send a Message via Quick Send
The manual and immediate sending of an active message is extremely simple and flexible, and can be initiated at any time directly from the operator’s workspace.
The Omni platform provides access to this functionality in the two main operation interfaces: both in Card View and in the Interaction List.
This ensures total agility, allowing the agent to start an active contact without needing to change their visual workflow.
Quick Send in the card-based interaction screen
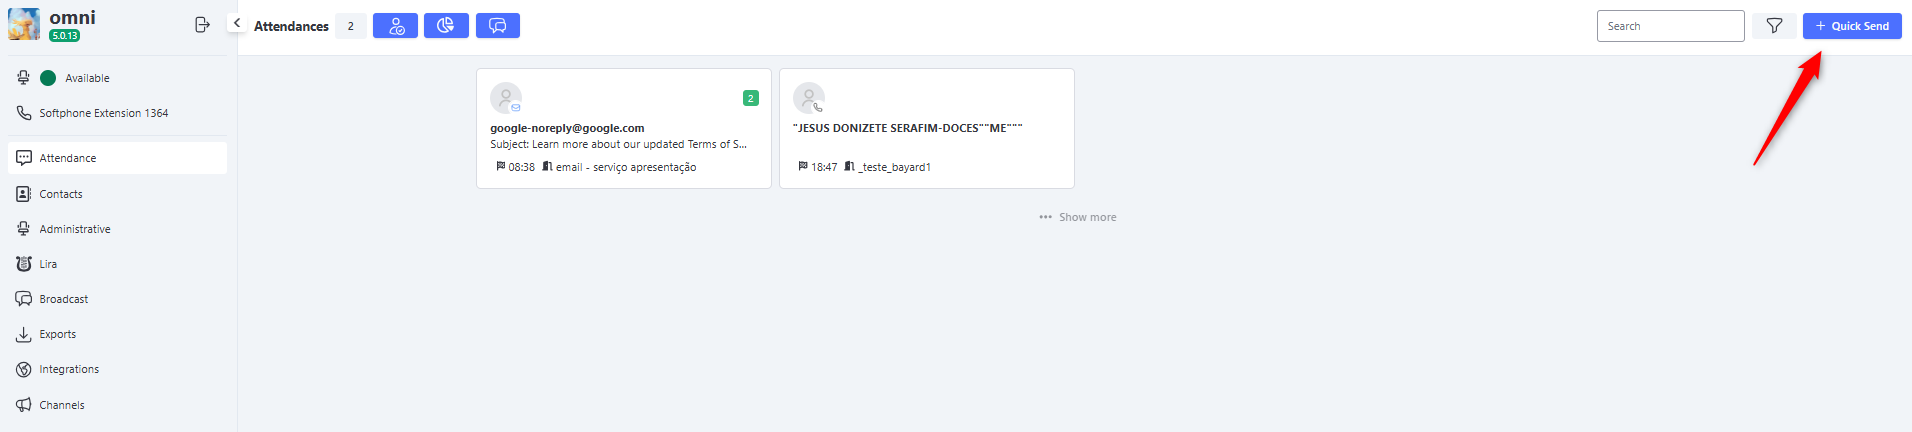
Quick Send in the Interaction List
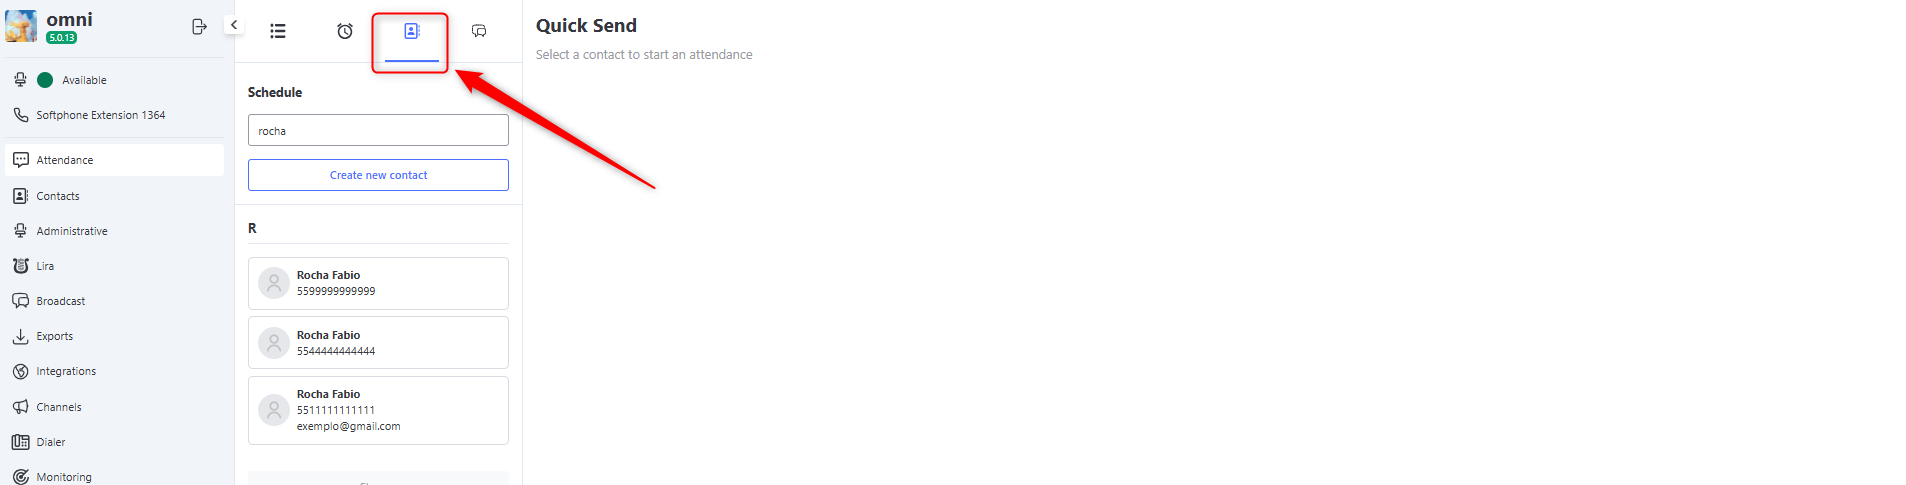
Regardless of the screen chosen to start the process, the user must follow the operational flow below:
- Click the Quick Send icon located in the top toolbar.
- In the search field, look for the desired contact by name or phone number.
- Select the correct contact from the dynamic list displayed by the system.
- Define which Medium will be used for the communication (the system will filter and display only the channels that the contact has properly filled in their record).
- Select the Service under which this new interaction will be generated, ensuring proper classification and future reporting.
- Channel Specifics:
- Voice: If the chosen medium is the phone channel (Voice), select the specific phone number of the contact to which the system should place the call.
- WhatsApp: Active communications via WhatsApp using Quick Send can only be completed if the operation has message templates approved by Meta (HSM - Highly Structured Message) previously registered and approved. Free-text messages are not allowed to initiate active conversations in this channel.
- Type the content of the message in the text field or select the predefined HSM template (mandatory for WhatsApp).
- Click the Send button to immediately trigger the communication.
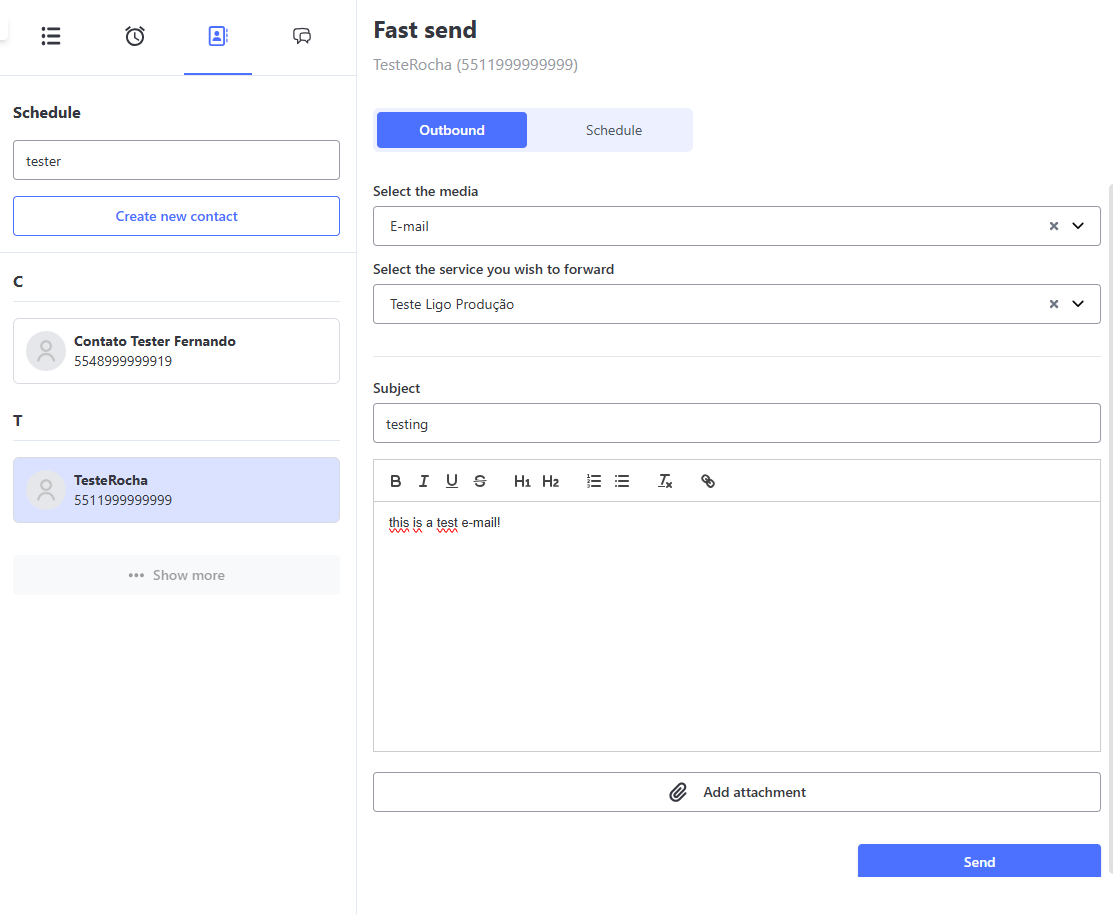
Scheduling via Quick Send
If the engagement strategy requires that the message be delivered at a more appropriate time, Omni allows scheduling the trigger using scheduling routines directly integrated into the Quick Send functionality.
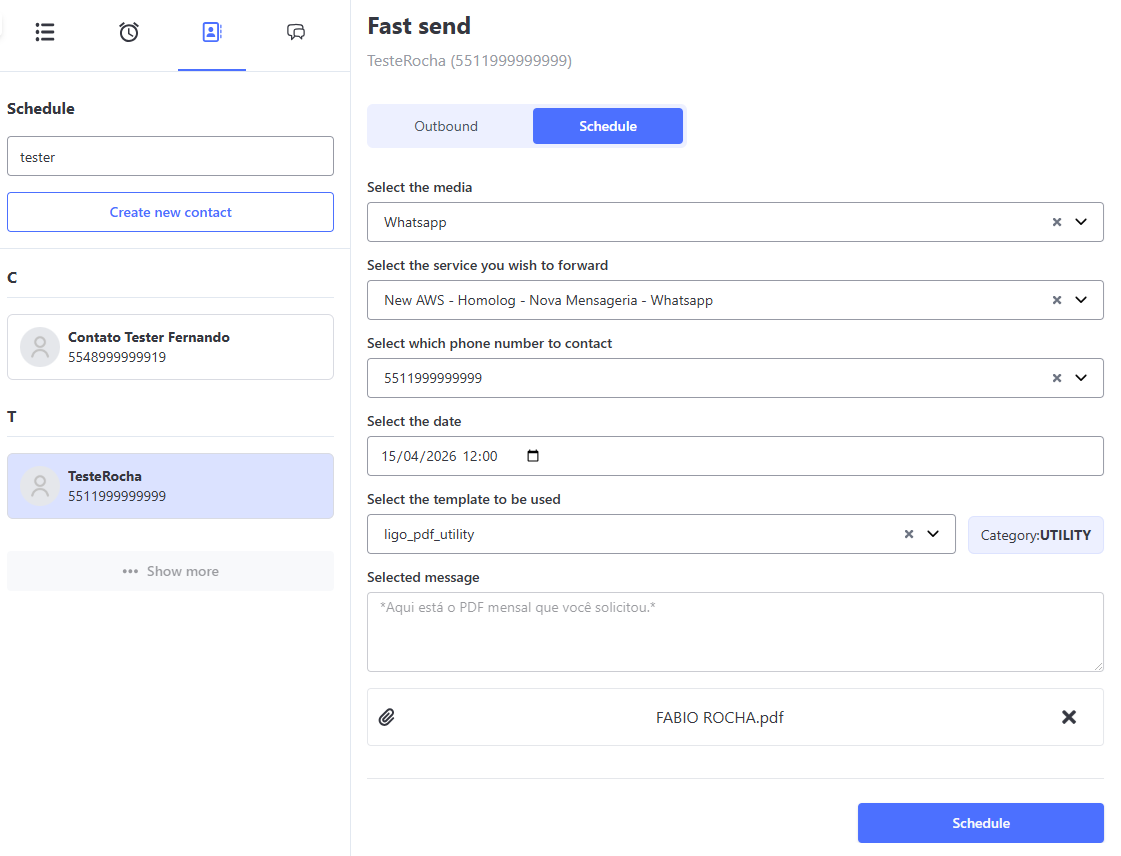
The flow is very similar to conventional sending, with the addition of the scheduling step. On the interaction screen, the user must follow the steps below:
- Click the Quick Send icon located in the top toolbar.
- In the search field, look for the desired contact by name or phone number and select it.
- To transform the immediate send into a scheduled one, click the Schedule button located just above the message fields.
- Choose the active Medium through which the scheduled message should be sent.
- Define the corresponding Service for that interaction.
- Set the exact Date and Time when the scheduled send should be executed by the system.
- Write the message content (or select the corresponding HSM template for WhatsApp) and click the blue Schedule button to register the scheduling in the database.
- As soon as the floating confirmation message of the saved scheduling is displayed on the screen, the record will be active and can be monitored or edited through the Scheduling menu.
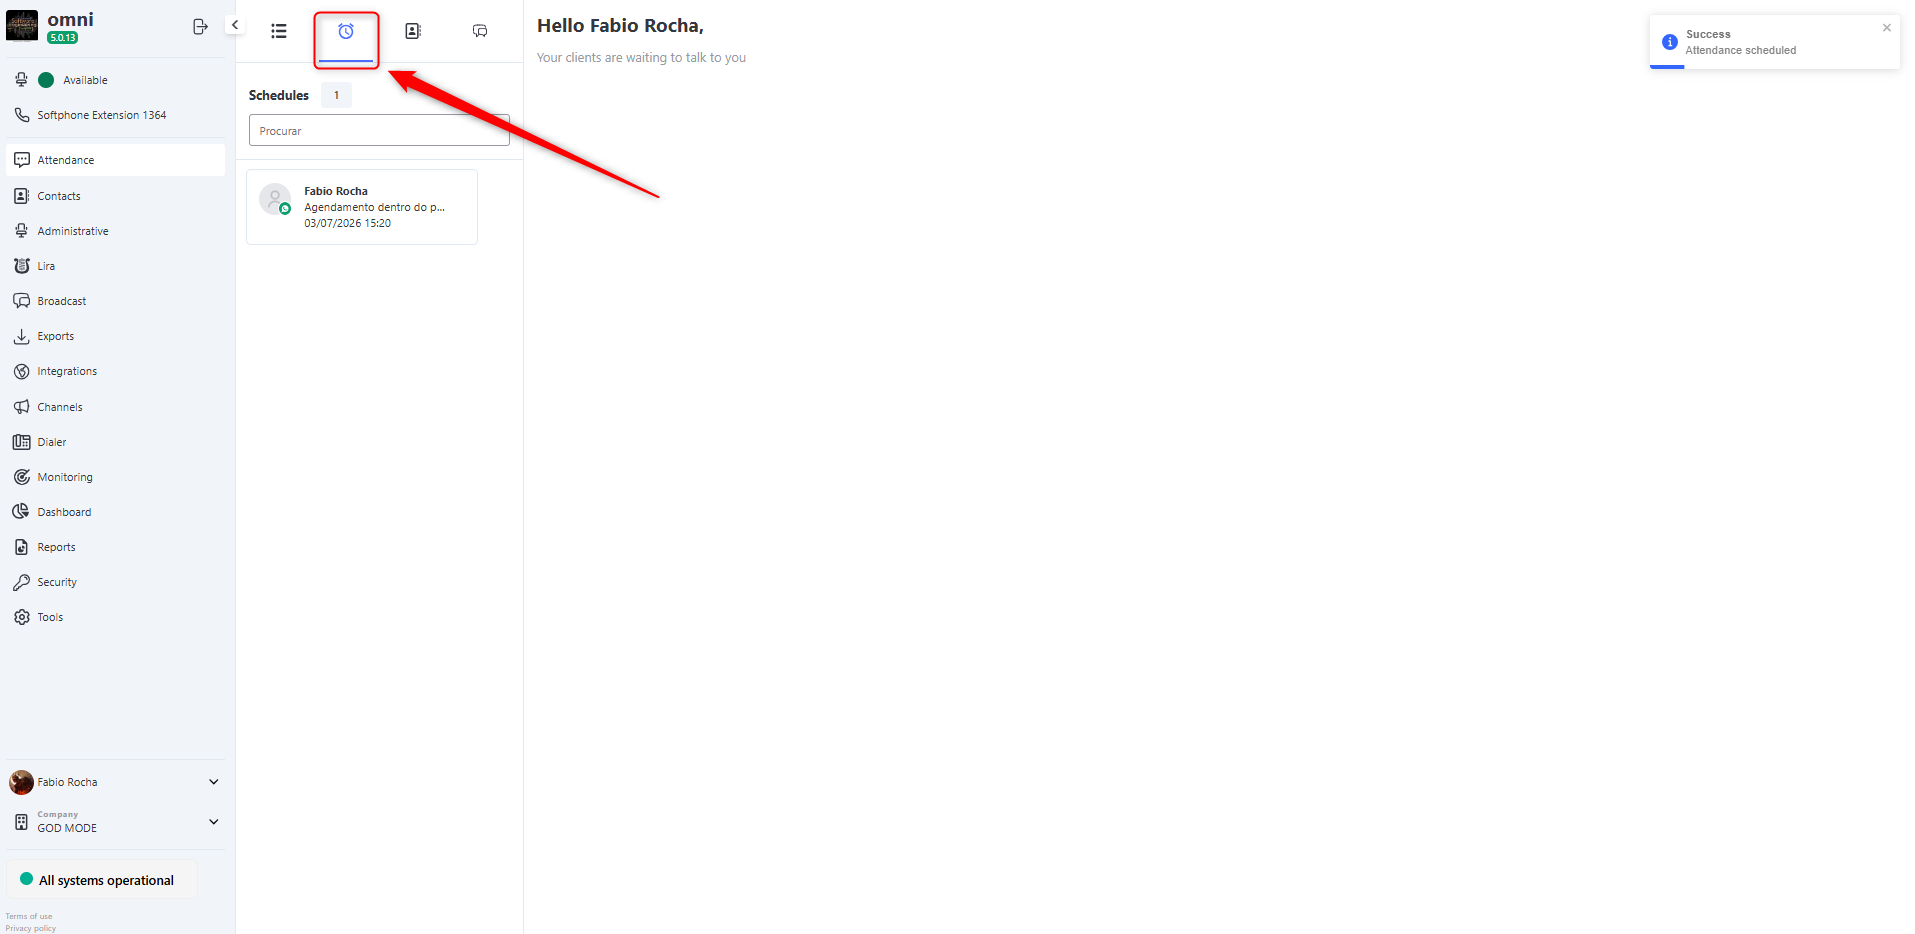
Sending Attachments via Quick Send
The Omni platform allows sending files and media directly through the Quick Send flow in WhatsApp. To ensure successful delivery, it is essential that the operation follows the technical criteria below:
- The selected message template (HSM Template) must be previously configured and approved by Meta to allow media reception in the header.
- The attached file must strictly comply with the extensions and formats approved by the system.
Below is the table of supported file guidelines for active sends:
| Attachment Type | Supported Formats |
|---|---|
| Image | jpeg, png |
| Audio | aac, mp4, mpeg, amr, ogg |
| Video | mp4, 3gp |
| Document | txt, pdf, doc, docx |
💡 Operational Tip: Before clicking send, make sure the chosen HSM template natively supports the type of attachment (image, video, or document) you added. If there is incompatibility between the approved template and the selected file, the WhatsApp ecosystem will reject the send.
Audio Sending
In Omni, you can send audio messages to your clients through the interaction screen. Currently, the system supports audio sending in WhatsApp and Boteria media.
⚠️ Important: All audio files sent, whether through attachments or via the recording button, will be automatically converted to MP3 format before sending.
Requirements
WhatsApp:
To send audio, the WhatsApp number must be registered in the new messaging system in Omni.
Boteria:
Audio sending is available only in Boteria’s standard medium and in integration with WhatsApp.
Sending Audio
To send an audio message, simply go to the interaction screen, in the conversation with the client, and click the microphone button. Once clicked, you can record the audio and send it to the client.
Audio Sending
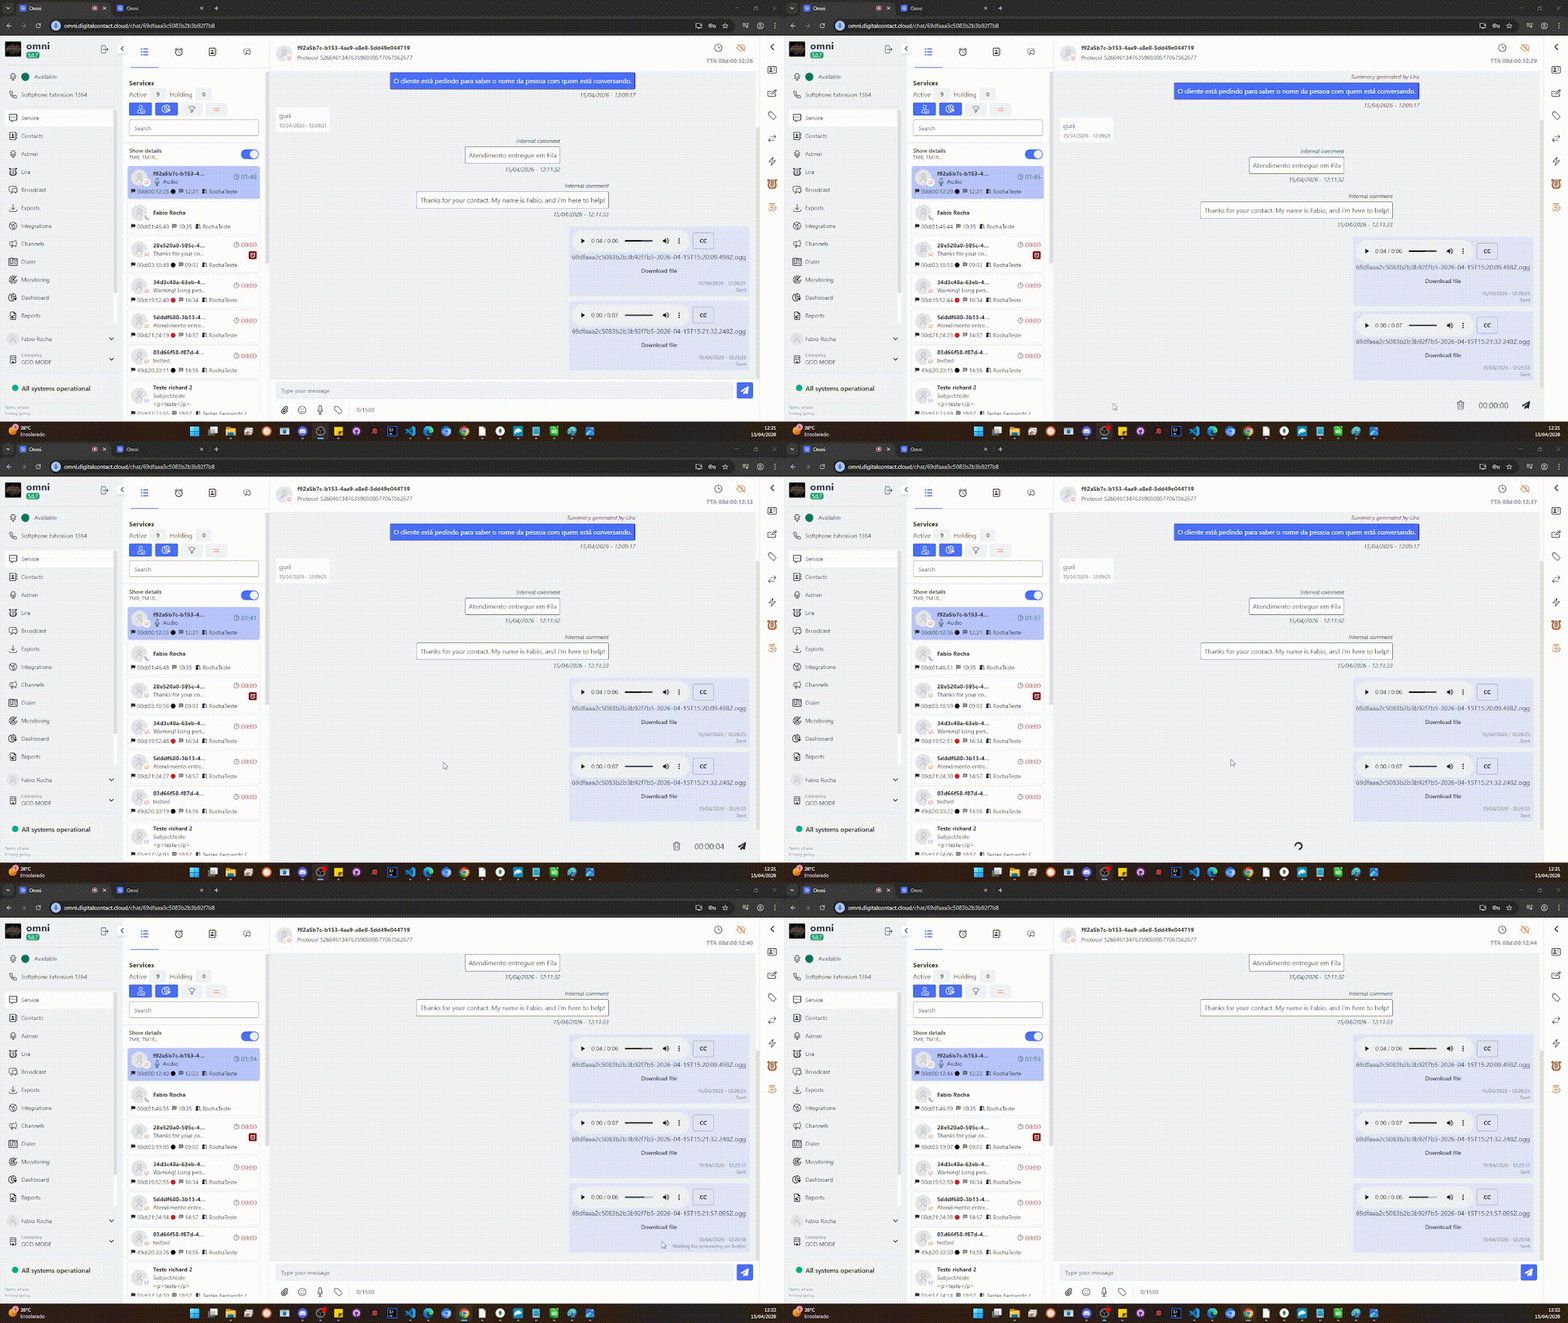
Audio Sending Block
In the Company registration section, at the bottom, there is a toggle button indicating the blocking of audio message sending in interactions, as shown in the image below.
Audio Sending Block
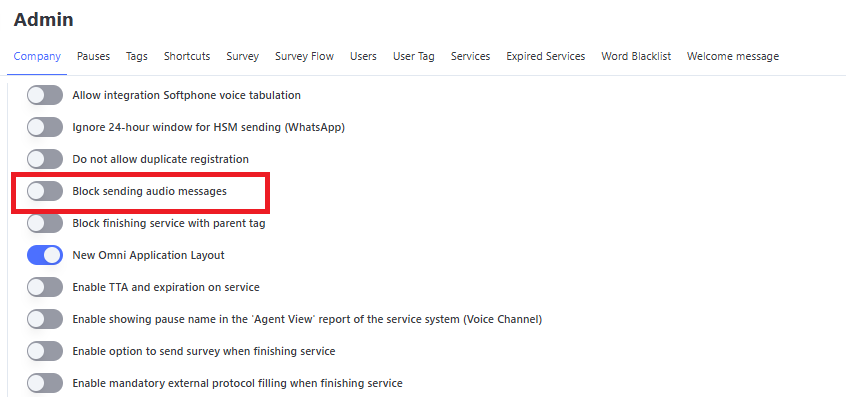
The default configuration of this option is unchecked. If checked, it will allow the use of the audio sending button on the service screen.
GIF Sending Block
This feature allows restricting the sending of GIF files by agents through the WhatsApp channel, ensuring greater control over the types of content shared with customers.
How to Configure
To block GIF sending on WhatsApp, follow the steps below:
- In the side menu, go to Security > Profile Management
- Click on the desired profile (for example: Agent, Supervisor)
- Go to the Functions column
- Access the OneScreen option
- Locate and select the option Block GIF sending
- Click Create or Update
💡 Quick tip: This configuration is made by access profile, that means, you can give access or block the GIFs sent to specific user groups.
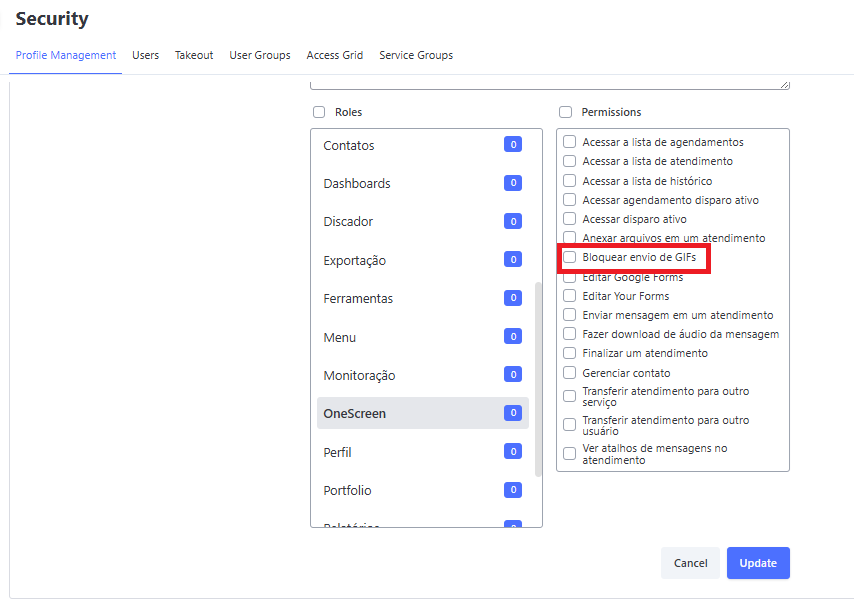
Functionality Operation
- ✅ By default, the option is disabled, allowing agents to send GIFs.
- 🔒 When the block is enabled:
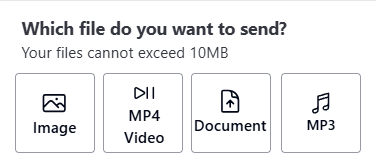
- The GIF sending button disappears from the agent’s interface on the service screen
- Only administrator users can change this configuration
⚠️ Important: This restriction applies only to the WhatsApp channel.
In other channels, GIF sending is not a supported feature, therefore there is no need for blocking.
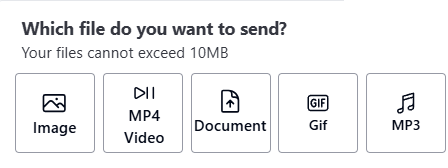
Attachment sending options with GIF sending enabled
Attachment sending options with GIF sending blocked
Audio Acceleration and Transcription
Audio Playback Speed
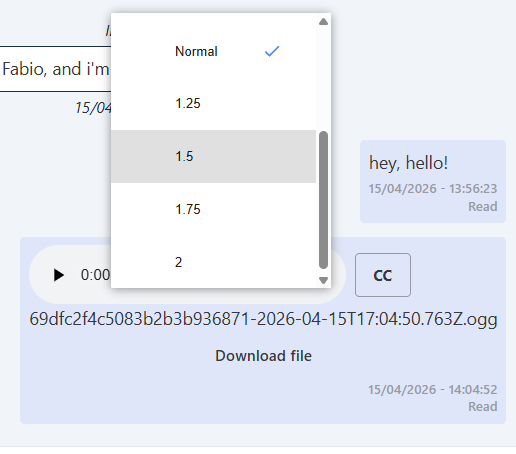
In Omni, when receiving or sending an audio message, it is possible to adjust the playback speed for the agent’s convenience. For long audios, playback can be accelerated up to 4x, while for those who do not want to miss any detail, the speed can be reduced to up to 50% of the original.
The current speeds are:
- 0.5x
- 0.75x
- Normal (Original)
- 1.25x
- 1.5x
- 1.75x
- 2x
- 4x
Audio Speed
Audio Transcription
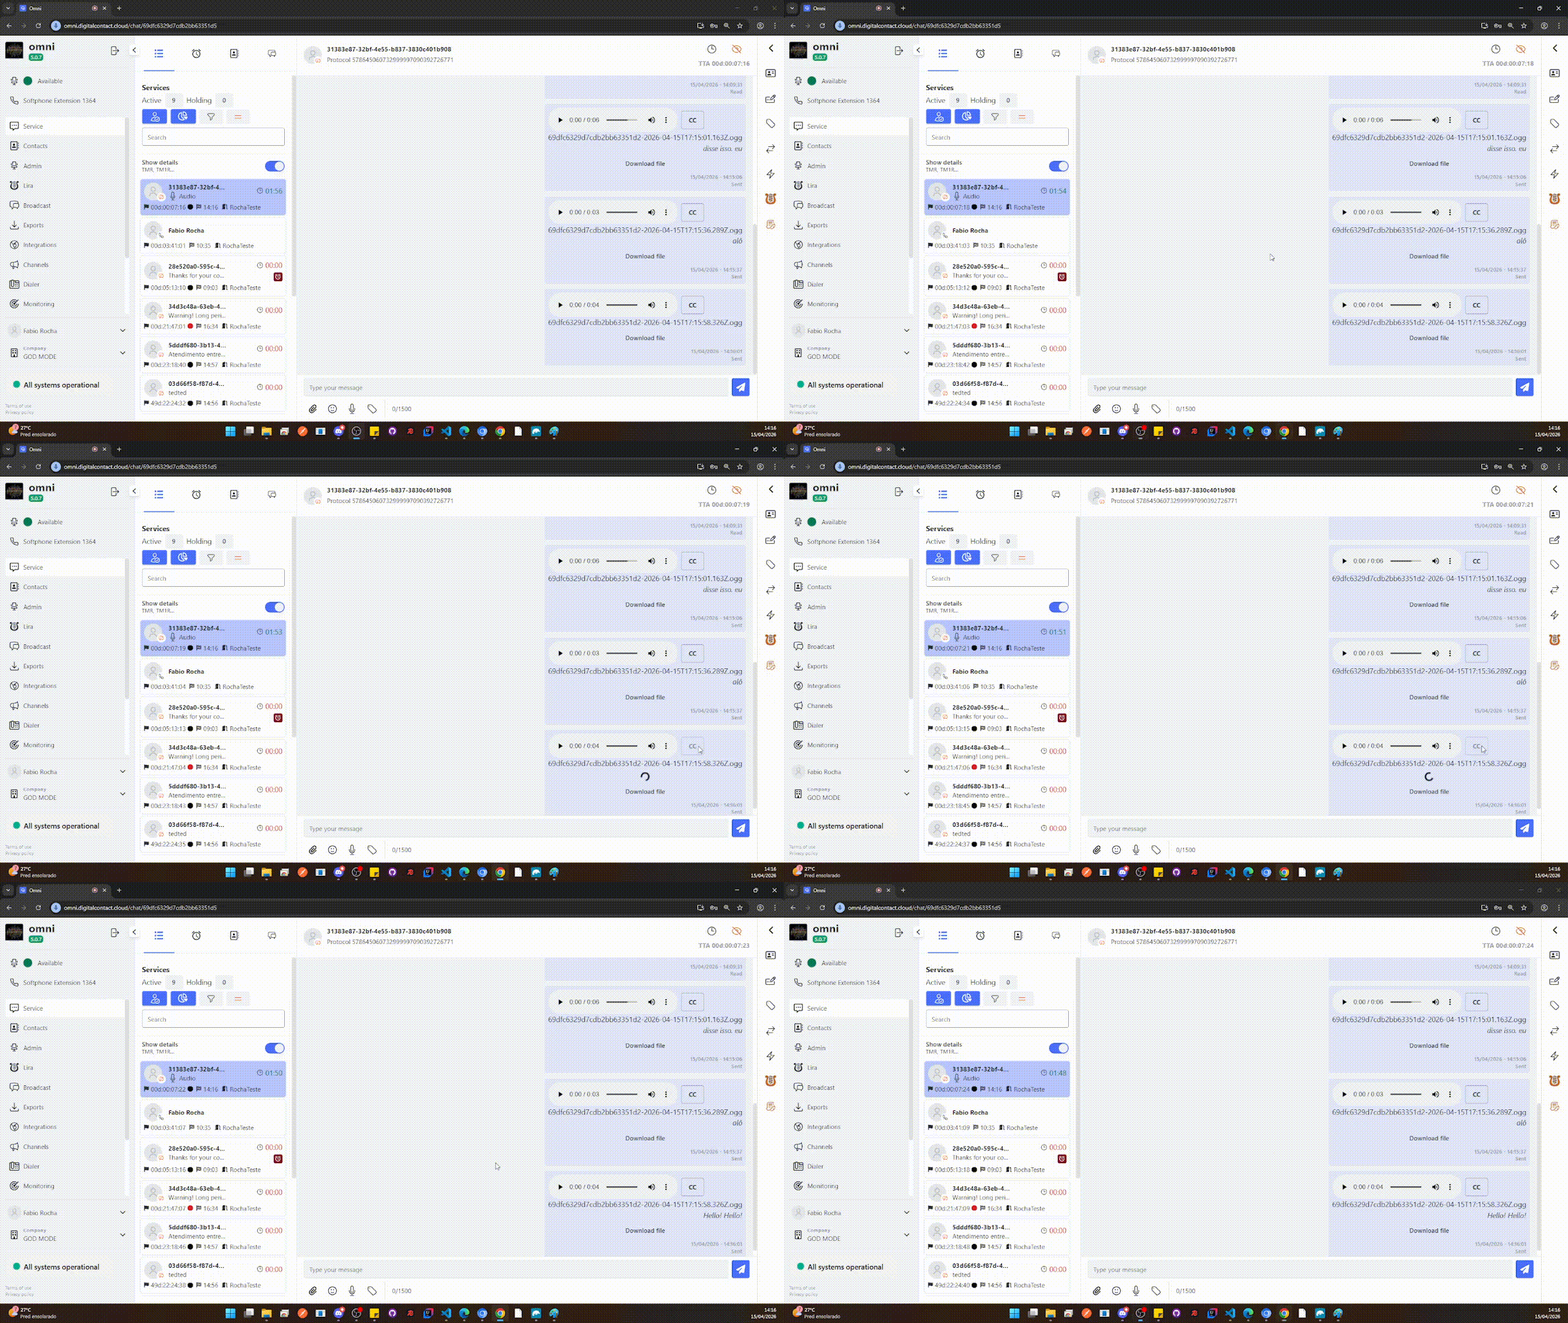
Omni has a new accessibility tool that allows audio messages to be viewed as transcribed text. Both sent and received audio messages can be displayed in text format.
To check the transcribed audio on the attendance screen, simply click the CC button located next to the audio download button.
Audio Transcription
Contact Timeline
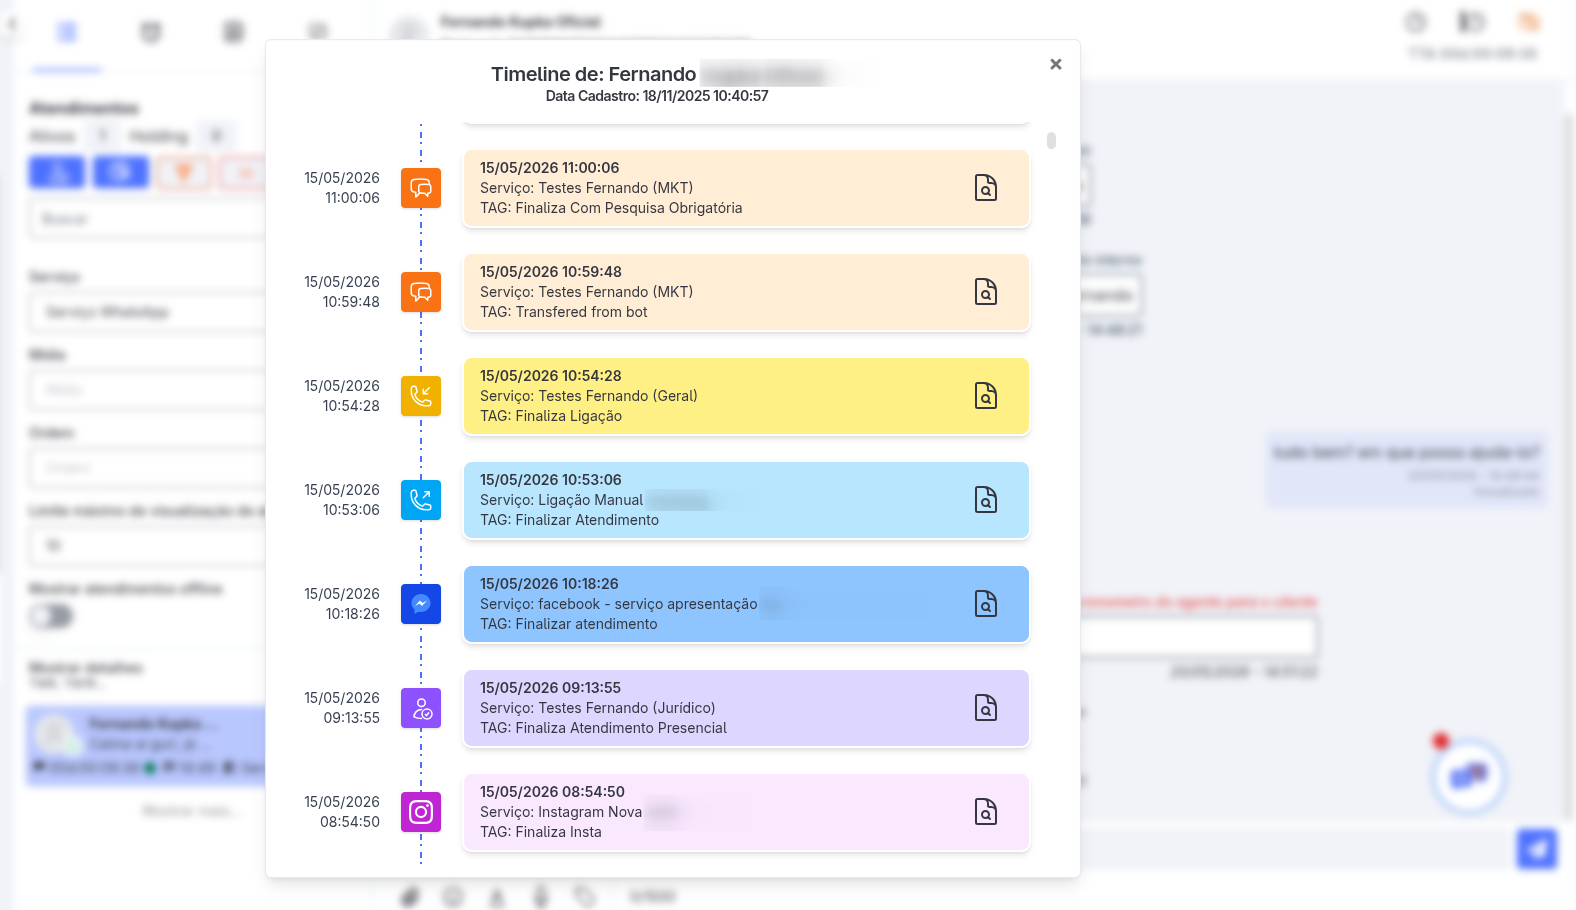
The Contact Timeline is a strategic tool that centralizes and displays the entire interaction history of a single client for the service agent. The key differentiator of this feature is omnichannel capability: the operator can view the contact’s trail in a unified way, regardless of the medium through which they interacted with the company (WhatsApp, Chat, Email, Phone, etc.).
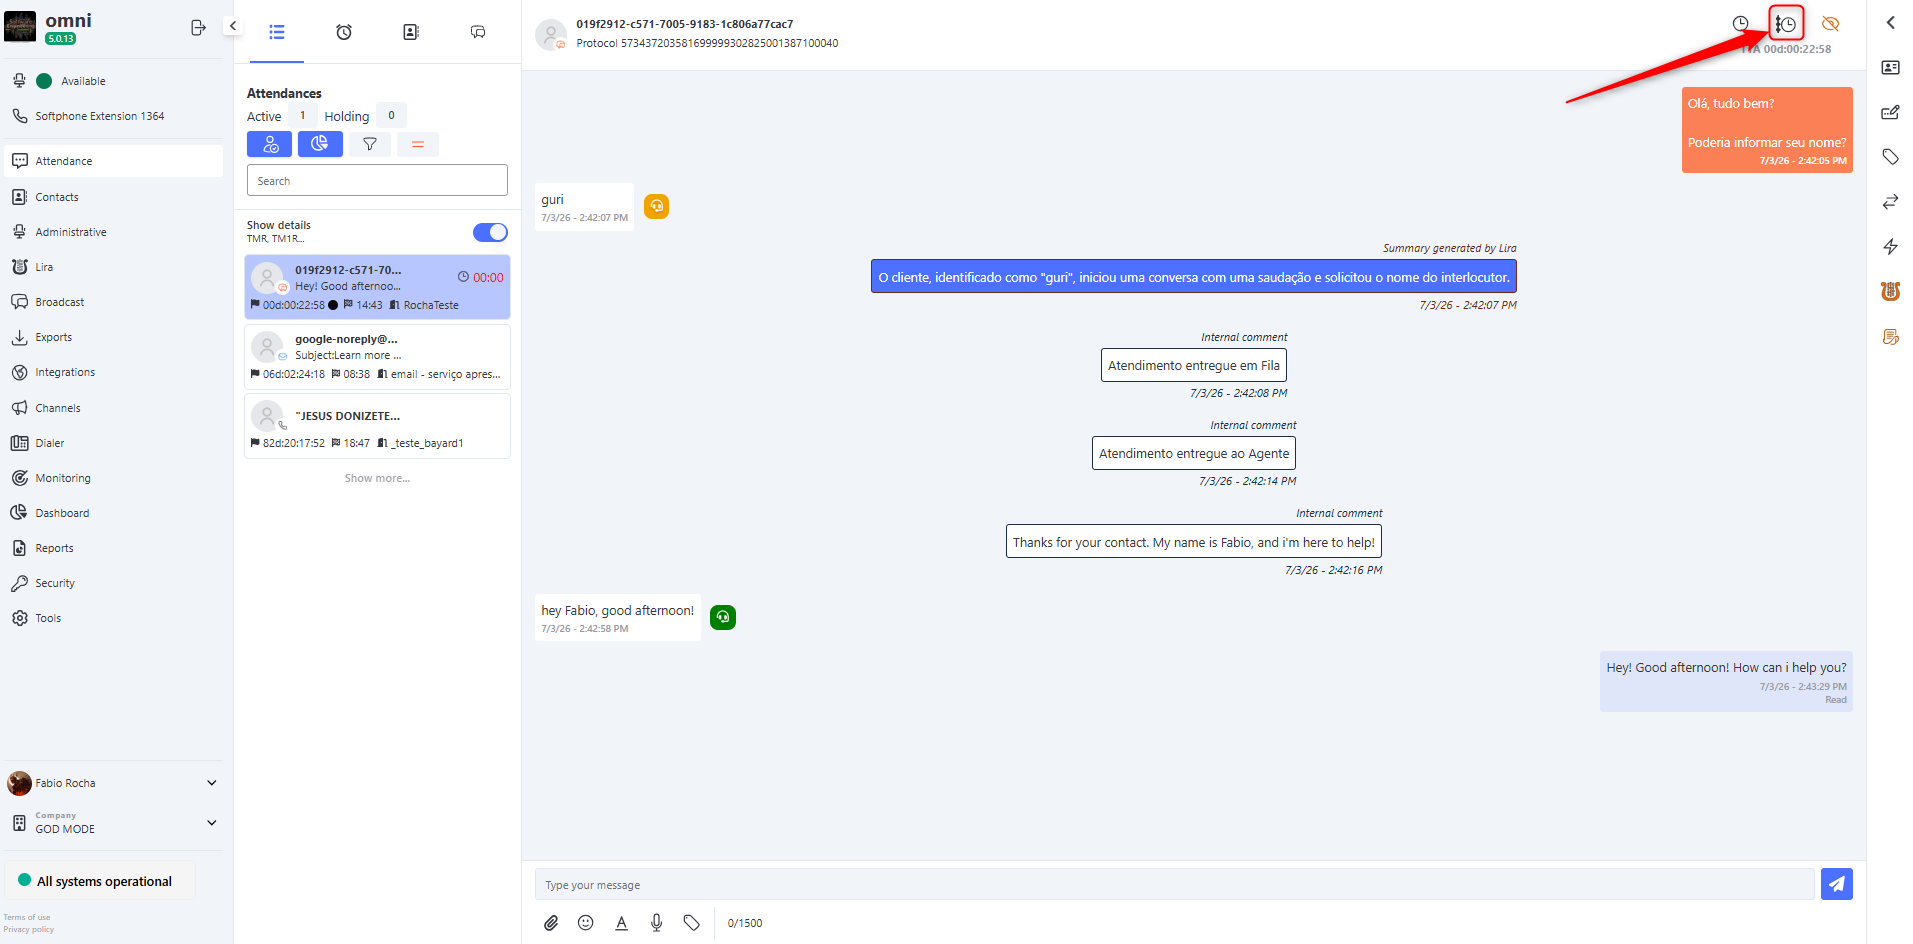
Display of the Most Recent Interaction
At the top of the timeline interface, the system highlights the fixed registration data so the agent knows exactly who they are speaking with:
- 👤 Contact Name: Displays the client’s name registered in Omni, facilitating immediate identification during the interaction.
- 📅 Created On: Shows the exact date and time when this contact’s initial record was created in the system.
Just below the header, the timeline loads the details of the client’s most recent interaction, structured with the following data:
- ⏱️ Interaction Time: Exact timestamp of when the conversation or contact occurred.
- 🌐 Media Icon: Quick visual identification of the channel used (e.g., WhatsApp balloon, Email envelope, phone for calls, etc.).
- 🛠️ Service: The queue or department through which the demand passed or is currently being processed.
- 🏷️ Closing Tag: Displays the tabulation/classification applied at the end of that interaction.
- Note: If the interaction is still ongoing (open), this field will remain empty.
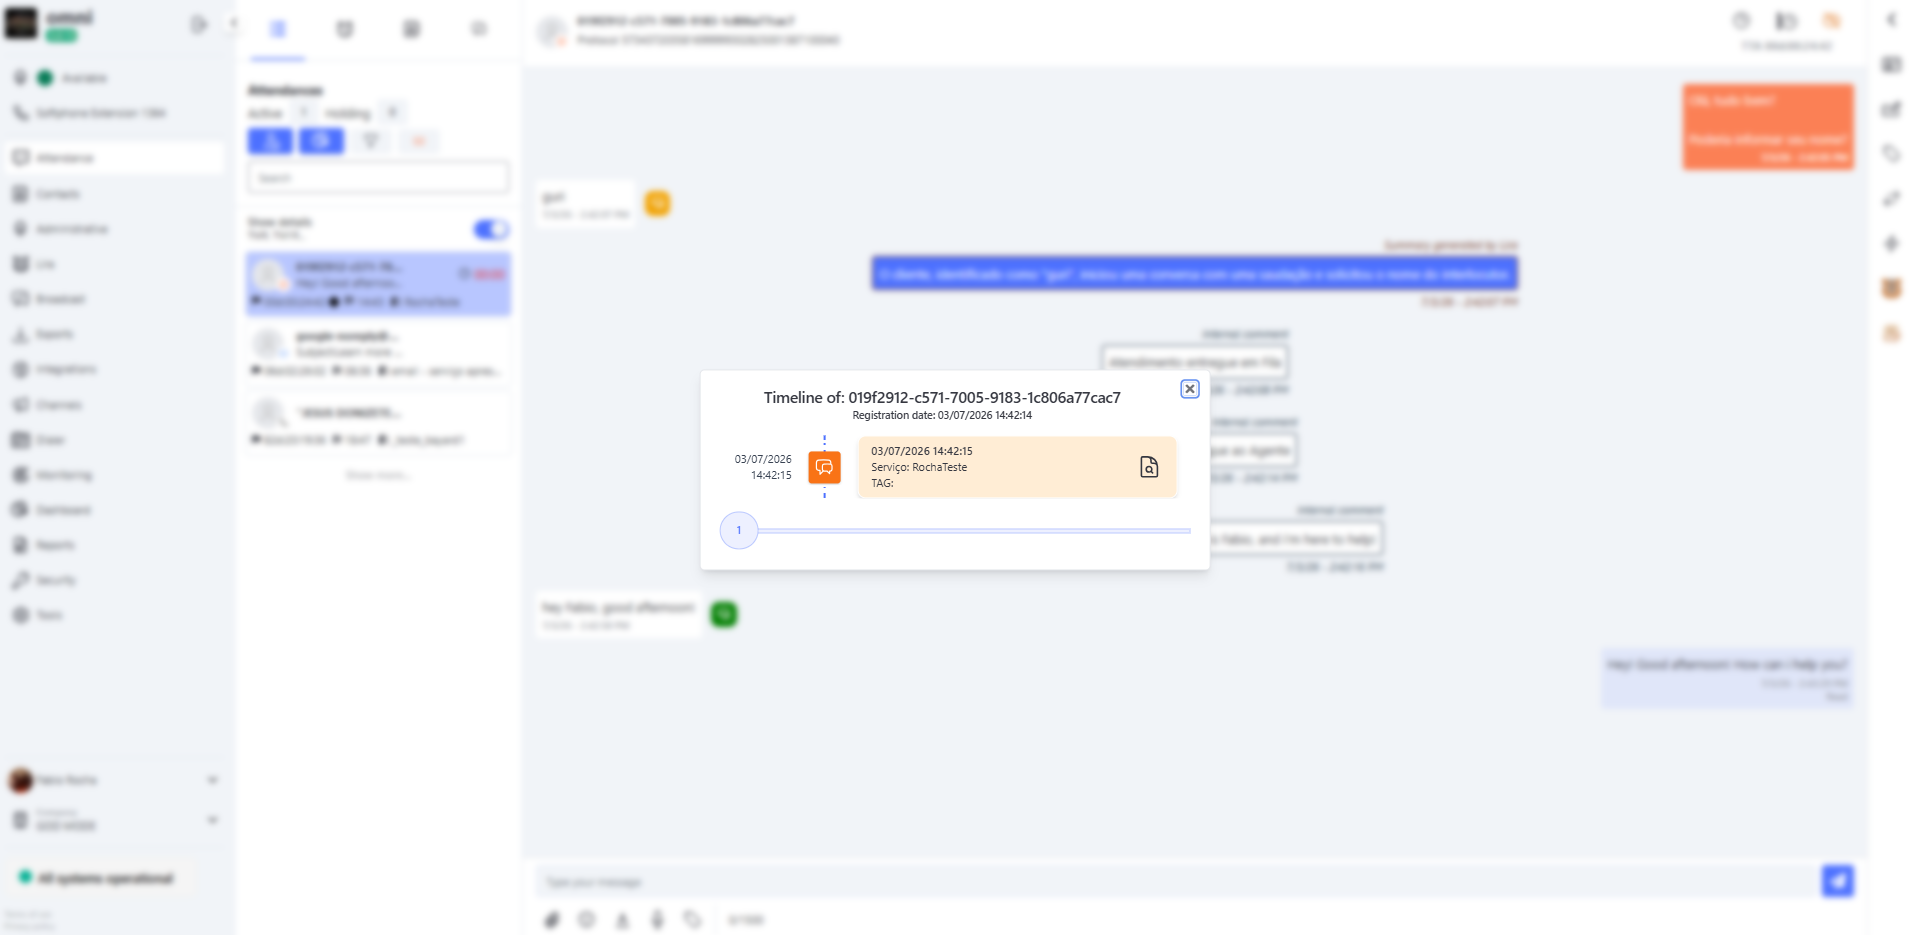
On the right side of this record, there is the Interaction History View Button (represented by the details icon). By clicking it, the system expands and displays the full conversation content or the technical details of that specific interaction.
Loading the Complete History
If the agent needs to dive deeper into the client’s historical journey, Omni offers simplified pagination navigation:
- Just below the block of the most recent record, the system provides a dynamic button showing the total number of previous interactions linked to that client.
- By clicking this button, the system expands the list chronologically, bringing the complete historical trail.
- No Limitations: The loading is unrestricted, with no constraints on the total volume of records or date range filters.
⚠️ Important Assumptions and Business Rules:
- Integrity and Lifecycle of the Contact: The link to the history depends exclusively on the existence and ID of the current contact record.
- Deactivation or Anonymization Scenarios: If an old contact is deactivated or anonymized and later a new record is created with the same name, previous interactions will not be inherited or displayed in this new timeline. The history remains strictly tied to the original record.
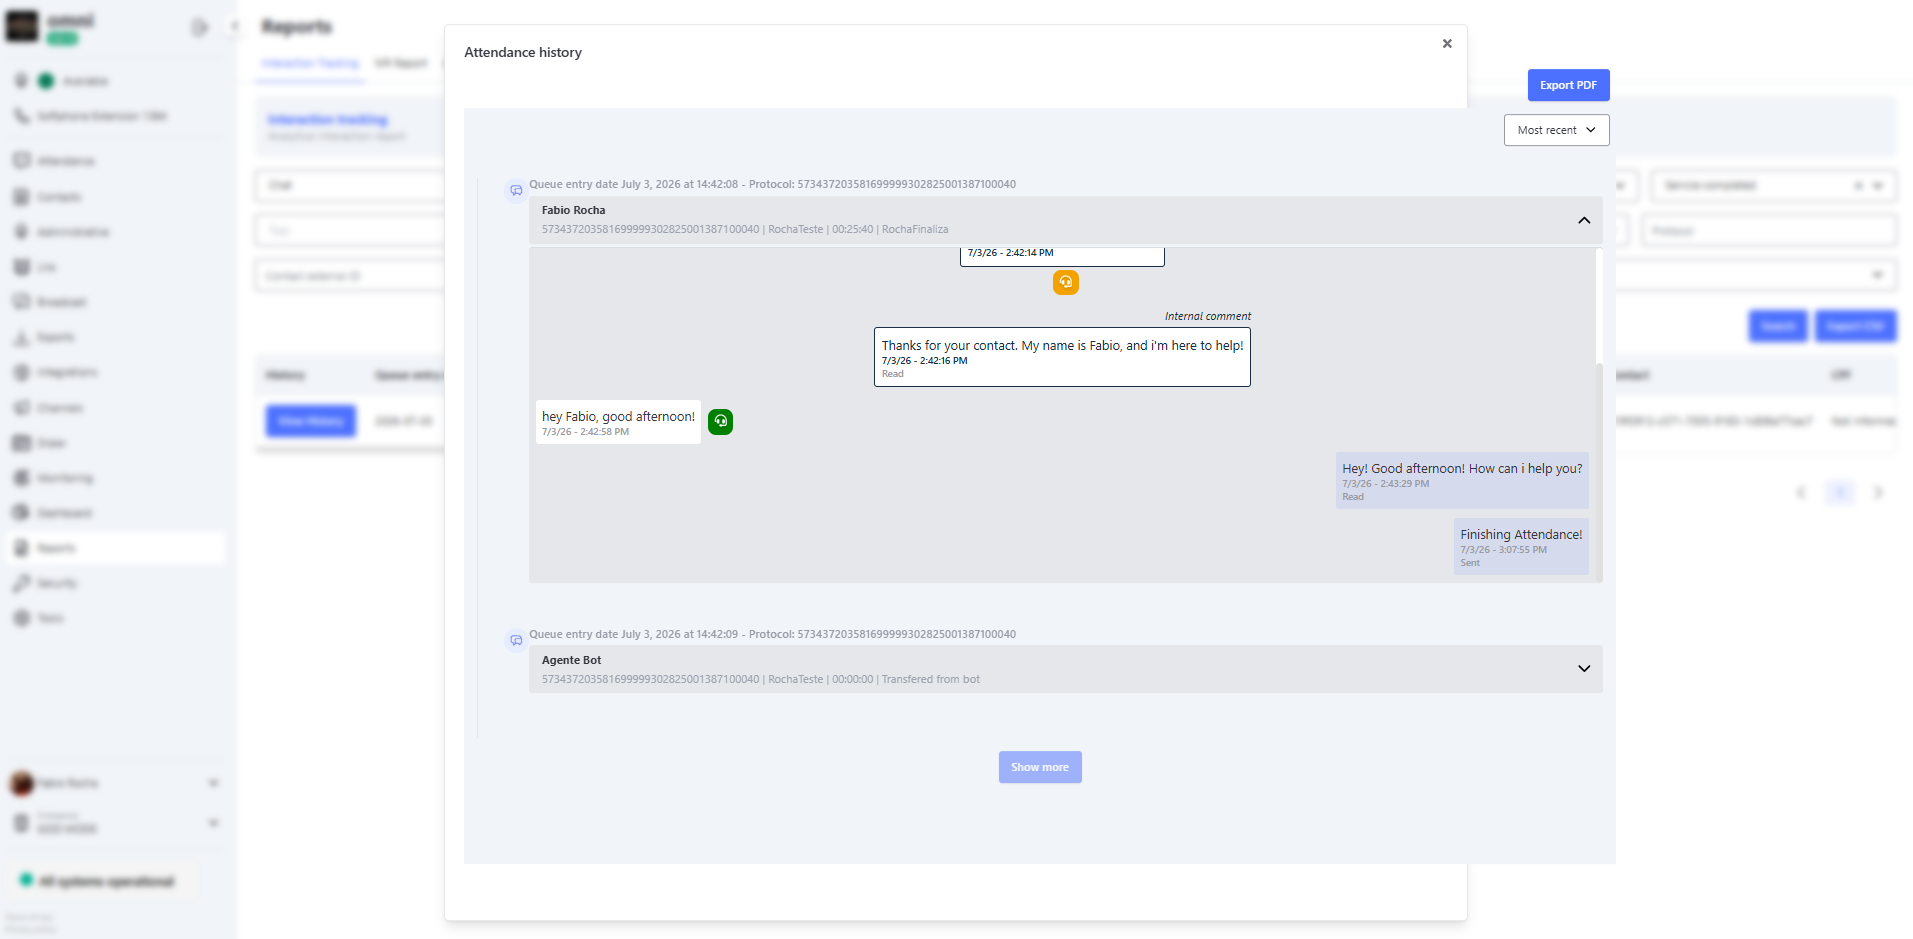
Service History
History up to 24 hours
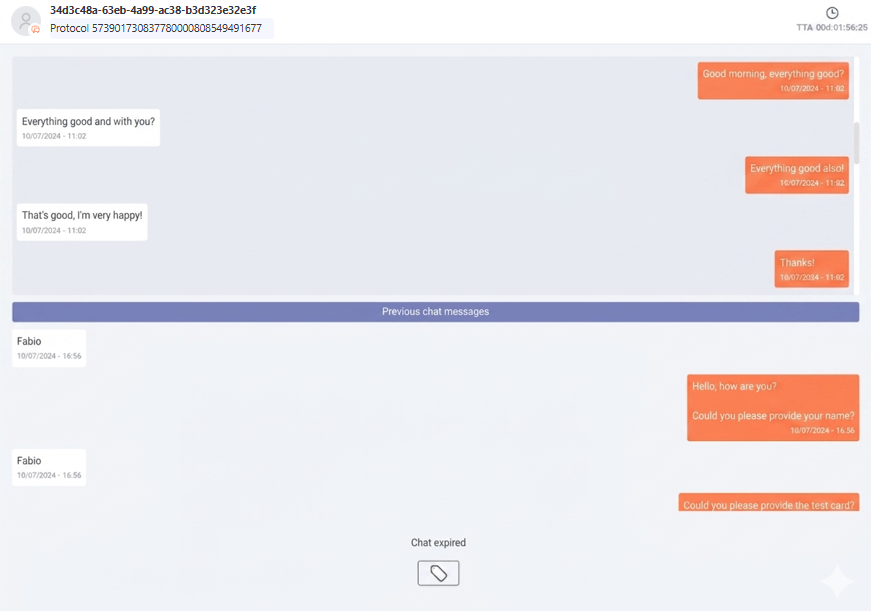
If a customer contacts 2 or more times within a 24-hour window, their history will be displayed on the service screen, right above the current interaction.
This history will only show messages sent and received within a 24-hour window.
If the interaction contains more messages older than 24 hours, they will not be displayed.
24-hour service history
History over 24 hours
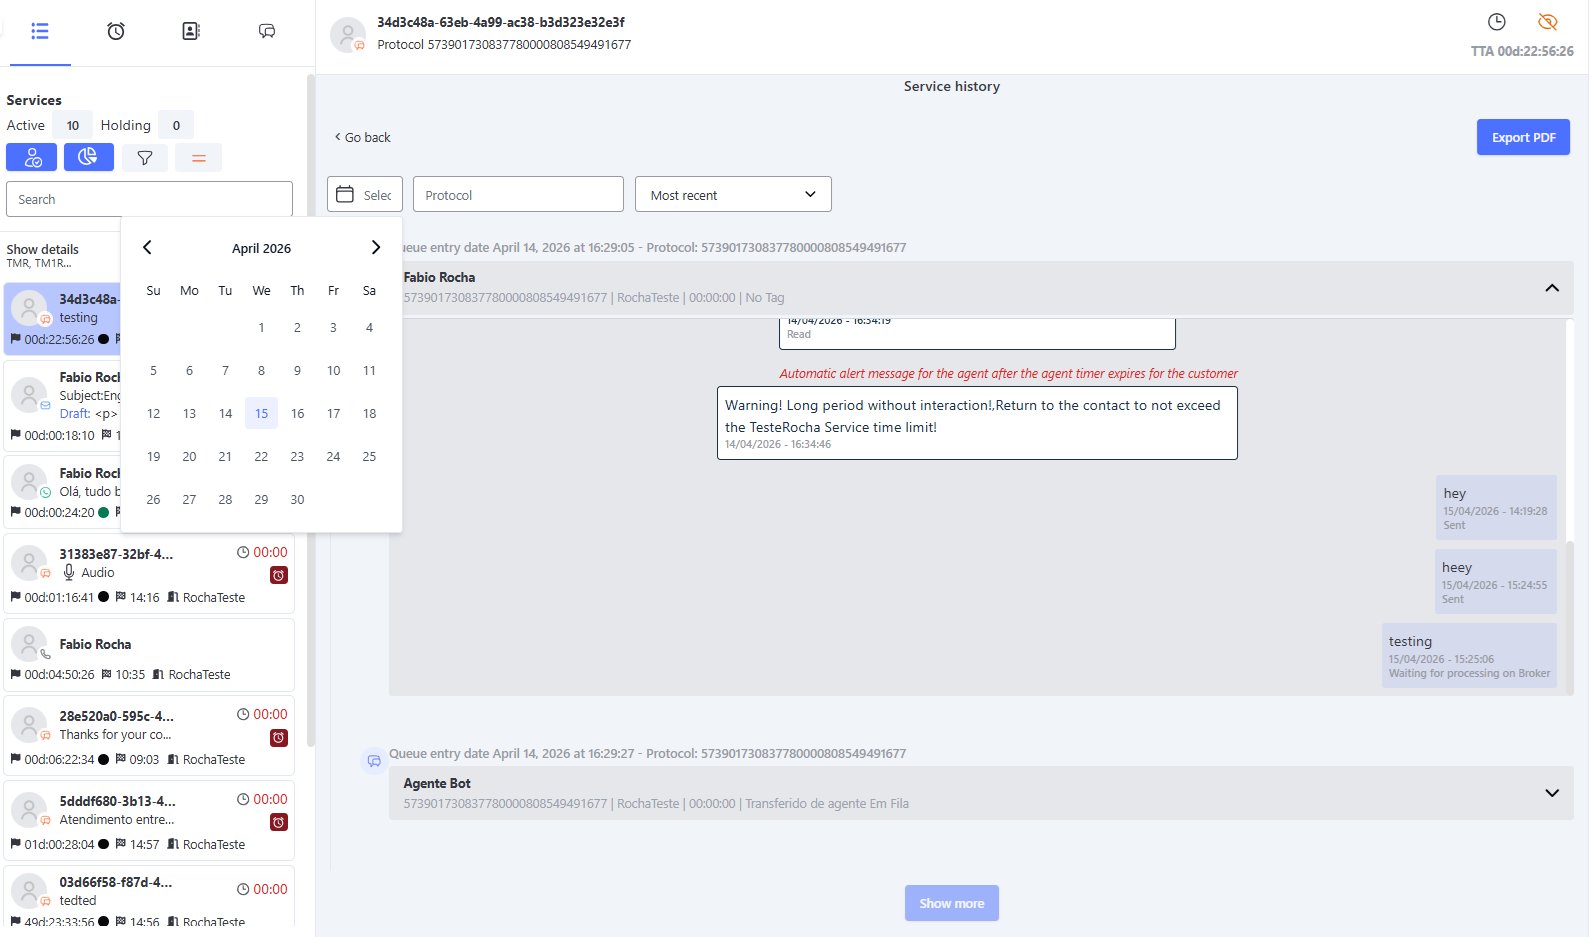
If the customer who contacted already has other interactions with an interval greater than 24 hours, to check the history you must click the "Clock" button in the upper right corner of the service screen.
In this history, you will be able to view the older records of this customer.
You can also use date filters to check specific periods or the protocol filter if you want to view a specific protocol.
Service history over 24 hours
History After Transfer
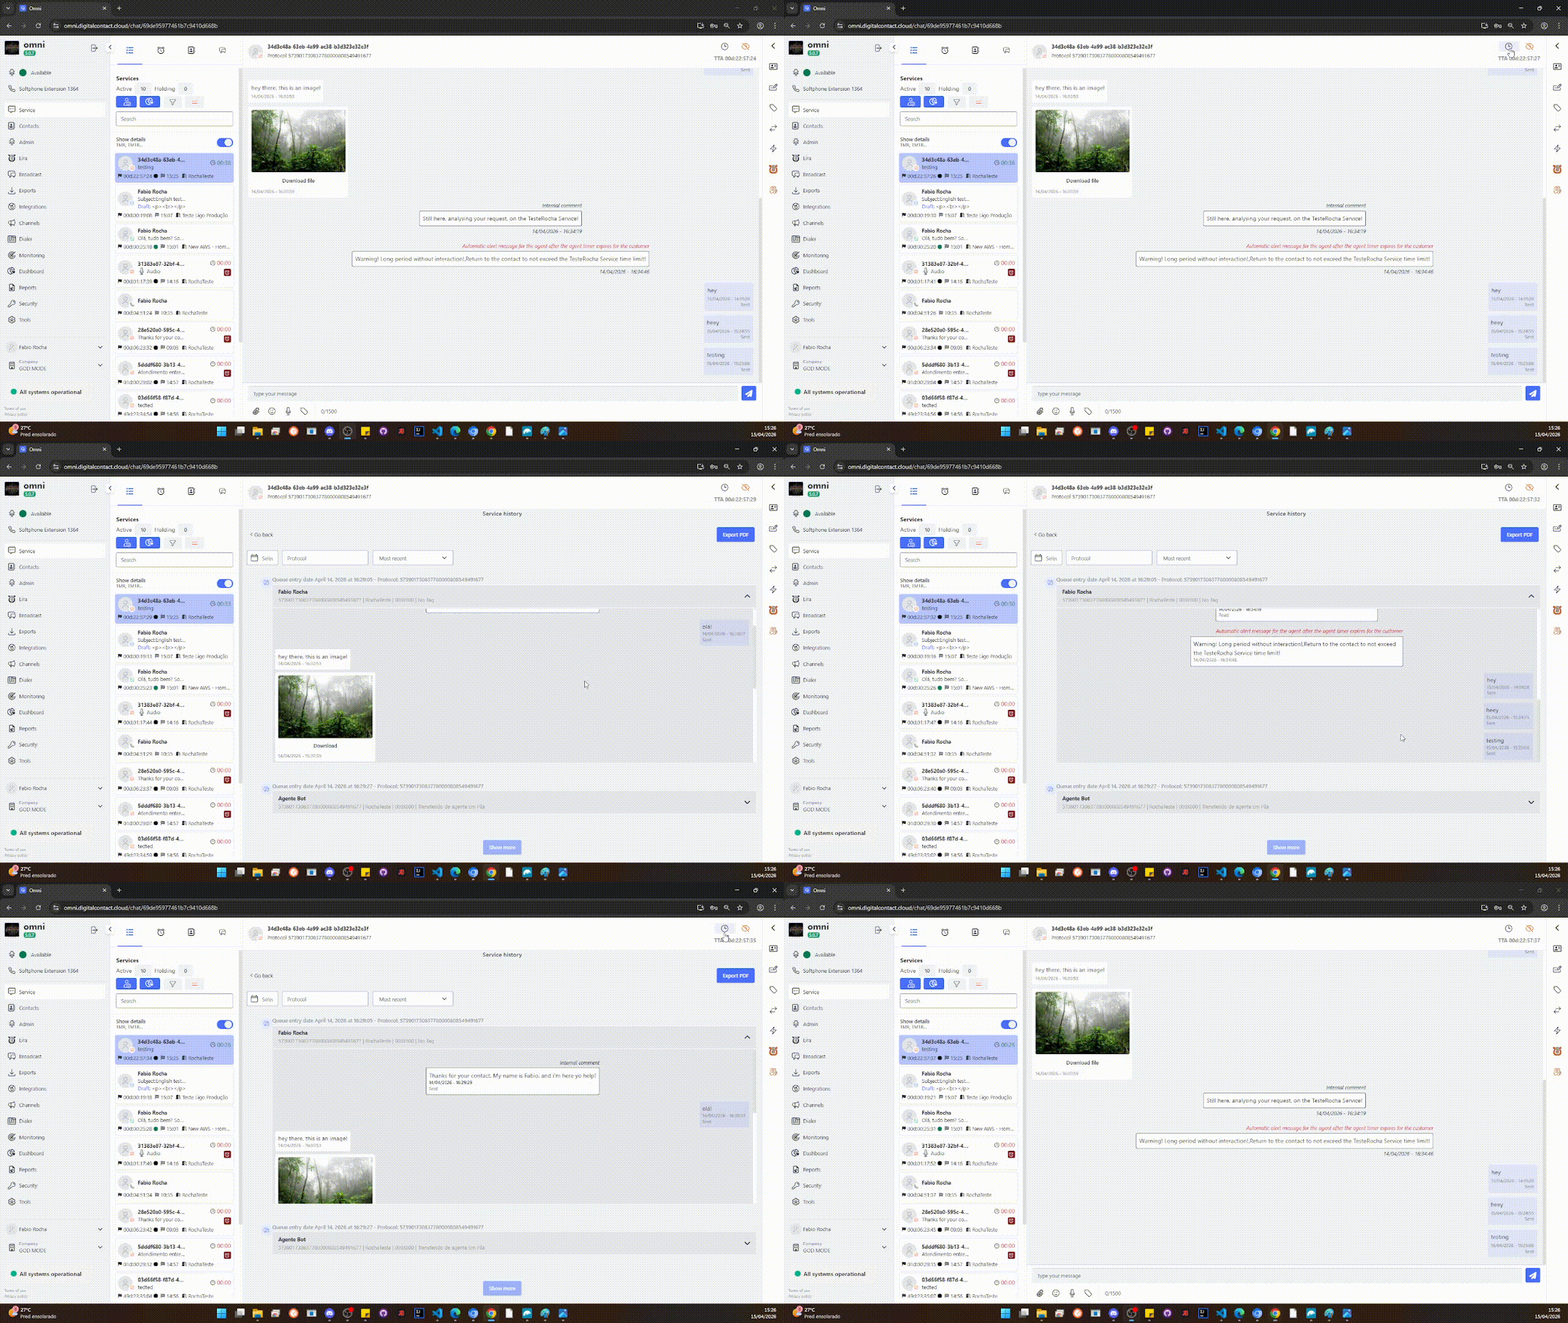
When a service transfer is performed, whether between agents or through a service, the system will automatically display the entire history on the Service screen.
The displayed history will include all interactions carried out, from the beginning to the most recent message, regardless of who sent the message — whether an agent, customer, or bot.
This functionality allows the current agent to have immediate access to the necessary information, making it easier to view and track relevant data to ensure efficient continuity in customer support.
History After Transfer
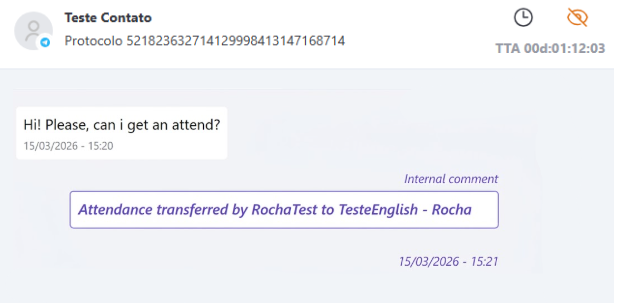
In addition, after the transfer, an internal comment will be displayed containing information about the user who performed the transfer and the one who received it. This comment will be visible only internally and will not be shown to the customer.
Internal Comment After Transfer
Sending Service History on Screen via Email
In Omni, you can send the service history displayed on screen to the customer by email. To perform this procedure, some system configurations are required:
You must enable the option Send Service History in the Company menu.
Activating Service History Sending in the Company Menu
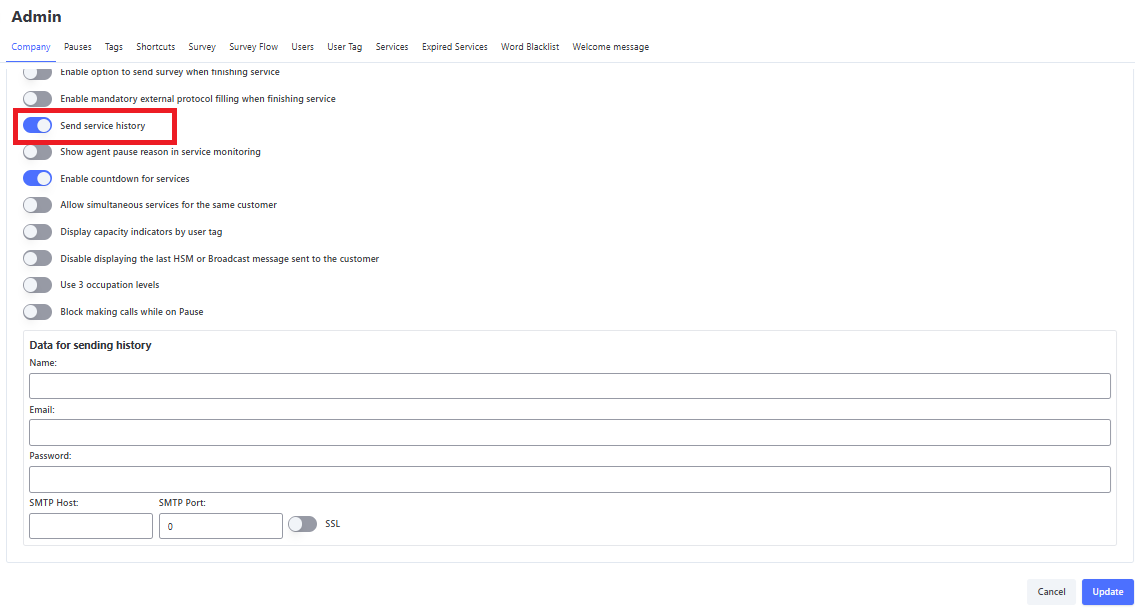
After enabling the Send Service History option, you must configure the email details:
- Name - Email name.
- Email - Email address.
- Password - Email password. Check with the provider if a specific password is required for sending emails through third-party programs.
- SMTP Host - SMTP host, check with the provider.
- SMTP Port - SMTP port, check with the provider.
- SSL Activation - If you have an SSL certificate, enable this option.
After activating and configuring the email, you must enable the Send Attendance History option in the Services menu. This gives you autonomy to decide which service will send the history or not.
Note: If your email provider is Google or Microsoft Azure, some additional configurations are required in the email provider. If you need help with these settings, you can access the page Email Sending Settings in Omni or click the links below.
Configurações de envio de E-mails Google
Configurações de envio de E-mails Microsoft Azure
Activating Service History Sending in the Attendance Menu
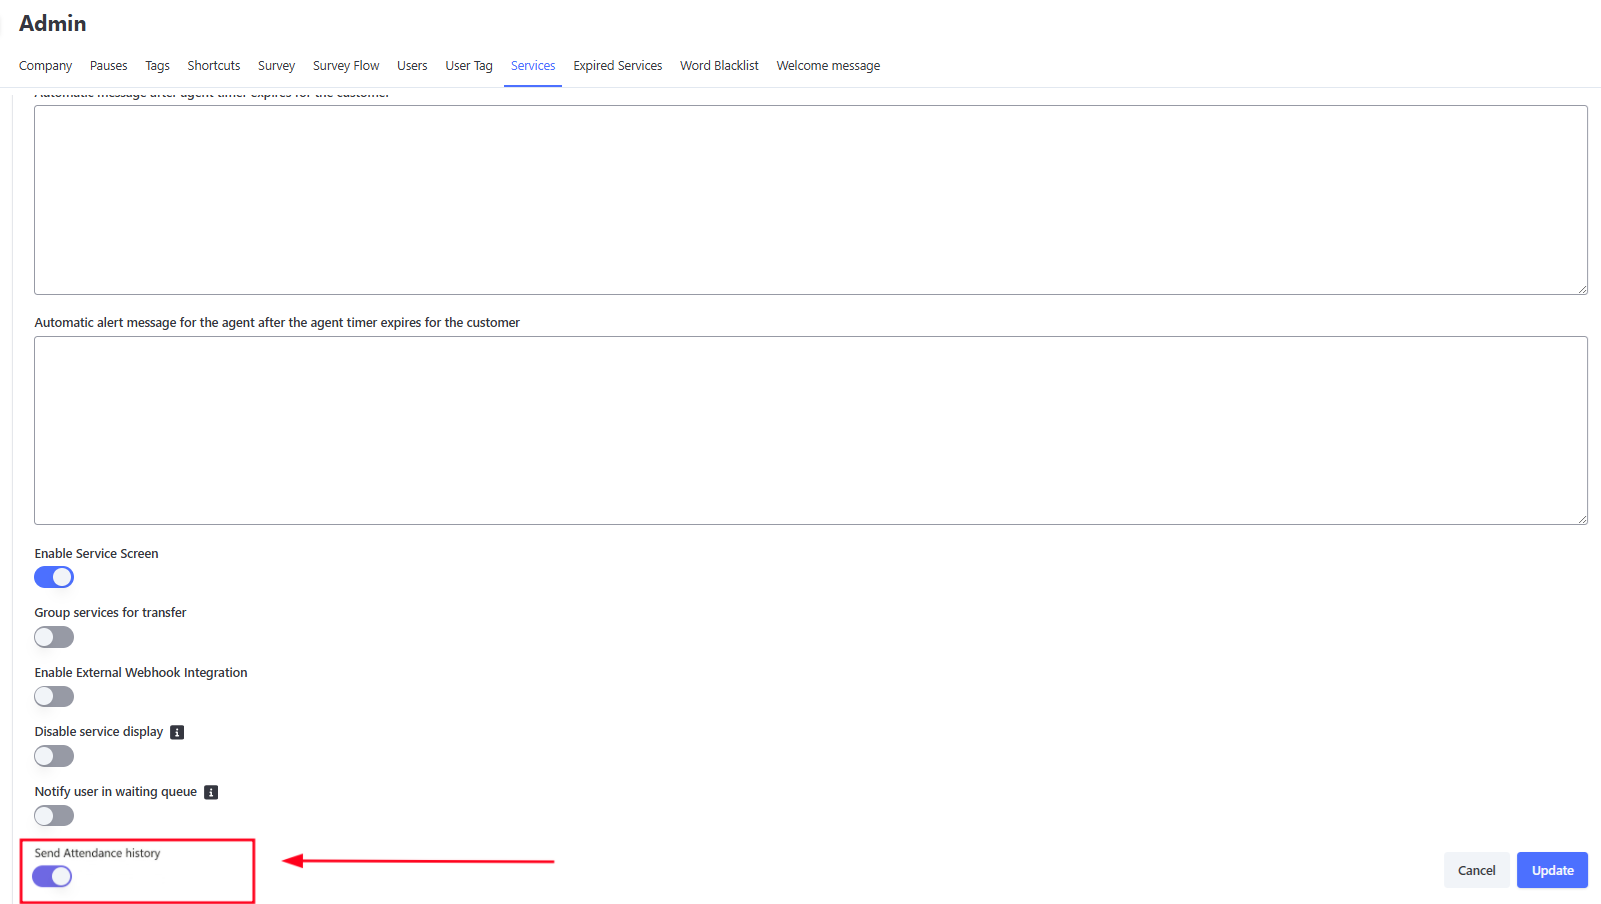
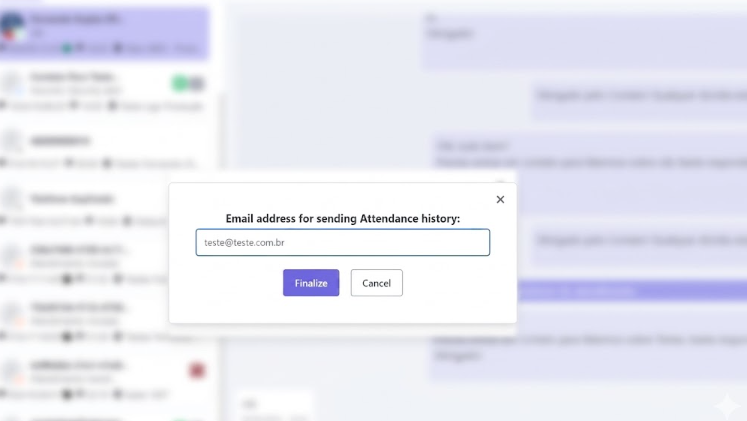
"After the activations in the administrative menu, when the user finishes the interactions, a pop-up will appear asking them to provide an email address to send the history.
If the contact already has an email registered, it will appear pre-filled. If no email is registered, once filled in, the address will be saved to the contact, storing the information for future interactions.
Service History Sending via Email
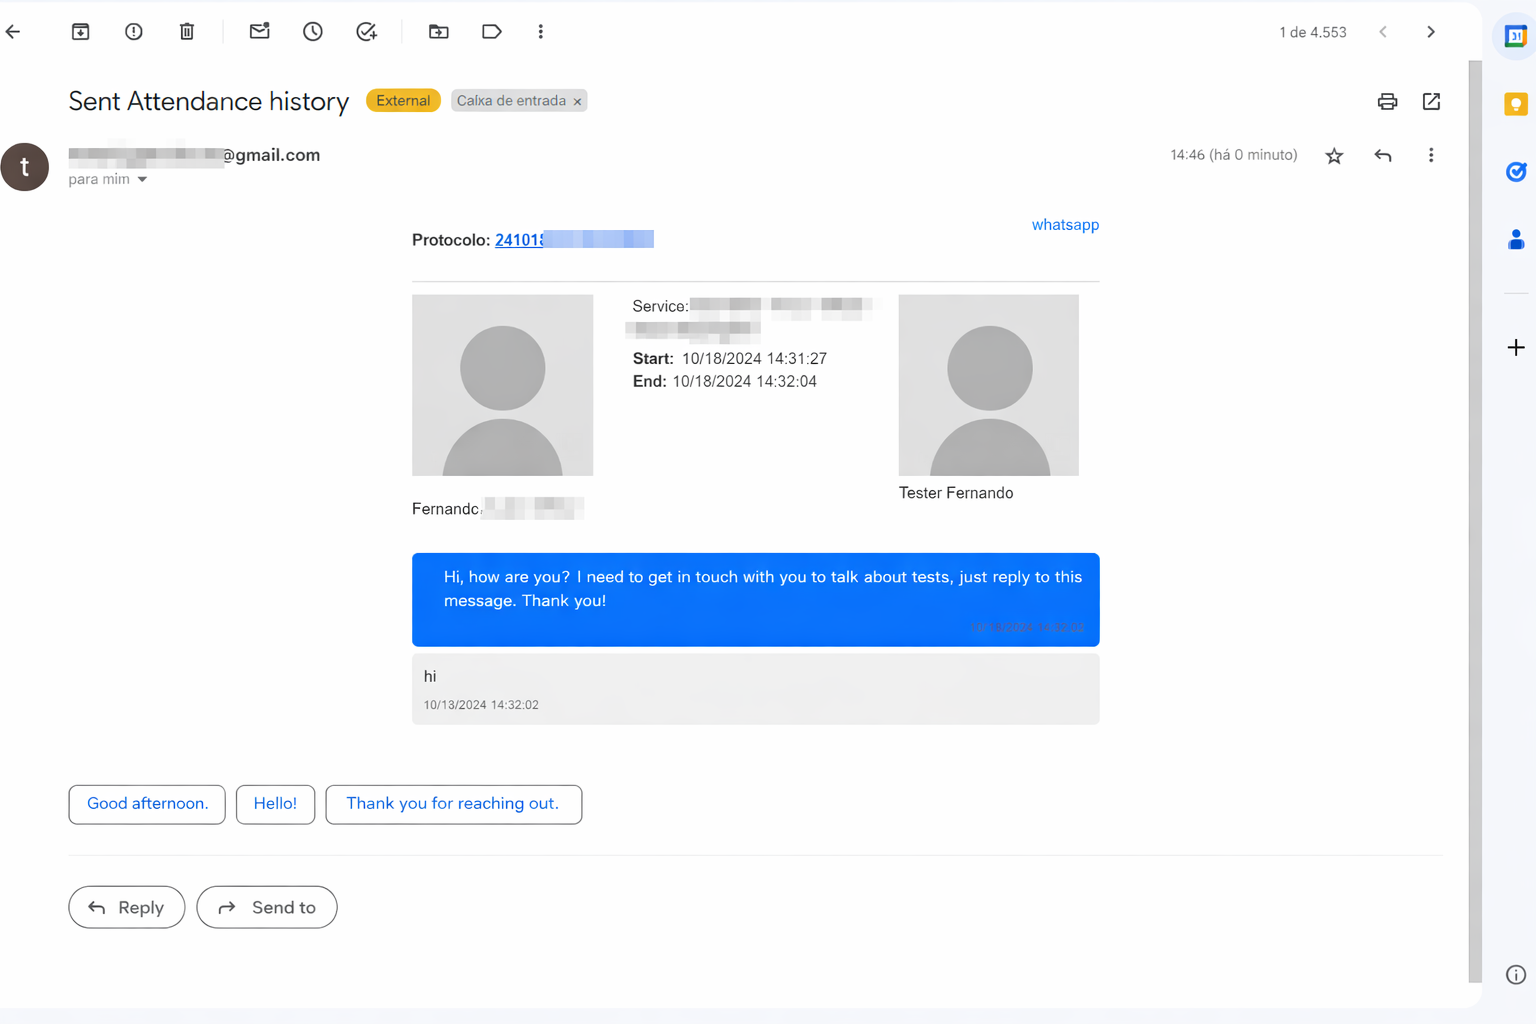
Receiving Service History via Email
External protocol
If it is necessary to fill in an external protocol when closing the interaction, you can enable the option in the Company menu.
The option to be enabled is: Enable mandatory external protocol entry when closing interaction
External protocol Activation
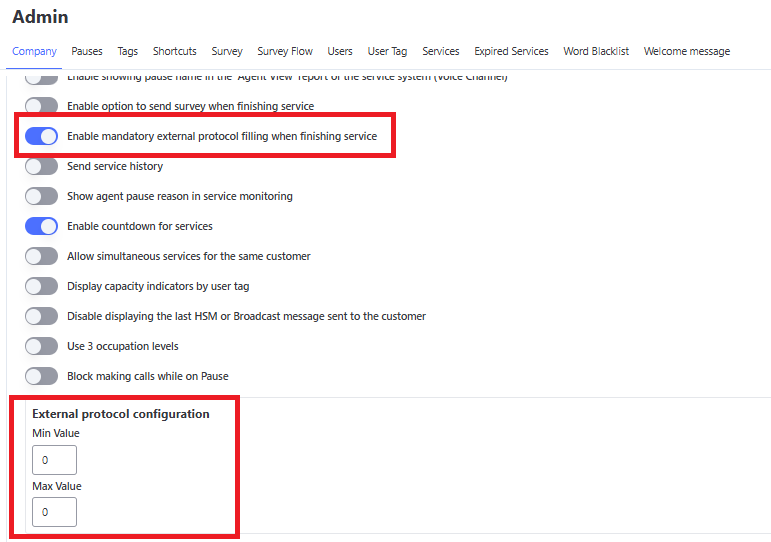
When enabling this option, the field External protocol Configuration will be displayed, containing two fields to define the allowed size of the external protocol:
- Min - Defines the minimum number of characters the external protocol must have
- Max - Defines the maximum number of characters the external protocol can have (minimum value: 1)
These fields allow you to configure the range of accepted characters for the external protocol according to your company’s needs.
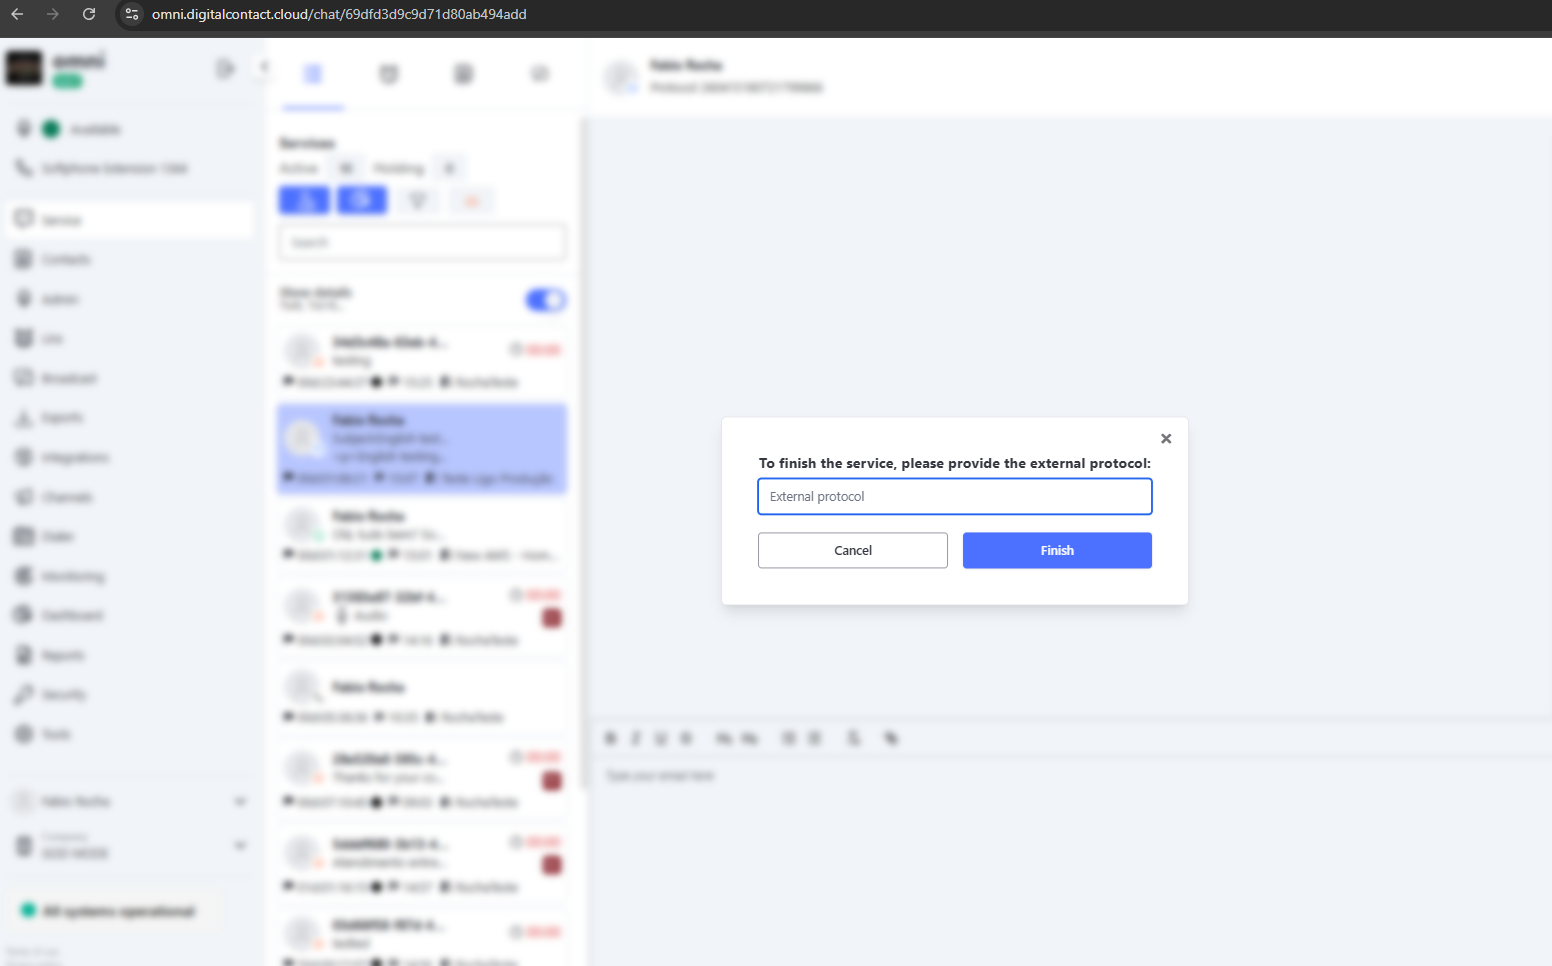
With this option enabled and configured, when closing interactions on screen, it will be necessary to provide the external protocol, and the entered code must be within the defined character range (between Min and Max). If the entered code does not meet this requirement, it will not be possible to close the interaction.
External protocol on the Service Screen
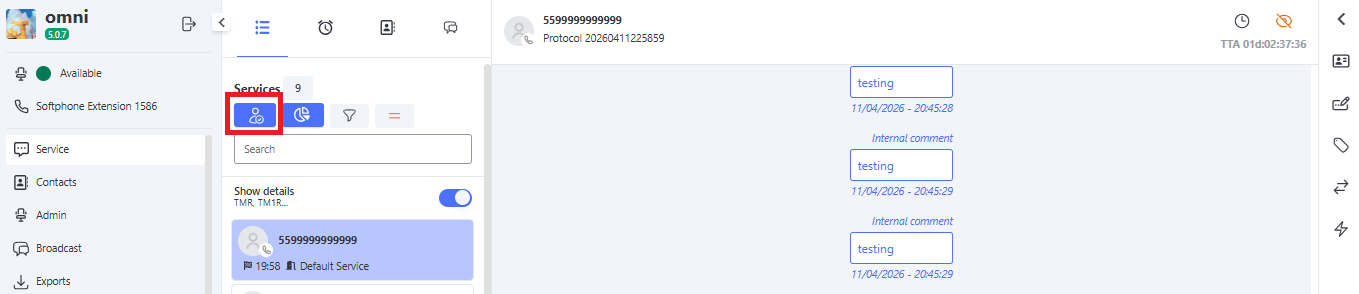
In-Person Attendance
The in-person Attendance allows the user to register an interaction that is not carried out through the system queue.
This Attendance is registered through the In-Person Attendance button available on the Attendance screen in card and queue view.
Attendance Screen in Card
In-Person Service Button on the Service Screen in Cards

Attendance Screen in List
In-Person Attendance Button on the Attendance Screen in List
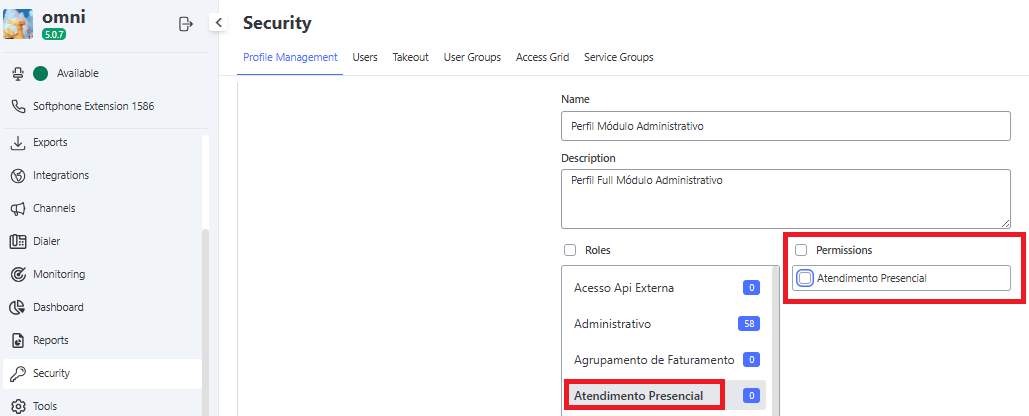
For the agent to have this button available, the Profile Management functionality must be enabled in the Security menu.
Granting Access to the In-Person Attendance Button
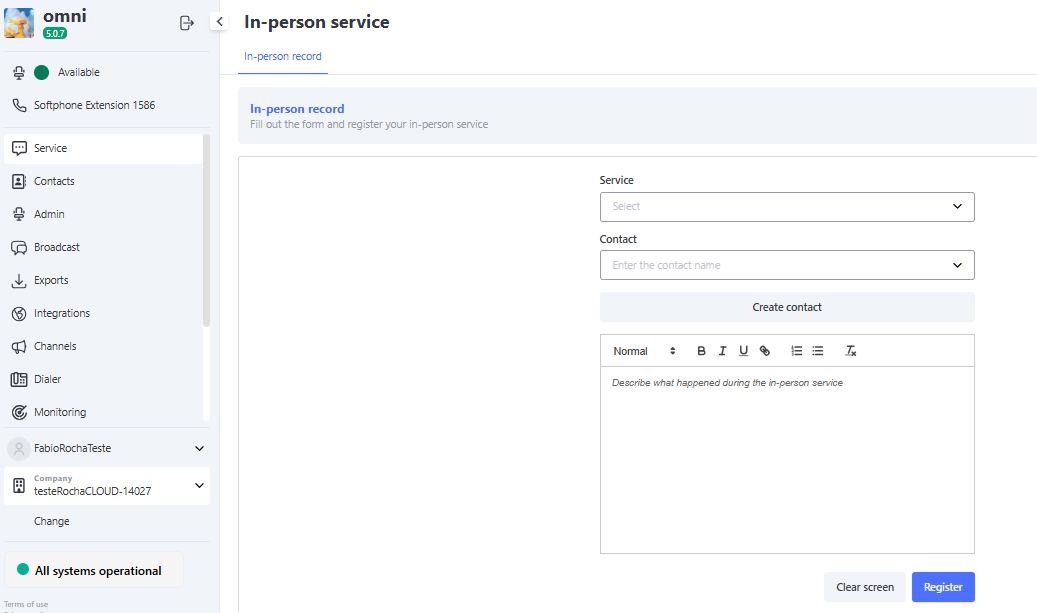
Registering In-Person Attendance
To register an in-person attendance, the following information must be provided:
- Attendance type
- Contact, if it does not exist you can create a new one
- Attendance description
Registering In-Person Attendance
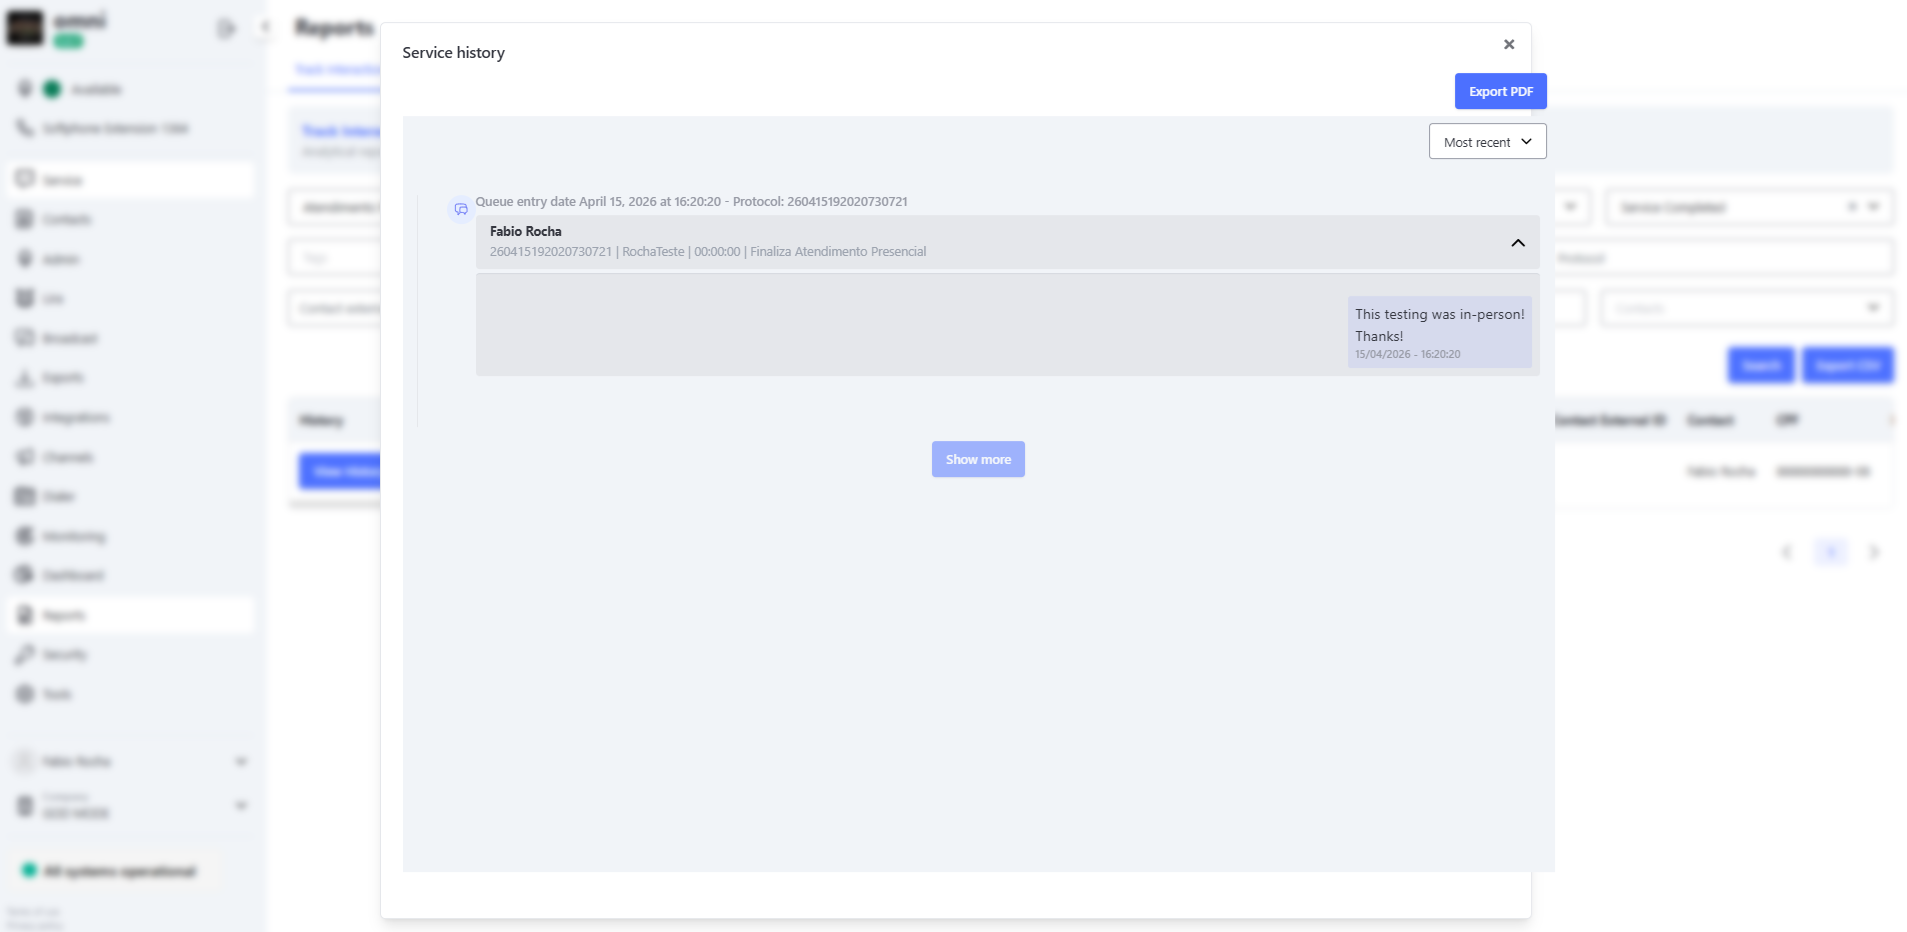
After the attendance is registered, it can be consulted in the Interaction Tracking functionality in the Reports menu.
Report of Interaction Tracking with In-Person Attendance Information
Closing In-Person Attendance with Tags
The In-Person Attendance module allows the use of customized Closing Tags. This functionality enhances management by enabling categorization of the outcome of each physical interaction and enriching the database for future analysis.
⚙️ Configuration and Requirements
For the system to display classification options, a prior configuration must be made in the administrative panel:
- Tag Registration: In the Administrative menu, the tag must be created and linked to the In-Person Attendance media.
- Link by Attendance Type: The tag must be associated with the specific Attendance that will be used.
🚀 How to Use in Practice
When selecting an attendance type that has configured tags, the system will automatically display a new field for selection. Simply choose the tag that best represents the outcome of that attendance.
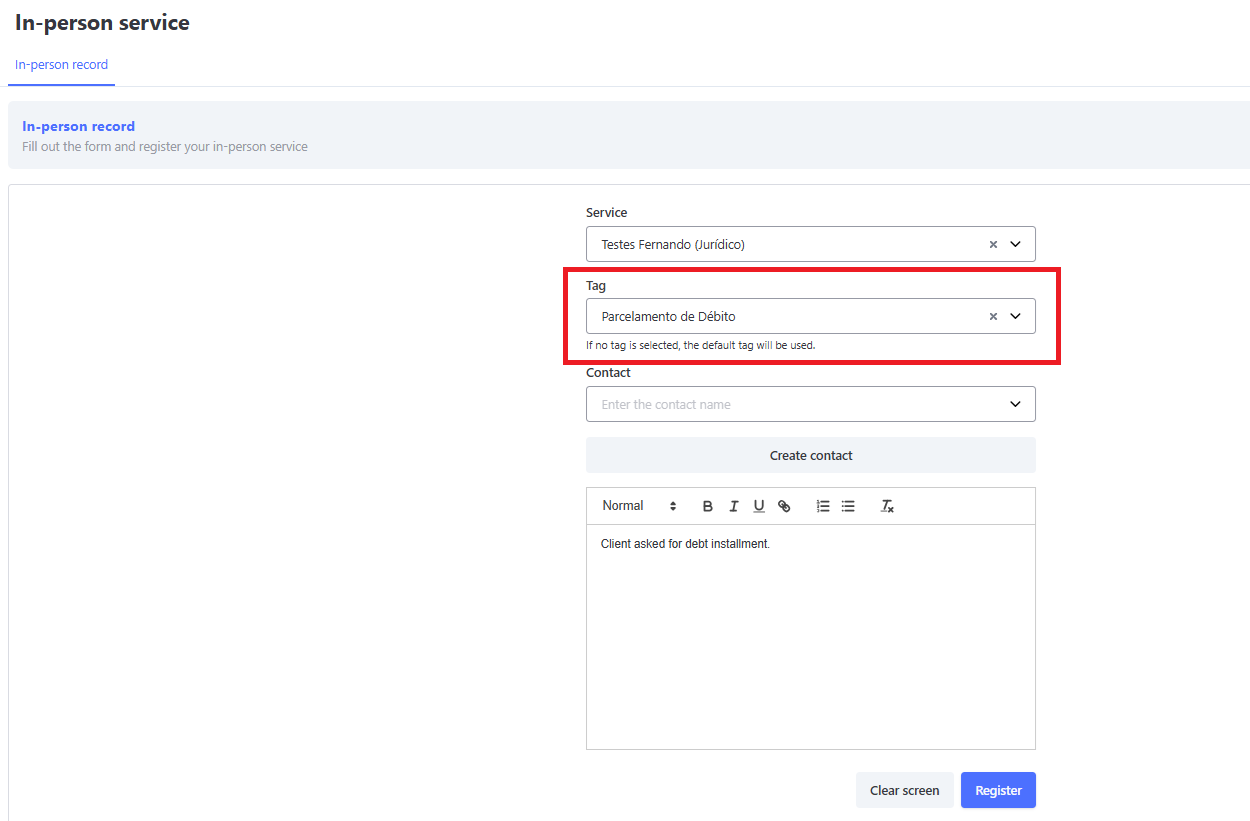
💡 Important Information: If you select an attendance type that does not have specific tags linked (or choose not to select any), the system will automatically apply the default tag: "Close In-Person Attendance".
📊 Audit and Reports
To ensure full operational control, the tag chosen by the operator is faithfully recorded and can be consulted in the Interaction Tracking Report. The data is available both on-screen and in .CSV file export, allowing for a detailed analysis of in-person productivity.