Administrative
Managing your company's data
The Administrative module manages the most important data on the platform, where registration and editing of the following can be performed:
- Companies
- Users
- Services
- Tags
- Shortcuts
- Pauses
- User tags
- Satisfaction survey
Companies
Company registration can be performed:
By a user who has permission to register on the Users screen
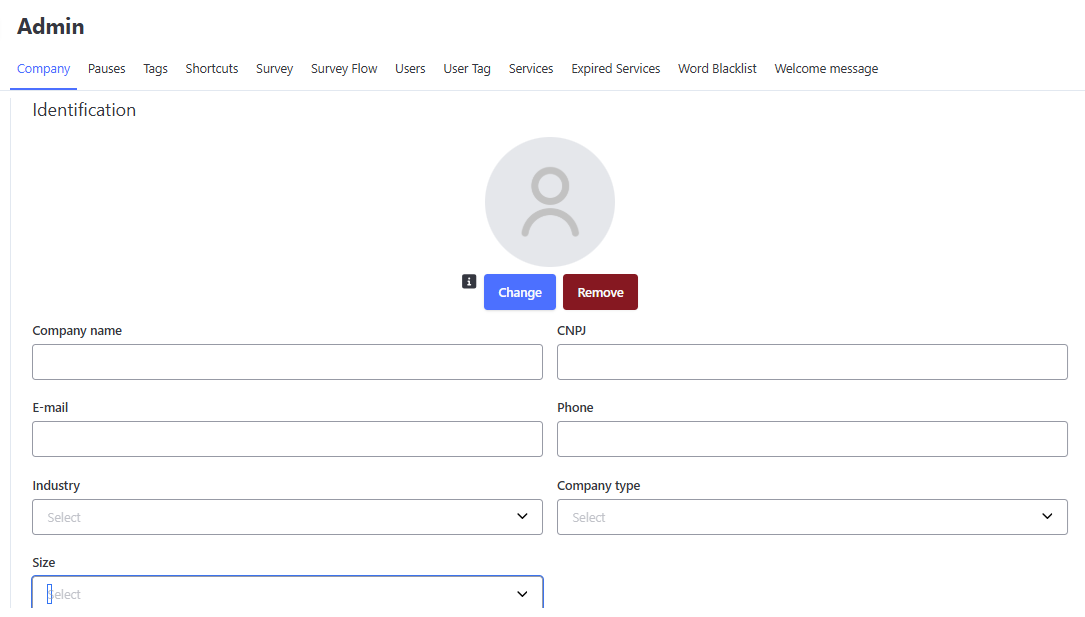
Users who have permission to register a new company can do so by completing the Company registration form through the following path:
- Administrative
- Companies
- Select the "New Company" button
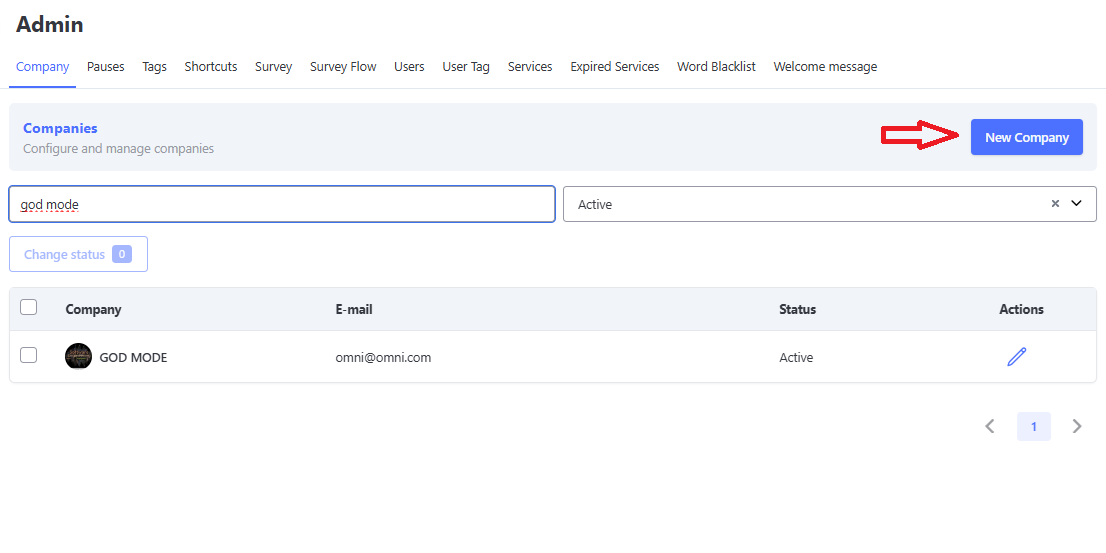
- Fill in the fields:
- Company Data, where the mandatory fields are:
-
Company Name
-
Company Email
-
CNPJ
-
Company Phone
-
ZIP Code
-
Address
-
Number
-
City
-
State
-
Country
-
Responsible Person Name
-
Responsible Person CPF
-
Responsible Person Email
-
Responsible Person Phone
-
Click "Create"
-
- Company Data, where the mandatory fields are:
📝 Note: The CNPJ field now supports both the numeric format (traditional format) and the alphanumeric format (new format established by the Federal Revenue Service).
Example of a fictitious alphanumeric CNPJ:70.32D.BW7/0001-44
A token will be sent to the responsible user's email address, allowing them to create a password for their first login. From that point on, they can begin the registration process for users, services, and channels according to the company's needs.
Company Logo
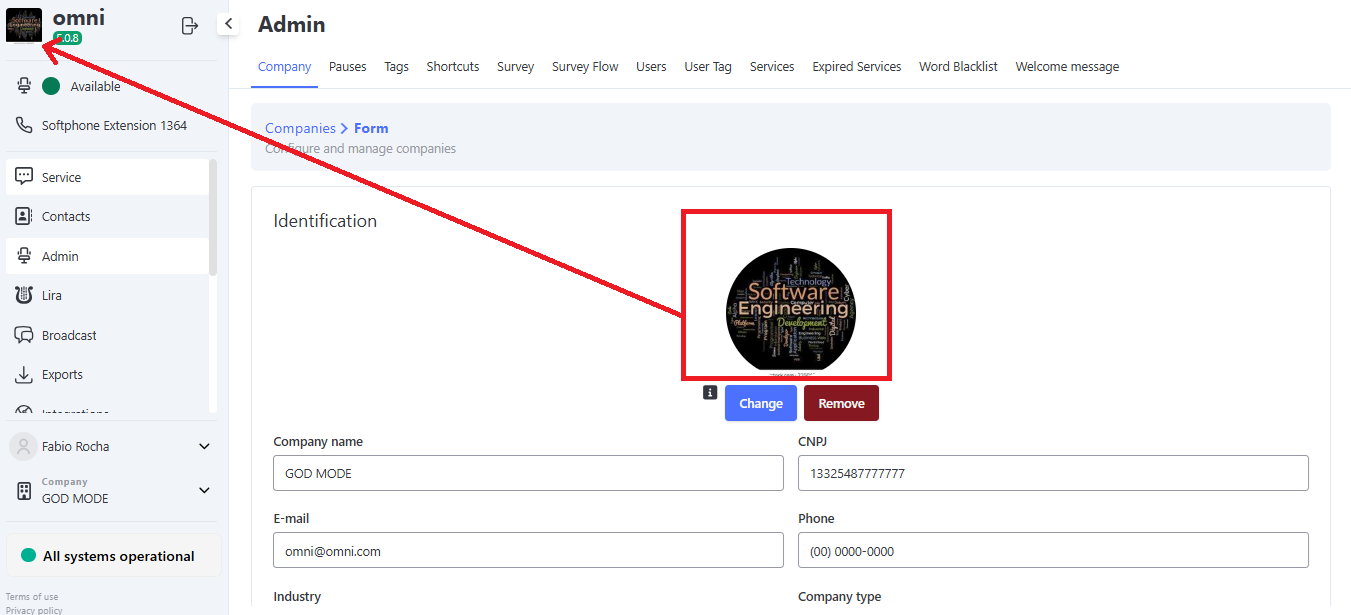
You can insert and change your company's logo. To do this, you must go to your company's edit menu and click the Change button located just below the image shown in the company identification section.
Next, adjust your logo for the best fit and click the Confirm button. If everything is correct, simply save the edits made in the company registration.
If you wish to remove the image, just click the Remove button, and a default system image will be displayed in its place.
The company logo will mainly appear in the upper right corner of the screen, as shown in the image below.
NOTE: The image may take some time to load. In addition, it may be necessary to clear your browser cache.
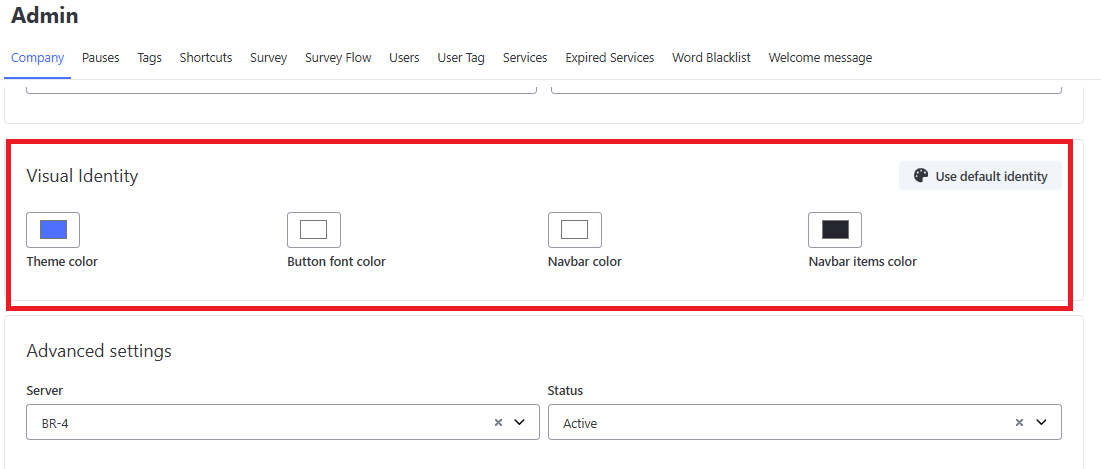
Visual Identity
The company's visual identity can be configured, in terms of colors, on the Company registration screen. The following can be changed:
- Theme color
- Button font color
- Navbar color
- Navbar item color
The company's logo, registered on the Company screen, will appear in the navbar to align with the visual identity on the platform.
Do Not Allow Duplicate Registration
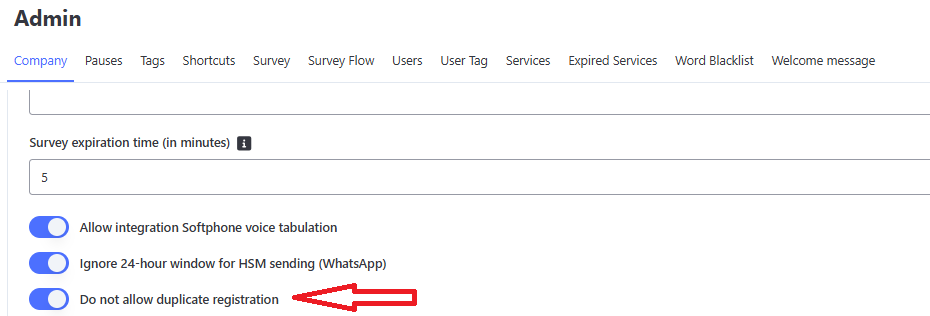
When this field is enabled, duplicate contact registrations cannot be created.
Fields validated to ensure unique registrations:
- CPF
- Phone
- CNPJ
Field: Do Not Allow Duplicate Registration
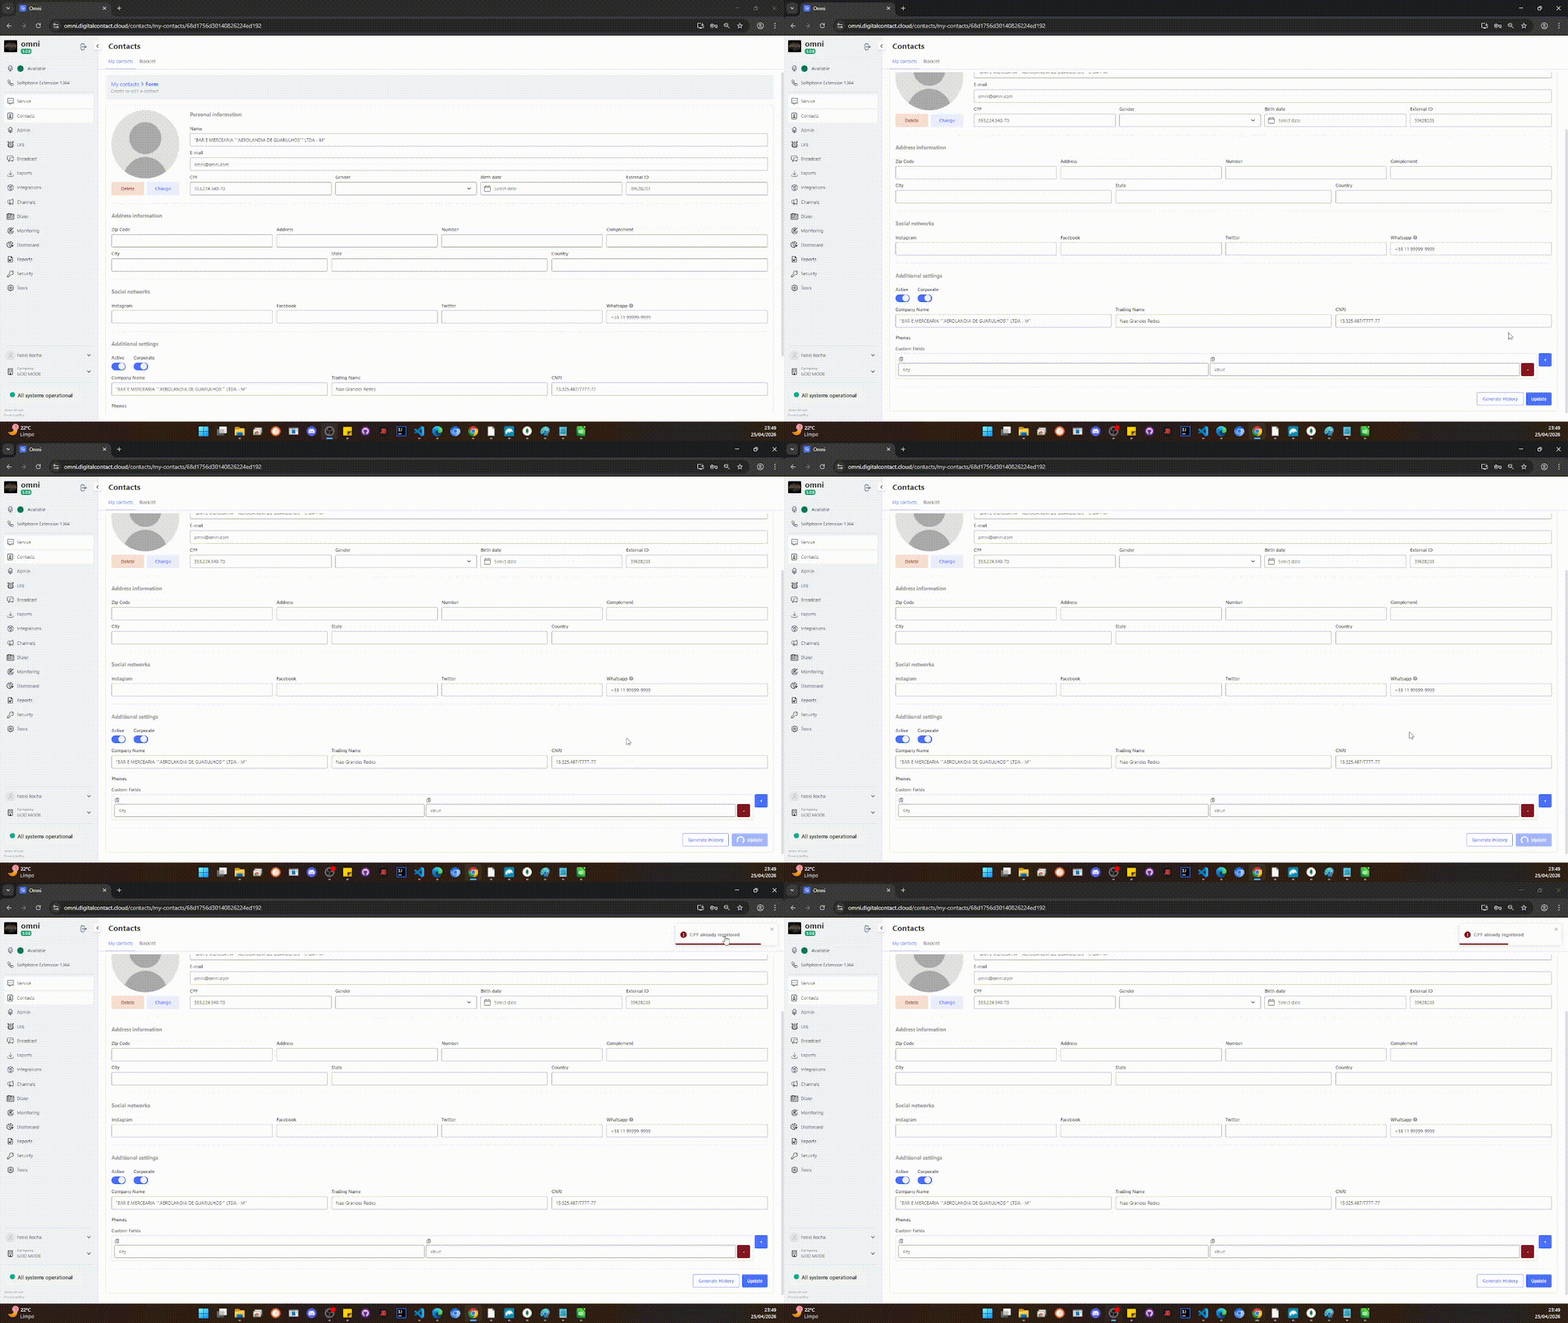
When attempting to register or edit contacts that contain repeated information, the system will highlight the fields indicating that the information has already been registered previously.
Duplicate Registration Validation
Custom Webhook Registration
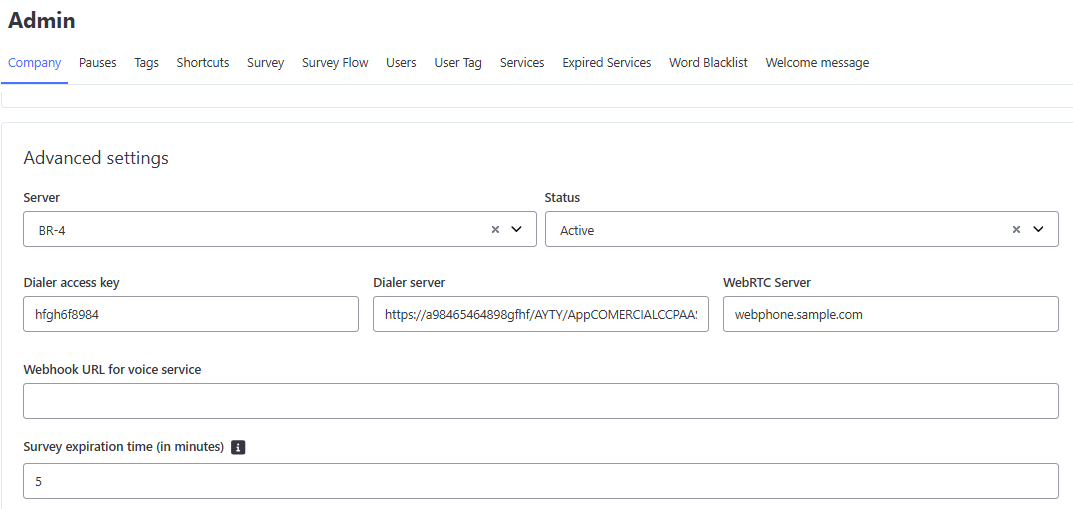
In Omni, it is possible to configure a custom webhook. This webhook serves as a dedicated channel for sending voice events, which are automatically forwarded to the URL specified in the application.
You can define a specific endpoint that will act as the final destination for all captured voice events, ensuring that the information is transmitted directly to the system designated in the configuration.
Custom Webhook Registration
Company Deactivation and Deletion
The functionality to deactivate a company (Organization) is a critical and irreversible action within Omni. It must be used with extreme caution, generally in scenarios of contract termination or massive operational restructuring, as it removes access, ends active flows, and deletes essential integration settings.
🛑 Impacts of Deactivation (Irreversible)
When confirming the deactivation of the Org, the system automatically performs the following actions, with no possibility of reversal:
- Total deletion of queue attendances: All customers waiting for attendance in queues linked to this Org will be removed.
- Automatic tabulation of screen attendances: Active attendances on agents' screens will receive the system's default finalization tag.
- Removal of configurations: Integrations and channels (such as native WhatsApp or IVR) will be completely deleted, cutting off communication instantly.
🔒 Safe Step-by-Step Deactivation
Due to the high risk of the operation, the system enforces a mandatory security lock that requires the user's conscious confirmation before enabling the delete button.
- Access the Administrative menu > Companies.
- Locate the company you want to deactivate and use one of the following paths:
- Click directly on the Deactivate option in the listing;
- Or access the company edit screen and change the status to Deactivated in the advanced settings.
- An alert modal will be displayed, listing all irreversible impacts.
- To validate the operation and activate the final delete button, you must type exactly the word DELETE (in uppercase letters and without quotes) in the indicated text field.
- Only after typing correctly will the Delete button (in red) become active for the final click.
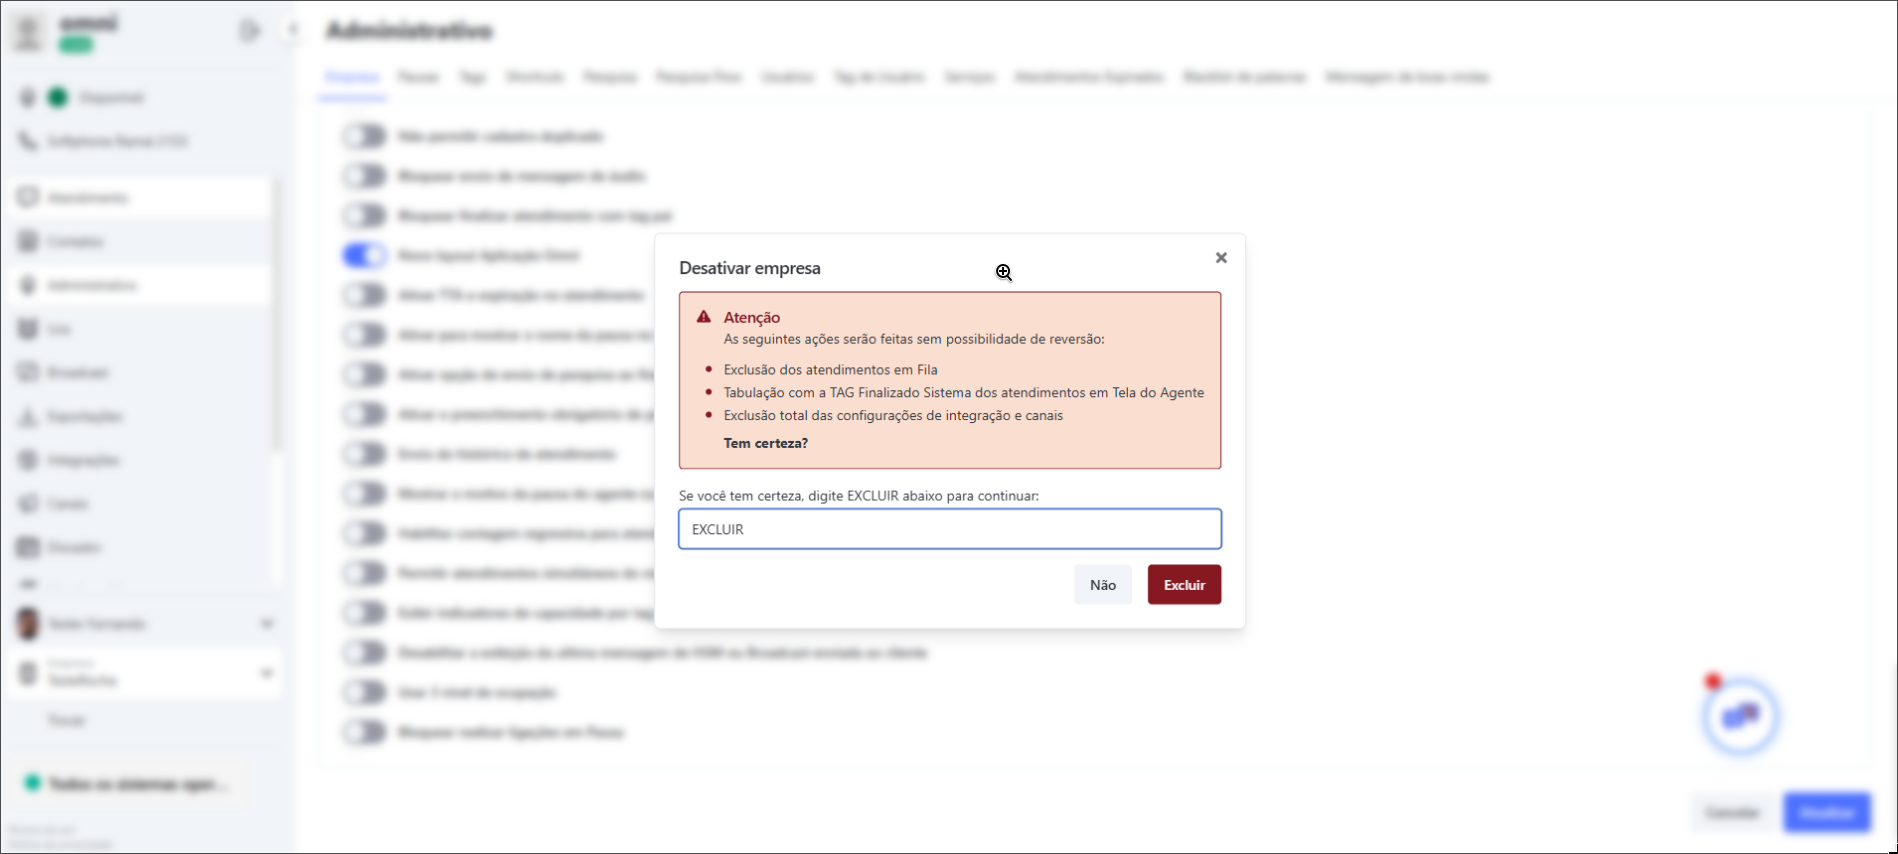
⚠️ Attention: If the "Delete" button remains gray (disabled), check that you typed the confirmation word correctly and without extra spaces.
Omni Experience in Spanish
Omni allows you to use the system entirely in Spanish, breaking boundaries and offering a native and seamless experience for international operations. When this feature is enabled, the entire interface is adapted to ensure that the attendance team has comfort, accuracy, and natural navigation, while maintaining the standard of excellence.
How to Enable the Language
For the international experience to be perfect, we need to align the system settings with those of your device. Follow the steps below:
📌 Mandatory Requirement
The browser must be configured with Spanish (Latin America) as the preferred language. This ensures that dates, currencies, and regional terms are interpreted correctly.
🚀 Step-by-Step Activation
- Access the Companies menu in the administrative panel. 🏢
- Use the search field to locate the desired company.
- Within the company settings, navigate to the Additional Information section. 📂
- Find the Language field and select the Spanish option.
- Click Save to record the change.
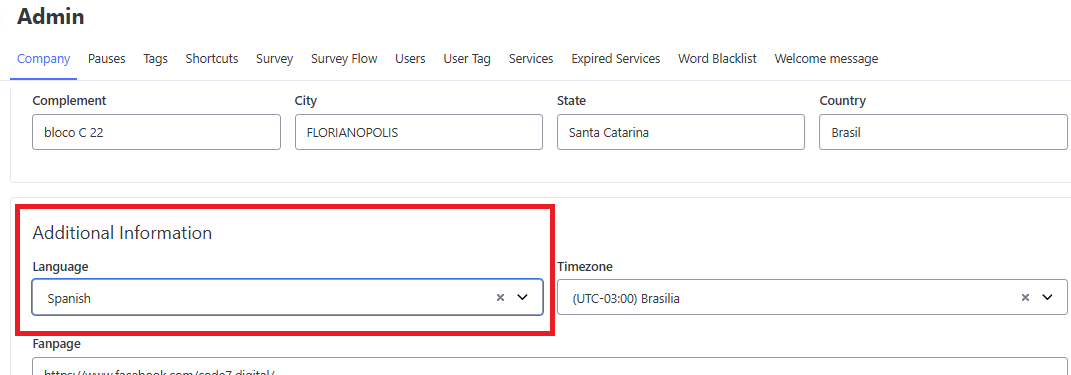
🔄 Applying the Changes
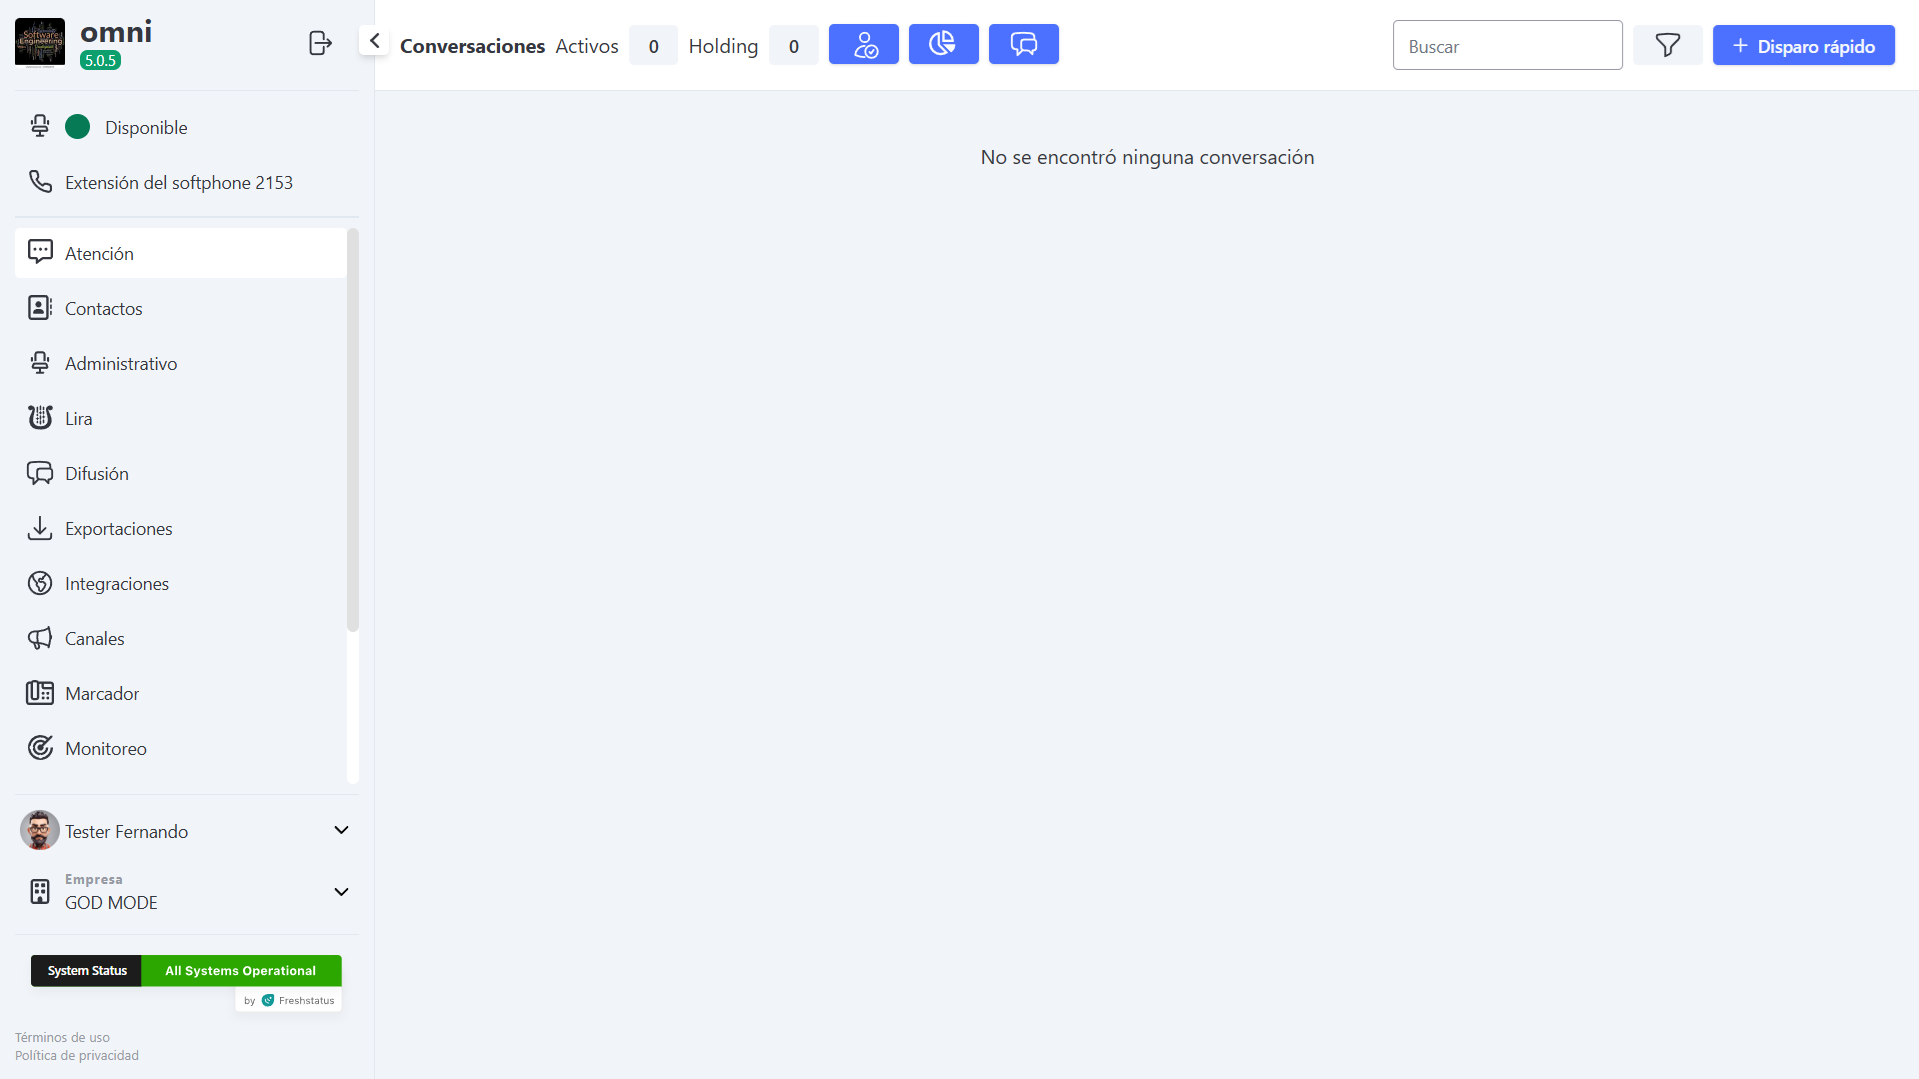
For Omni to "learn" the new language and update all interface components (Softphone, Dashboards, and Menus), it is mandatory to log out and log in again to the system. 🔐
After logging in, the system will already be fully operating in Spanish.
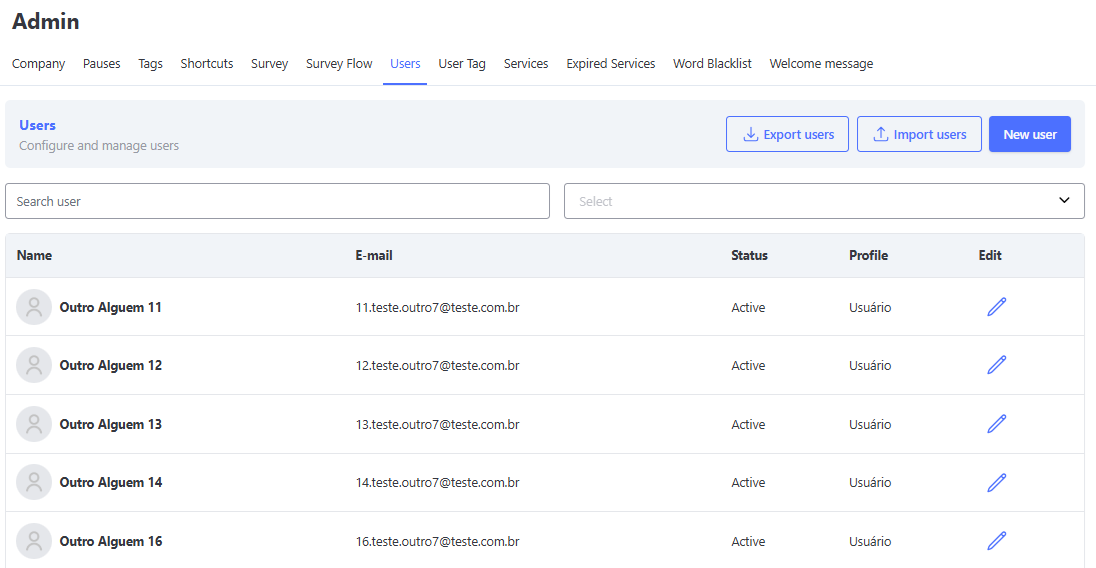
Users
The Users screen displays the users already registered in the organization and also provides the option to create a new registration as well as edit an existing one.
It shows the available fields with indicators for mandatory fields (*).
User Registration Screen
On the registration screen, there will be fields to provide the following information:
- Registration of new users
- Personal information
- Name – mandatory field
- CPF
- Email – mandatory field, as it will be used for the user's login
- Accepted format: The email must follow the RFC 5322 standard, containing:
- Allowed characters in the local part (before @): letters "a" to "z", numbers "0" to "9", dot (.), underscore (_), hyphen (-), and plus (+).
- The @ character is mandatory.
- Must contain only lowercase letters.
- Valid domain containing letters, numbers, dot, or hyphen.
- TLD (Top Level Domain) with at least 2 characters after the last dot (e.g., .com, .br, .org).
- Valid examples:
teste@gmail.com,usuario.nome@empresa.com.br,abc123@mail.co - Invalid examples:
TEste@gMail.com(contains uppercase letters),teste@gmail(no TLD),@gmail.com(no user),teste@.com(invalid domain),teste@gmail.c(TLD with 1 letter) - Not allowed characters: spaces, accents (á, é, ç, ã, etc.), special symbols such as
< > ( ) [ ] : ; \ , " ', line breaks, and tabs.
- Accepted format: The email must follow the RFC 5322 standard, containing:
- Phone – mandatory field
- Gender
- Date of Birth
- ZIP Code
- Country
- State
- City
- Address
- Number
- Additional Information
- Attendance profile information
- Default Outbound Voice Service – defines which service will be registered for the user's outbound calls. If this field is not filled, one of the services already registered for the user will be defined.
- Number of chats – refers to the total number of attendances the user can handle simultaneously. If not defined, 3 attendances will be set automatically.
- Status – Active or Inactive
- Automatic Softphone Login – Active or Inactive. This setting determines whether the user will be available for attendance immediately upon login.
- Services – select the services in which the user will perform attendances. You must register at least 1 service and up to 50.
- Editing already registered users
- Access level – Admin / Manager / User
- Permissions
Registering a user
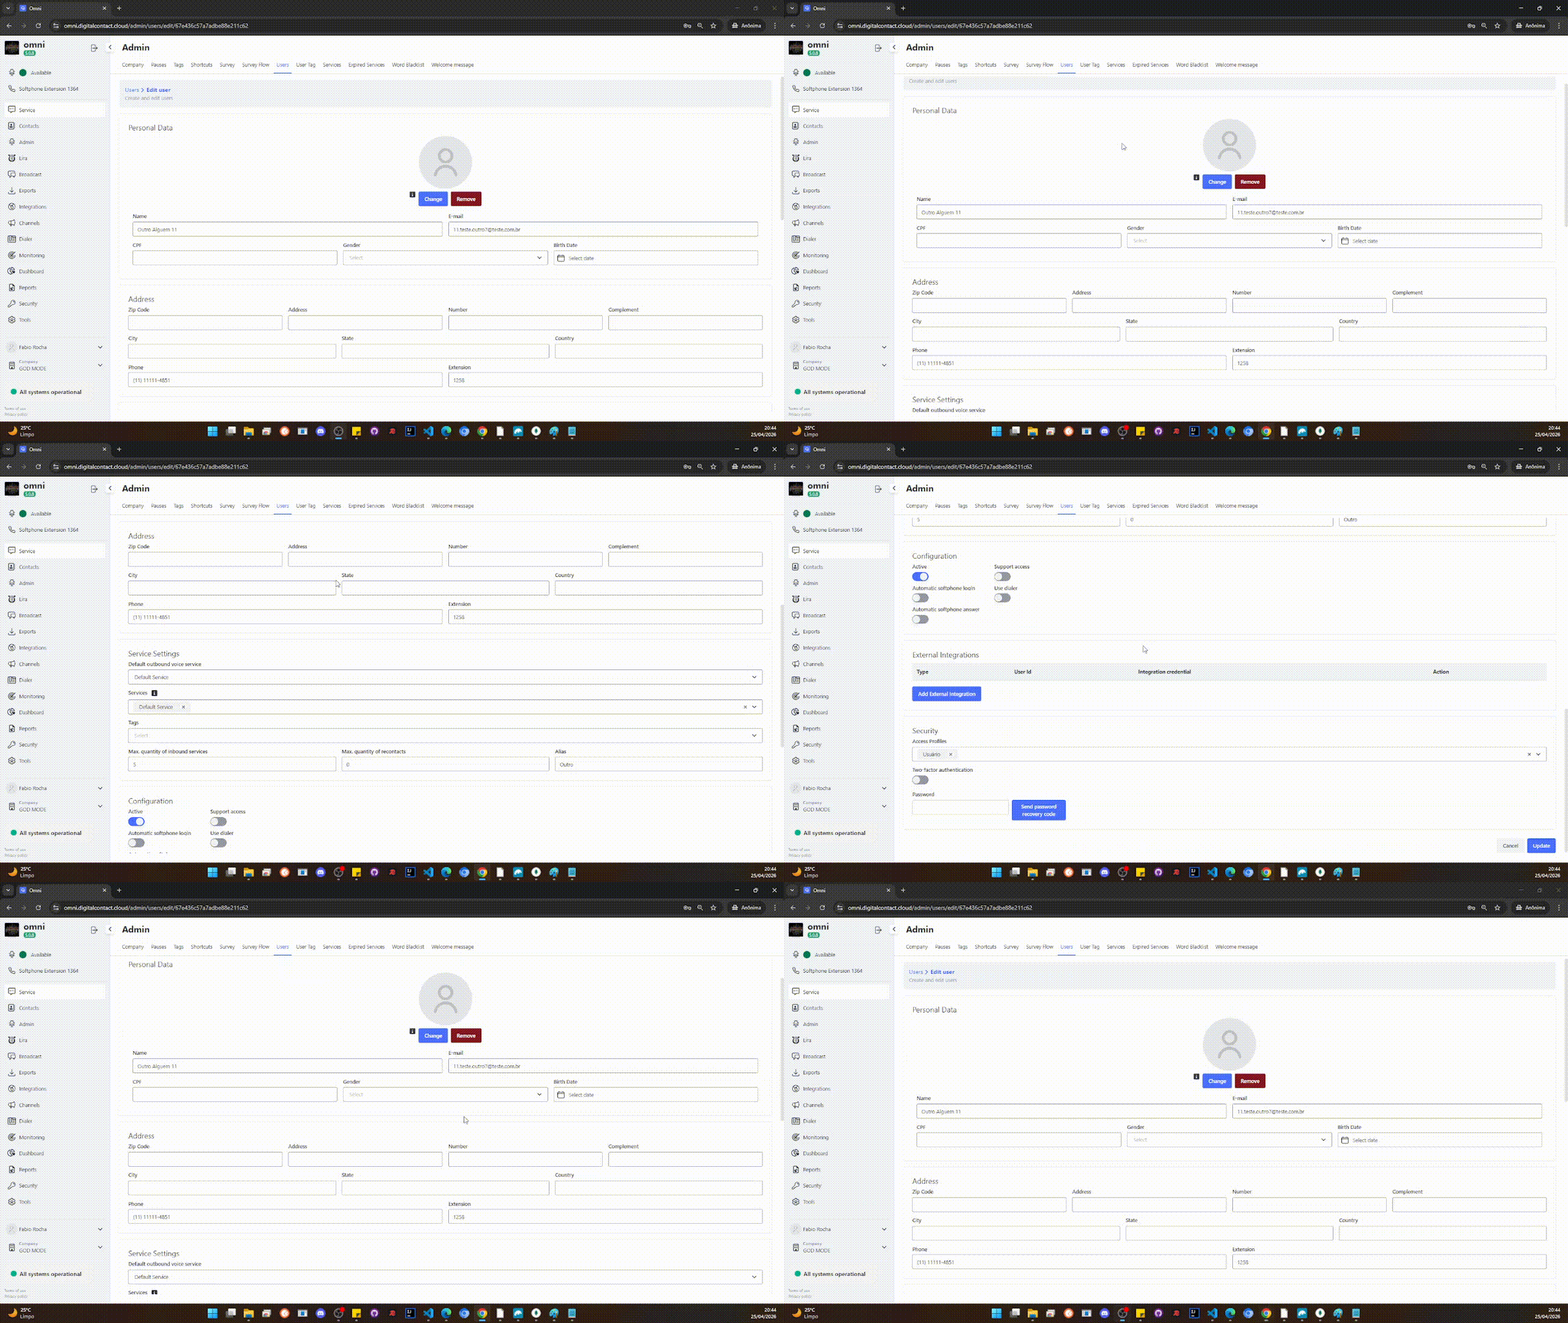
Note: The "Save" link will only be available on the screen after the mandatory fields have been filled in.
Security - Password - First Access
When the user registration is completed and saved, an email is sent to the new user containing a Token so that they can create a password and perform their first login.
Example of email received for password reset or first access of a new user
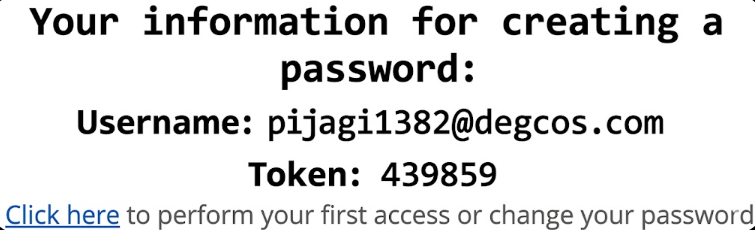
Security - Password - Recover Password
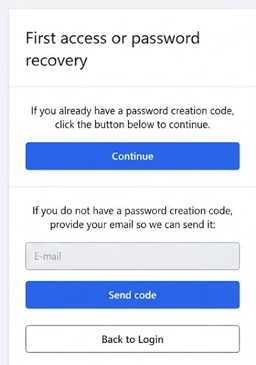
To recover the password, the process is similar to the first access. Simply click on the link "First access or recover password" and the user will receive an email with a new token that will be used to create a new password by following these steps:
- Click on "First access or recover password"
- Click on "Continue"
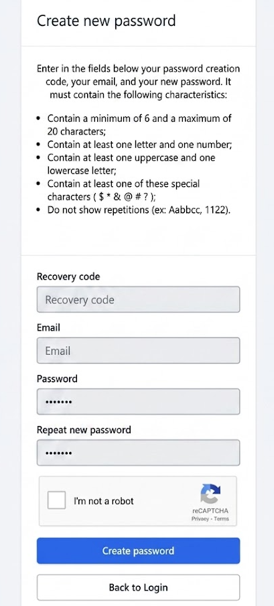
- Enter the email
- Enter the token
- Enter the new password
Example of email received for password reset or first access of a new user
Password recovery or first access screen
Entering data for password registration
Valid Password and Login
The password must meet the following requirements:
- Have at least 6 and at most 20 characters;
- Contain at least one letter and one number;
- Contain at least one uppercase and one lowercase letter;
- Contain at least one special character ($ * & @ # ?);
- Must not contain repetitions (e.g., Aabbcc, 1122).
Security - Optional Two-Factor Authentication - First Access
For companies that wish to increase the login security of their users, Two-Factor Authentication has been implemented. Through the Google Authenticator app, a second token is generated for login.
User Registration with Two-Factor Authentication
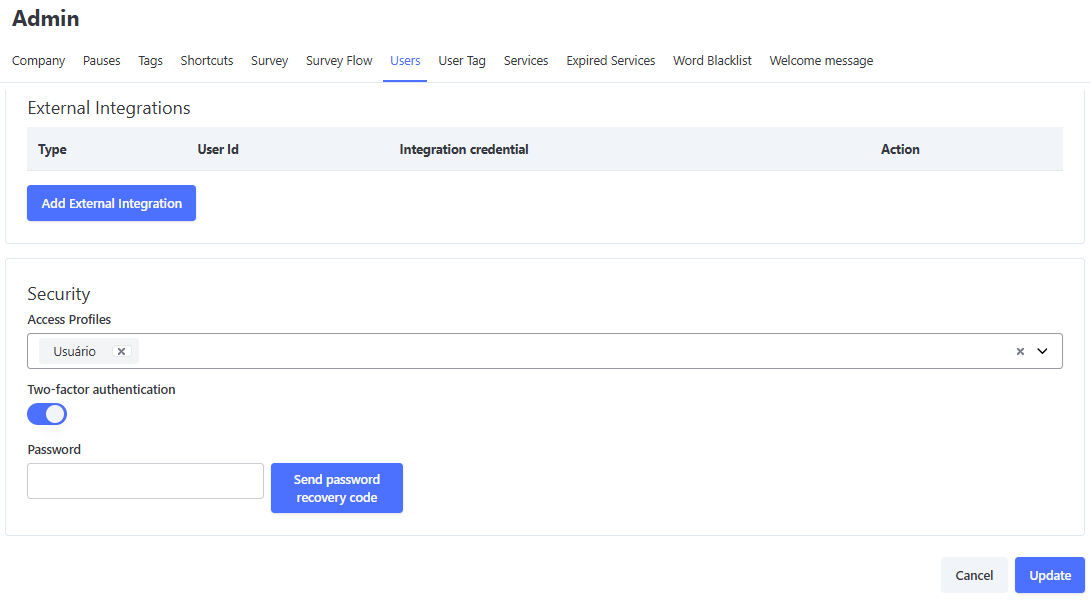
After the user registration is created with the "Two-Factor Authentication" field enabled, on the first access a QR code will be displayed. This code must be used in Google Authenticator to generate the token for login. The QR code will only be available during the first access or when changes are made in the User Edit screen. For subsequent logins, the QR code will not be shown once it has already been registered in the Google Authenticator app.
Two-Factor Authentication
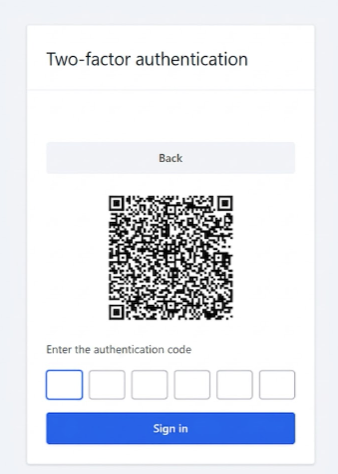
After the user registration is created with the "Two-Factor Authentication" field enabled, on the first access a QR code will be displayed. This code must be used in Google Authenticator to generate the token for login. The QR code will only be available during the first access or when changes are made in the User Edit screen. For subsequent logins, the QR code will not be shown once it has already been registered in the Google Authenticator app.
Permission table
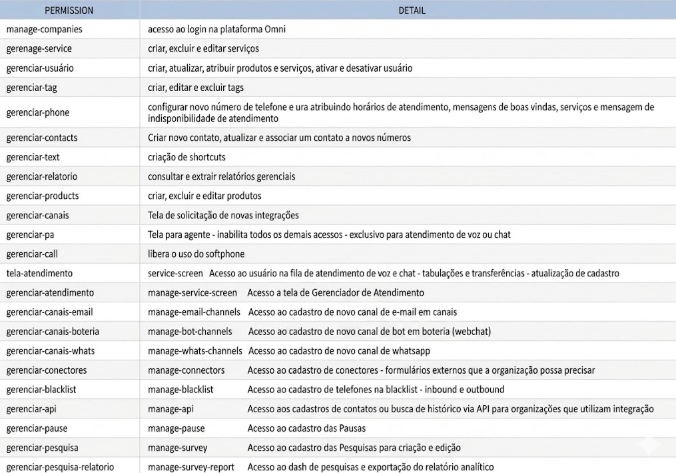
Creating Users with a CSV File
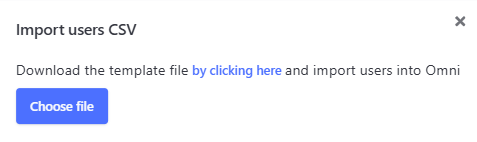
You can create users in Omni through a .CSV file.
To do this, you can click the "Import Users" button.
Import Users Button
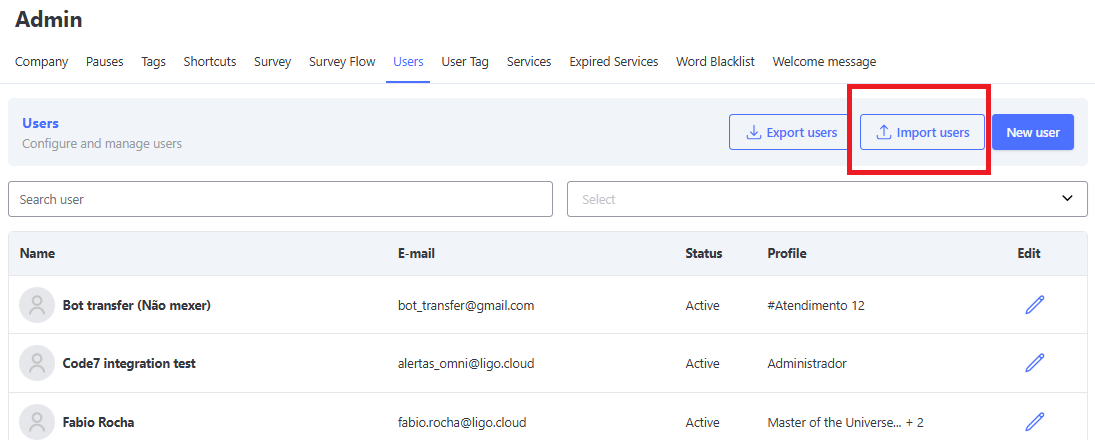
The data that can be imported in the file are:
- name: User's name (Mandatory Field)
- e-mail: User's email (Mandatory Field)
- phone: User's phone (Mandatory Field)
- password: Password (Mandatory Field)
- service: Service, provide by ID (if left blank, only the "default service" will be added)
- profile: Access profile, provide by ID (if left blank, the "User" profile will be added, which only grants access to the attendance screen)
- Note: The profile IDs can be accessed by going to the Security menu, then Profile Management, and clicking the Export CSV button.
- max_attend: Maximum number of inbound attendances per user (if left blank, the default value is 0)
Note: If necessary, you can download the template file and overwrite it with the required information.
User Import Screen
Prioritization of Attendances by Service (Primary Skill)
To optimize the distribution of digital attendances and ensure that priority demands are directed to the correct specialists, Omni now includes the Primary Skill rule.
This functionality allows defining a main preference service for each user, ensuring that the agent receives calls from this priority queue before attending to other demands.
👤 Configuration in User Registration
In the user management menu, the Primary Skill field has been added:
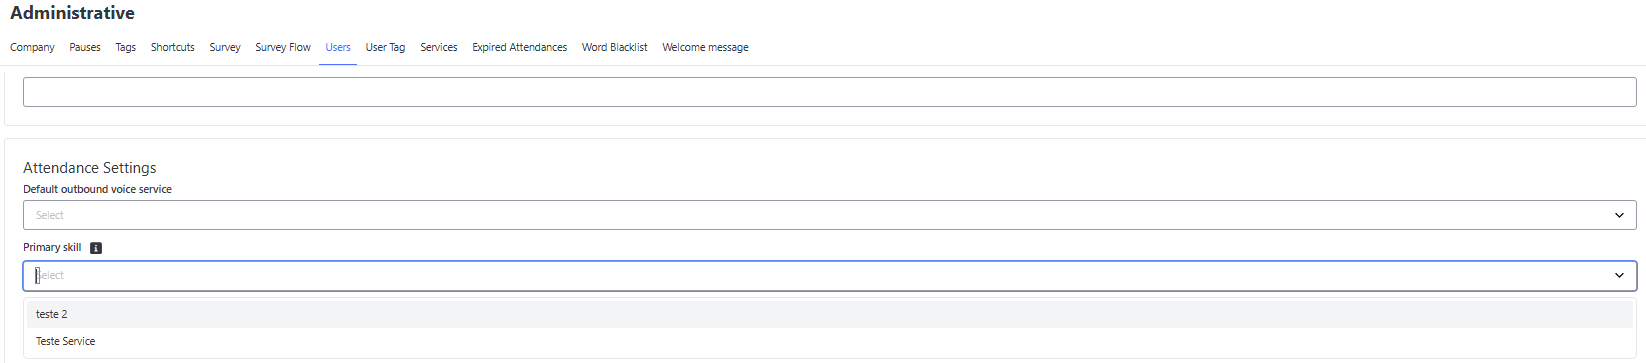
- Service Selection: Allows selecting 1 text service (such as WhatsApp, Chat, Telegram, etc.) to be the number one priority for that operator. Voice services are not listed in this field.
- Optional Filling: The field is not mandatory. If the user does not have a Primary Skill defined, they will continue to receive attendances through the system’s standard distribution rule.
⚙️ How the Distribution Rule Works
When a new interaction enters the Omni queue, the distribution engine follows the following priority flow:
- 🎯 Search for Specialist (Primary Skill): The system first checks if there is any agent available who has that service configured as Primary Skill and who still has free attendance capacity (slots available).
- 🔄 Standard Distribution: If there is no agent with that Primary Skill free at the moment, the platform proceeds to the traditional distribution logic, delivering the interaction to other agents enabled in the service according to the queue and capacity.
💡 Note: The Primary Skill will always respect the maximum limit of simultaneous chat capacity configured for the agent.
📌 Points of Attention and Tie-Breaking Criteria
To ensure perfect understanding of the routine in daily operations, it is worth highlighting some important behaviors of the distribution engine:
- 👥 Multiple Agents with the Same Primary Skill: If more than one operator is available with the same service configured as Primary Skill, the system will use the platform’s traditional tie-breaking rules (such as the longest time without receiving calls) to define who will receive the attendance first.
- 📇 Customer Wallet Priority: The Customer Wallet rule overrides the Primary Skill. This means that if a contact with an active wallet enters attendance, they will be directed straight to their respective wallet owner, regardless of other agents having that service configured as priority.
User Integration
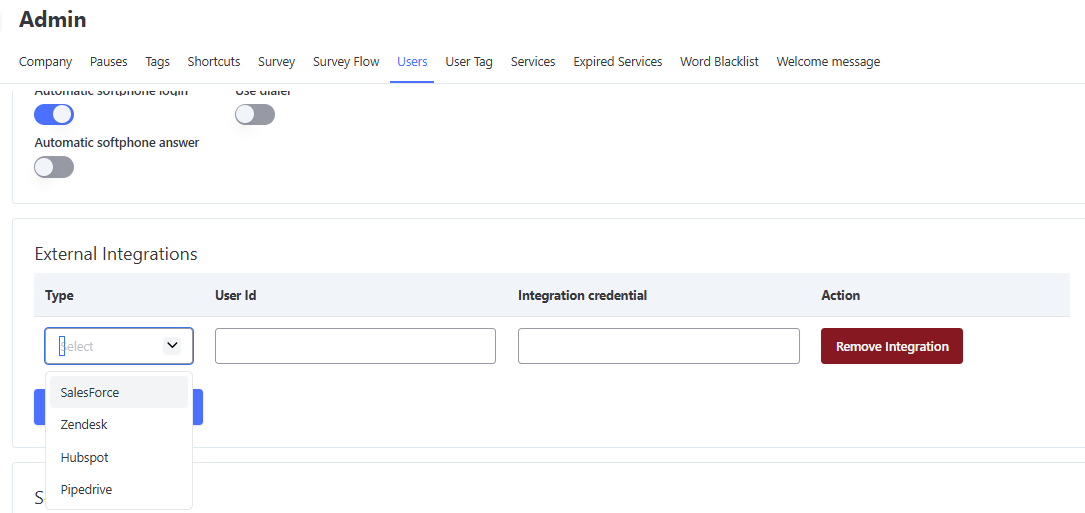
Integration allows users of our platform to synchronize their information with SalesForce, Zendesk, Hubspot, and Pipedrive services.
When configuring, you must provide:
- Integration type: the system in which the user is registered
- User ID: the ID of the user's registration in the external platform
- Email: the same email used in the external system
Registering External Integrations for the User
Services
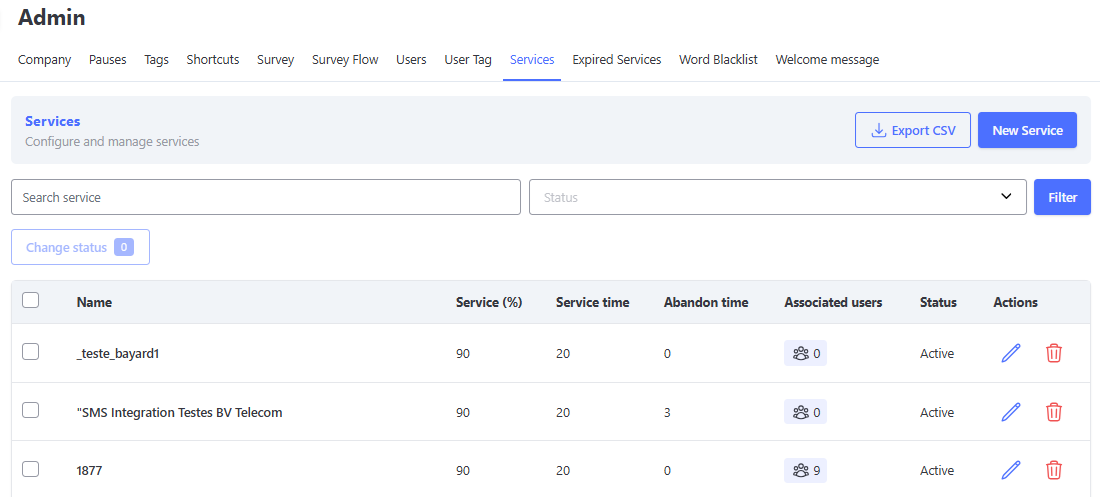
On the main Services screen you will find information such as:
- Download CSV of the services list
- Create a new service
- Activate/deactivate one or more services
- Service name
- Attendance (%)
- Service time
- Abandonment time
- Associated users
- Status
- Edit service
- Delete service
- Service search filters
Services Screen
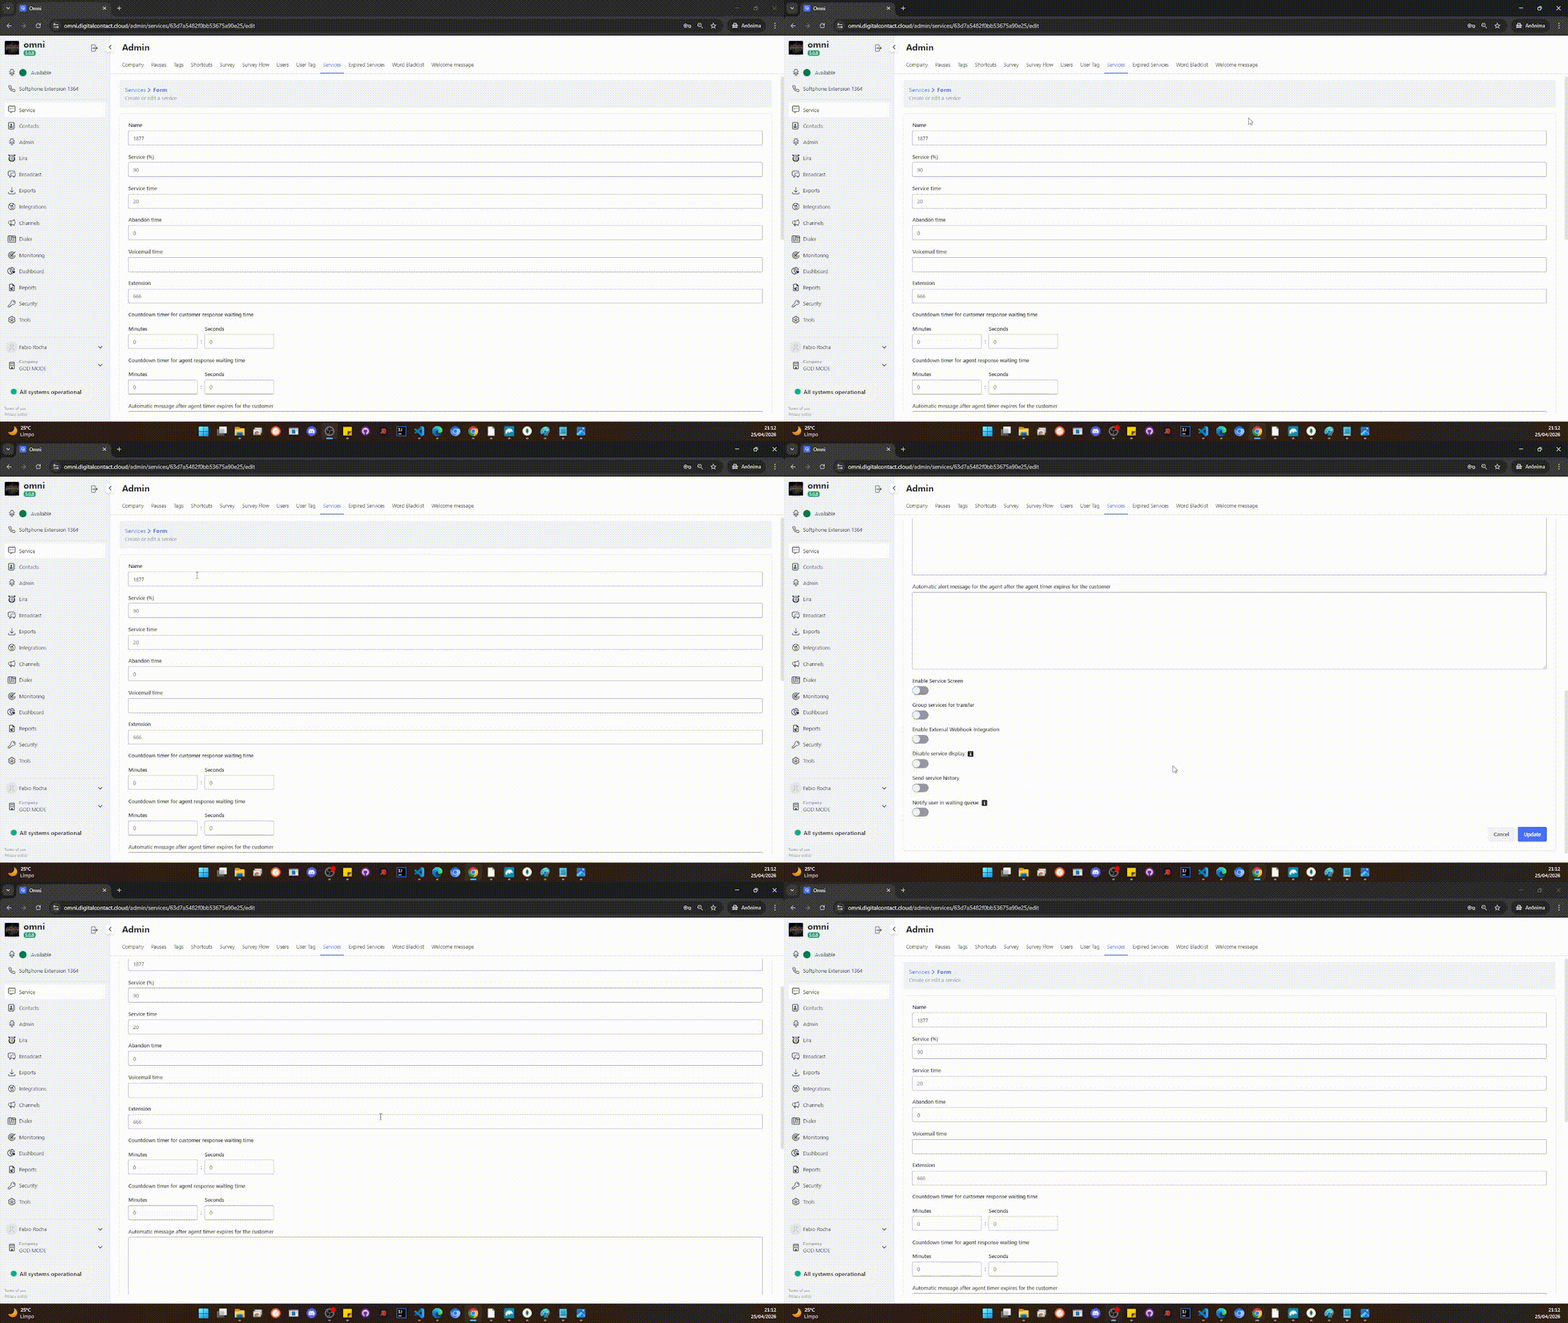
Registering New Services / Editing Services
-
Click the New Service or Edit Service button and fill in the following information:
-
Name – name of the service to be registered
-
Attendance (%) – desired attendance percentage for the service
-
Service Time (s) – desired time for the service to start
-
Abandonment Time (s) – acceptable time for the service to be abandoned
-
Internal Service Number (Extension) – must be registered with 3 digits and will be used for the user to transfer the call directly to the requested service
-
Enable Attendance Screen – whether the service will be enabled to be attended on the Attendance Screen
-
Enable External Webhook Integration – allows integration with external webhooks
-
Disable Service Display – if disabled, the service will not appear for transfers on the attendance screen
-
Notify User in Waiting Queue – when enabled, Omni will send messages to your client in the queue according to the configuration of the cards in the notification carousel
-
Notify Queue Position – when activated, Omni automatically sends the client’s position in the service queue. For this information to be displayed correctly, you must include the variable
{posicao_fila_atendimento}in the text of at least one of the notification carousel cards. This variable will be dynamically replaced with the client’s current position number.Example of use:
"Welcome to Omni! Your position in the service queue is 2. Please wait, you will be attended shortly."
Registering or Editing Services
Notification Carousel
The Notification Carousel allows the warning messages that inform the client of their position in the queue to be customized.
To customize these notifications, the option Notify user in waiting queue must be enabled.
Activating and Registering Notification Carousel
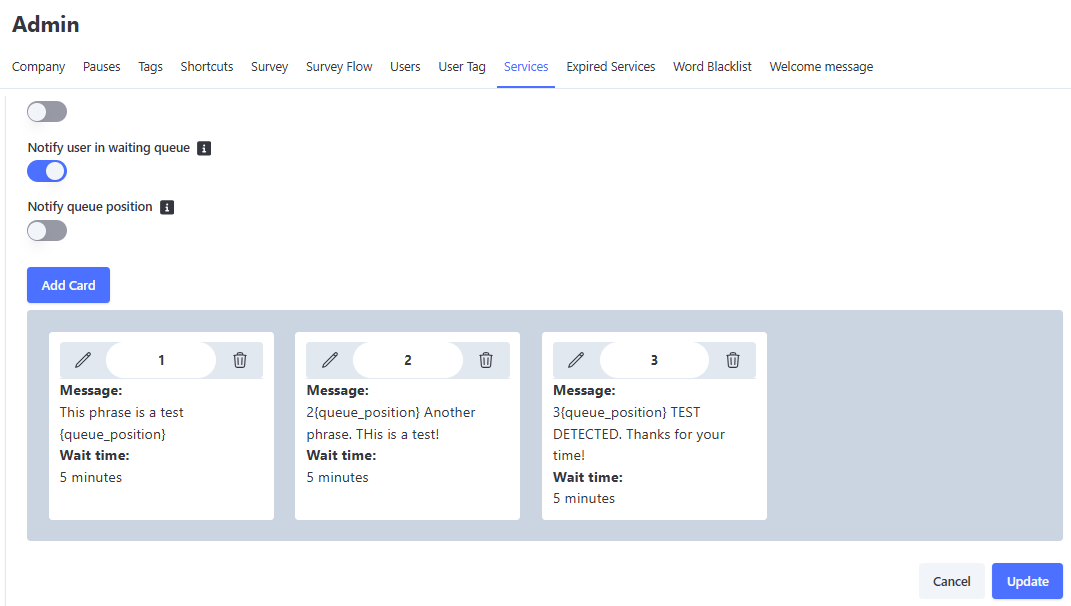
This notification carousel follows the following rules:
- Maximum of 30 cards.
- The first message must have a mandatory interval of 5 minutes.
- Subsequent intervals must be at least 5 minutes and at most 15 minutes after the last message.
- There must be at least 1 card (5 minutes).
- For the queue position to be displayed correctly, the card must contain the variable
{posicao_fila_atendimento}.
Carousel Operation
When registering the cards, if all are cycled through, the sending sequence restarts, and the client will receive the first messages again. Therefore, if only 1 card is created, the client will always receive the same message.
Cards can be moved among themselves, changing the order normally.
If any card configuration is changed while clients are already receiving notifications, it may take up to 5 minutes for the update to be applied. In this case, clients who were already on the tenth card will receive the first card again, thus restarting the sequence.
Important: All messages sent by the notification carousel will be recorded and saved in the service history, allowing complete tracking of communication with the client during the waiting period in the queue, through the "Observe conversation" function, until distribution and completion of the service in the history.
Linking Users to the Service via CSV File
In Omni, it is possible to add multiple users at once through a .CSV file.
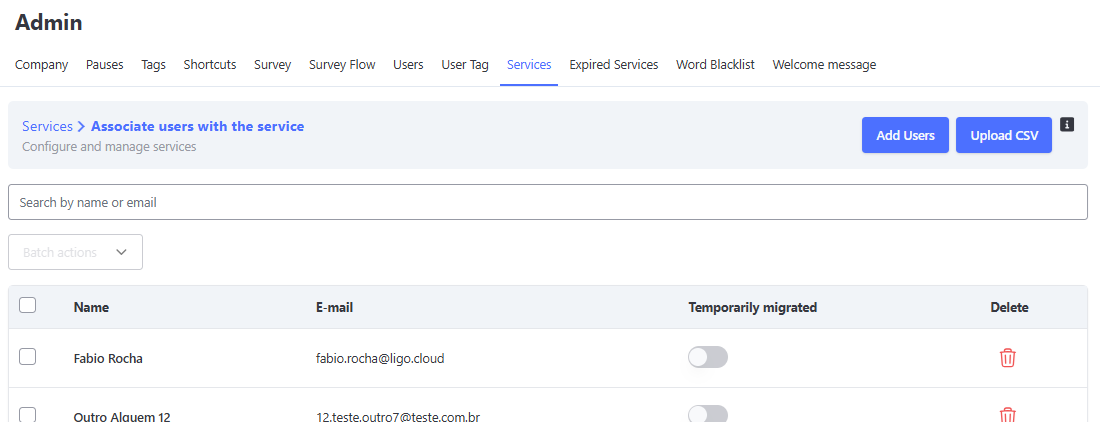
This CSV can be uploaded by clicking the button in the "Associated Users" column and then clicking "Upload CSV".
Associate Users Screen
The CSV template for adding users must be a simple list of emails separated by commas.
Example: example@example.com, example2@example.com, example3@example.com
Associating Users via CSV
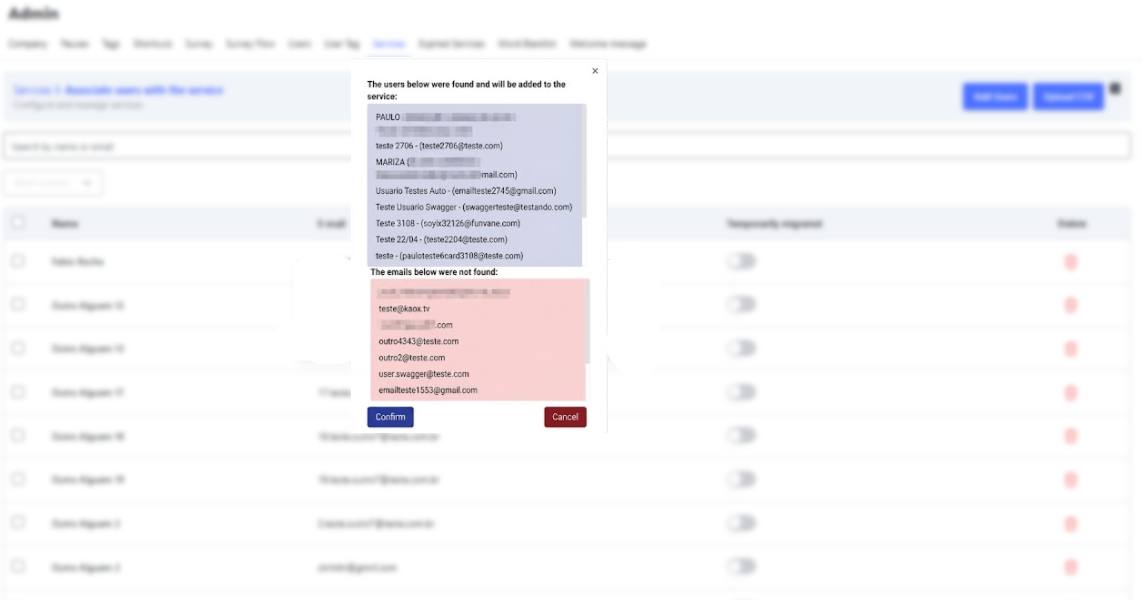
Note: After performing this operation, the affected users must log out and log back into the platform.
Transferring Attendance Between Specific Services
In Omni, you can select specific services to which an attendance can be transferred.
When creating or editing a service, you can enable the option: Group services for transfer
Enabling Transfers to Specific Services
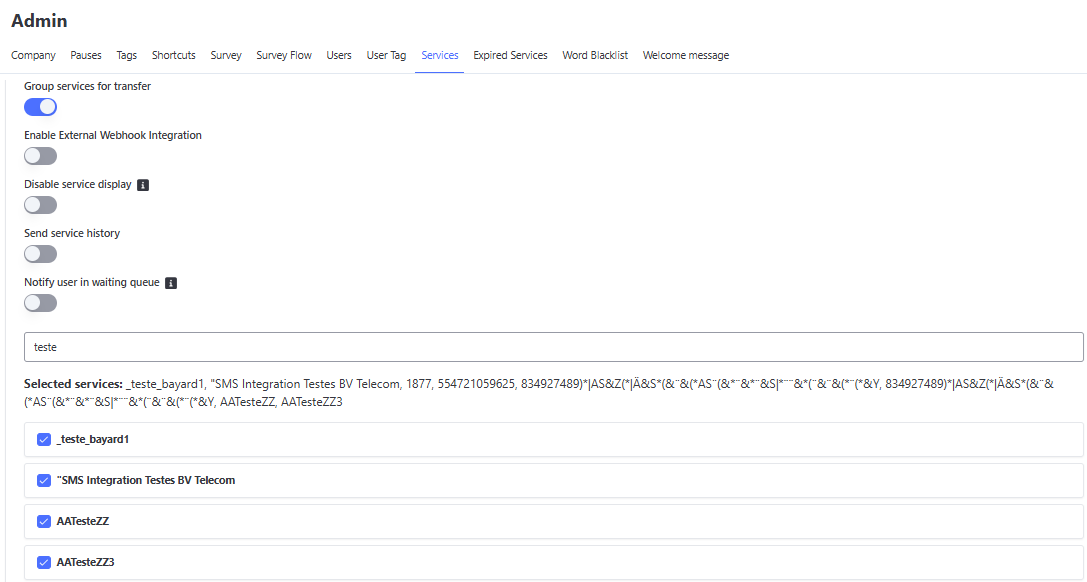
When enabling and selecting the services, when the agent performs a transfer between services, only the selected services in this list will appear.
Note: To enable this function in the service, it must not have a transfer tag linked in the Tag menu.
Tags
Tags are used to finalize attendances in Omni, allowing each interaction to be clearly organized and categorized.
They provide several configuration possibilities that enrich the service process and assist in the later analysis of contacts.
Main Purposes of Tags
- 📝 Information logging: defines how the attendance was carried out (e.g., sale, cancellation, new negotiation).
- 💬 Automatic closing message: sends a predefined text to the client when the attendance is closed.
- 🔄 Automatic transfer: allows the attendance to be redirected to another service when a tag is applied.
- 📞 Phone finalization: used when the operator identifies that the number does not belong to the contact.
- 🚫 Contact finalization: used when the client clearly states they no longer wish to receive calls or messages.
- 📊 Mandatory survey sending: defines whether a satisfaction survey will be sent upon closing.
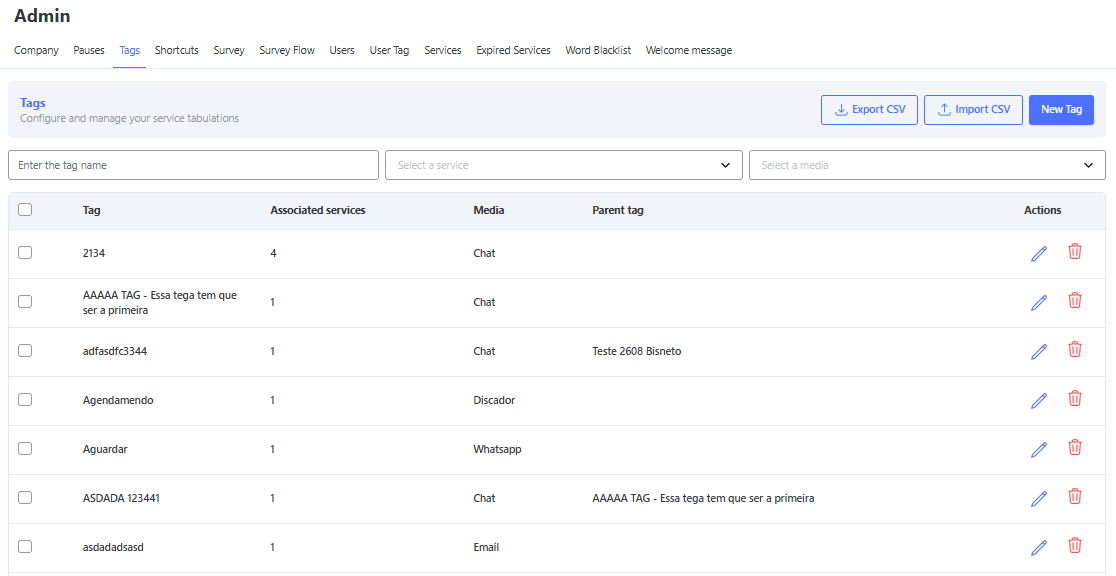
Main Tags Screen
On the main screen, the user can view all registered tags, as well as the number of associated services, linked media, and parent tag (if any).
It is also possible to edit or delete an already registered tag.
Registering a New Tag
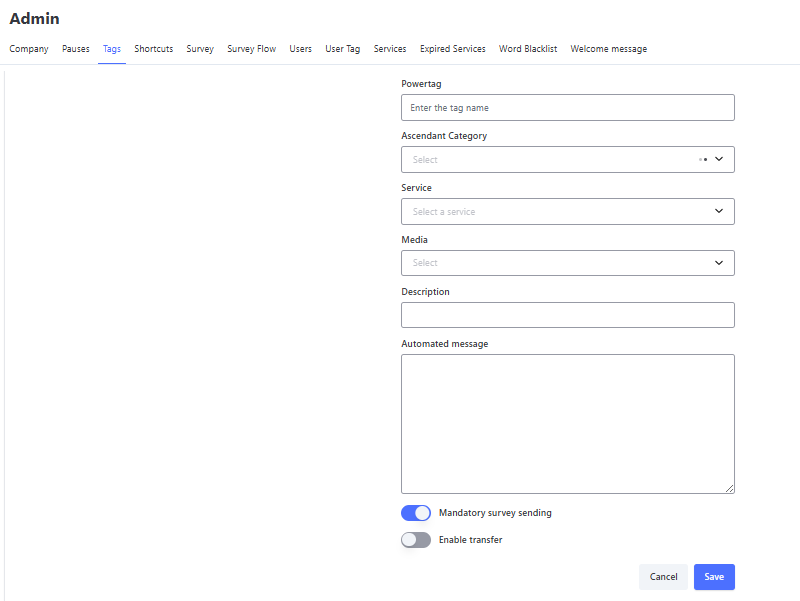
When creating a new tag, you must fill in the following fields:
- 🏷️ Powertag: free name that identifies the tag.
- 🗂️ Parent Category: allows you to select an existing parent category if you want to organize the tag in a hierarchy.
- 🛠️ Service: choose one or more services to which the tag will be linked.
- 📡 Media: select the media where the tag will be applied (e.g., Email, WhatsApp, Voice, Chat...).
- 📝 Description: explanatory text about the use of the tag.
- 💬 Automated Message: message that will be automatically sent to the client when the tag is applied.
- 📊 Mandatory Survey Sending: defines whether it will be mandatory to send the satisfaction survey when closing the attendance with this tag.
- 🔄 Enable Transfer: when enabled, you can indicate a service to which the attendance will be automatically transferred when the tag is applied.
Importing Tags via CSV
In addition to manual registration, the system allows batch import through a CSV file.
This option speeds up the process, enabling the creation of multiple tags at once in a standardized way.
Import Behavior
During import, the system validates whether the tag provided in the CSV file already exists.
- If the tag does not exist, it will be created normally.
- If the tag already exists, the existing record will be updated with the information from the CSV file, without creating a new tag.
This allows, for example, adding new services to an existing tag without the need to make manual changes.
📑 CSV File Filling Rules
Each line of the file represents a tag to be registered.
⚠️ Important: Fields marked with 🔒 are mandatory.
Other fields are optional and may be left blank.
- 🔒 Powertag: free name for the tag.
- Parent Category: ID of the parent category.
- 🔒 Services: IDs of the services, separated by
|. - 🔒 Media: must be filled in exactly according to the values available in the system:
- Chat
- ConsumidorGov
- Dialer
- fbmessenger
- omnichannel
- SMS
- telegram
- Description: explanatory text about the tag.
- Automated Message: message automatically sent to the client when the tag is applied.
- 🔒 Mandatory Survey Sending: choose between Y or N.
📌 Example of a Valid CSV
| Powertag | Parent Category | Services | Media | Description | Automated Message | Mandatory Survey Sending |
|---|---|---|---|---|---|---|
| Closed Successfully | a12f9c3|b45d8e7 | Attendance successfully completed | Thank you for contacting us, see you soon! | Y | ||
| Client Not Found | c89f1d2 | Voice | Could not reach the client | N | ||
| Transfer to Support | d34e7fa | e67b2a1|f90c3d4 | Chat | Redirect attendance to support | Y | |
| Service Cancellation | g12h4k9 | Client requested cancellation | Your cancellation request has been recorded. | N |
Shortcuts
What are Shortcuts?
Shortcuts are created to optimize attendance and standardize frequent responses.
Each shortcut must be linked to a service, ensuring that the agent uses messages appropriate to the context.
This helps with:
- ⚡ Agility
- 📝 Standardization
- ✅ Quality of attendance
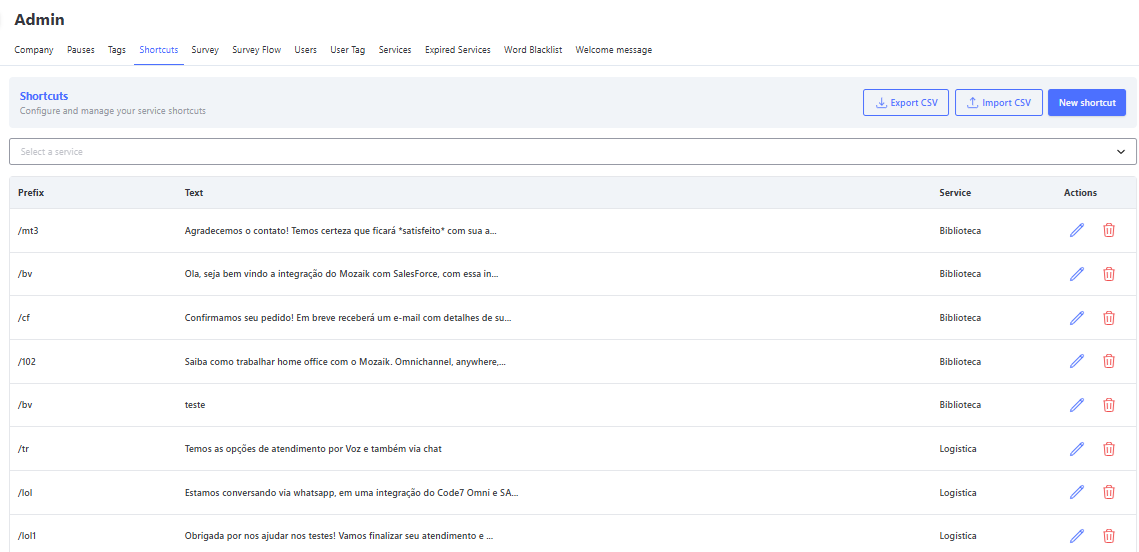
Shortcuts Screen
On the main screen, it is possible to view, edit, and delete all registered shortcuts.
🔍 Available Search Filters
- 🔤 Filter by Prefix: Allows locating shortcuts through the activation term (the configured prefix). The search is intelligent and accepts both the full term and a partial search (returning all shortcuts that start with or contain the typed text).
- 🛠️ Filter by Service: Allows segmenting the listing based on attendance queues. When selecting a specific service, the system will filter and display only the shortcuts that were explicitly linked to that queue.
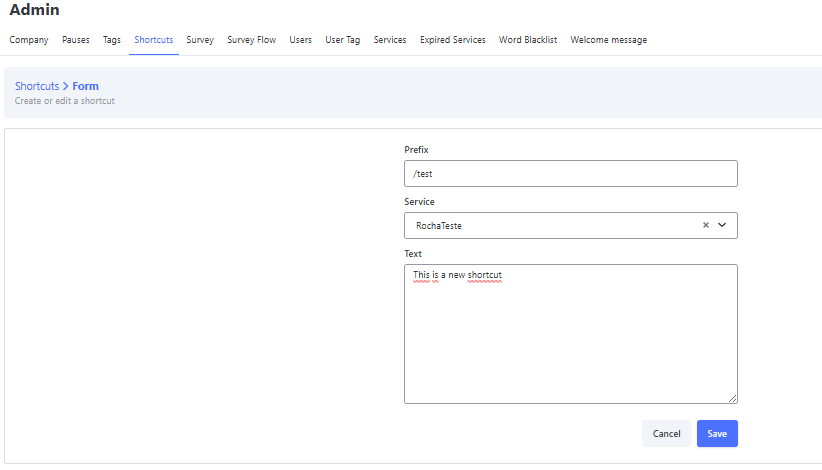
How to Register a Shortcut
To create or edit a shortcut manually:
- Access the Shortcuts menu in the admin panel.
- Click on "New shortcut" in the upper right corner.
- Fill in the following fields:
- 🏷️ Prefix: shortcut used by the agent (e.g.,
/hello). - 🛠️ Service: select the service to which the shortcut belongs.
- 💬 Text: message that will be automatically inserted when the shortcut is used.
- 🏷️ Prefix: shortcut used by the agent (e.g.,
- Click Save to finish.
How to Use on the Attendance Screen
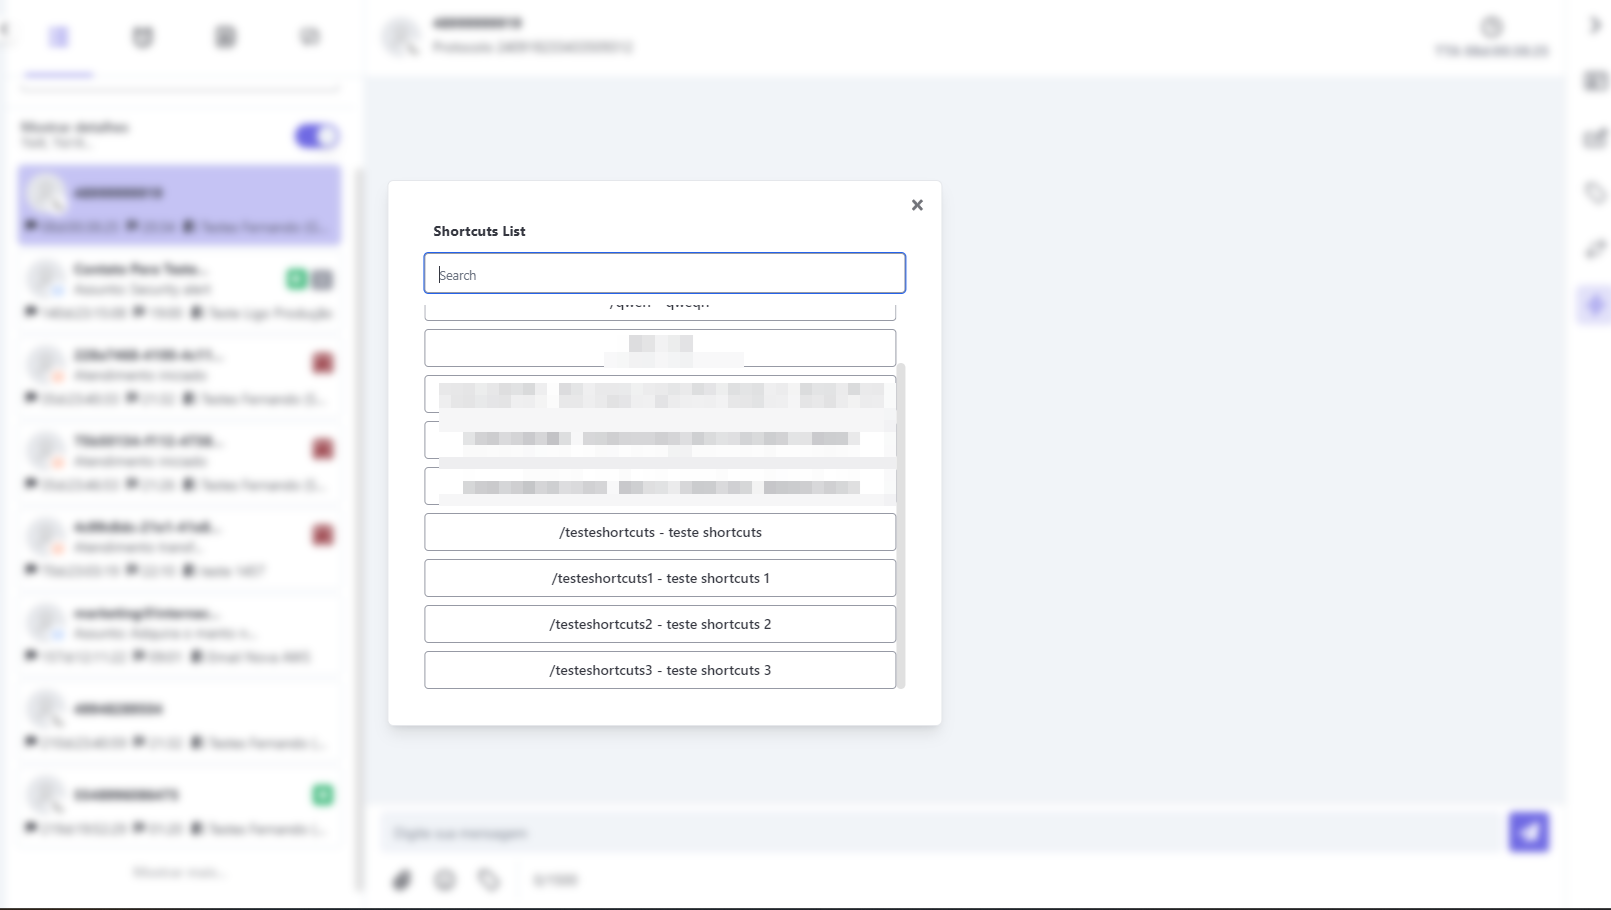
On the Attendance Screen, the agent can type the slash "/" to open the list of available shortcuts.
By selecting the desired shortcut, the system automatically inserts the configured text.
Exporting Shortcuts in CSV
The export feature allows downloading a spreadsheet with the registered shortcuts.
📋 Conditions
- If no filter is applied → the file will contain all shortcuts.
- If filters are active → only the filtered results will be exported.
🗂️ Fields in the Exported CSV
| Field | Description |
|---|---|
| CompanyId | Company identifier. |
| Prefix | Shortcut used by the agent (e.g., /help). |
| Text | Message content. |
| Service | Service associated with the shortcut. |
📊 Example of Exported Data
| CompanyId | Prefix | Text | Service |
|---|---|---|---|
| OMNI_001 | /hello | Hello! How can I help you? | Technical Support |
| OMNI_001 | /thanks | Thank you very much for your wait! | Customer Service |
| OMNI_001 | /help | We are here to help! | General Support |
This is the format in which the data is displayed in the exported CSV, allowing external analysis and easier management of shortcuts.
Importing Shortcuts via CSV
In addition to manual registration, it is possible to import shortcuts in batch using a CSV file.
📑 Filling Rules
⚠️ Important: all fields are mandatory.
The file must be in CSV format and respect character limits.
- 🔒 Prefix: shortcut used by the agent. Must start with
/and have a maximum of 40 characters. - 🔒 Service: can be provided by ID or by the name registered in the system (the name must be identical).
- 🔒 Text: message that will be inserted by the shortcut, with a limit of 800 characters.
📌 Example of a Valid CSV
| Prefix | Service | Text |
|---|---|---|
| /thanks | Support | We appreciate your contact! We are available. |
| /deadline | Logistics | The estimated delivery time is up to 5 days. |
| /cancel | Customer Service | Your cancellation request has been recorded. |
| /help | f9a1c23d | Please describe your question in more detail. |
Advantages of Using Shortcuts
- 💬 Quick responses → eliminates repetitive typing.
- 📝 Standardization → all agents use consistent messages.
- 🔍 Right context → each shortcut belongs to a service.
- 🧑💻 Fewer errors → reduces chances of incorrect typing.
- 🗂️ Simple management → easy to register, edit, and import in batch.
Pauses
Used to identify user pauses, the registration of Pauses helps team management to measure productivity indicators, since this information will appear in management reports.
Attendance Pause Screen
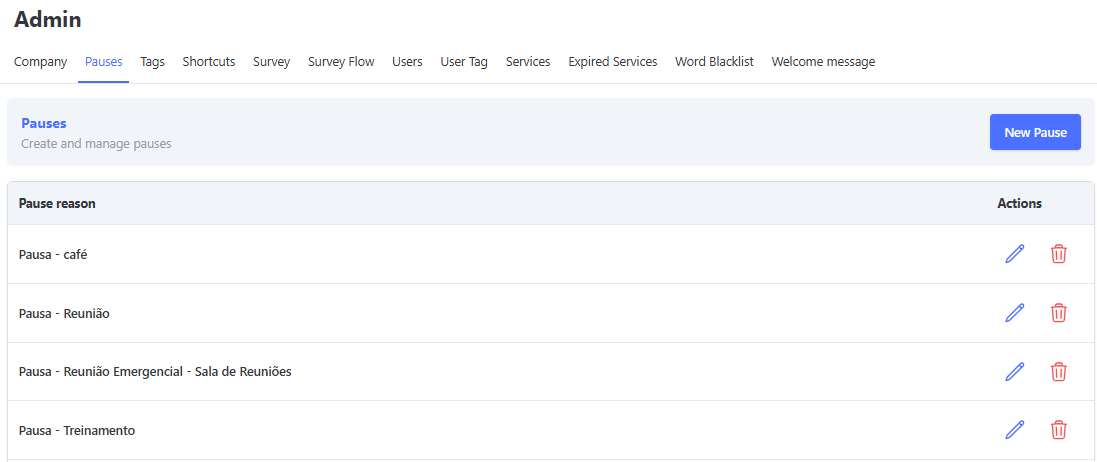
Your registration is simple: just click the "New Pause" button at the bottom of the screen and fill in the "Pause Reason" field.
To delete, simply click on the trash can icon.
Pause Registration Screen
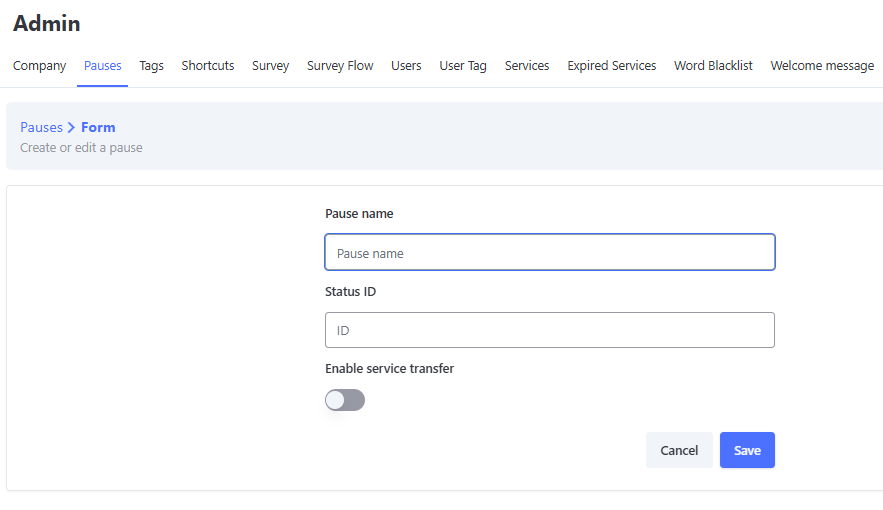
When the user goes on a Pause, they will find a list to choose the reason for the Pause they are taking.
Pause Usage Screen
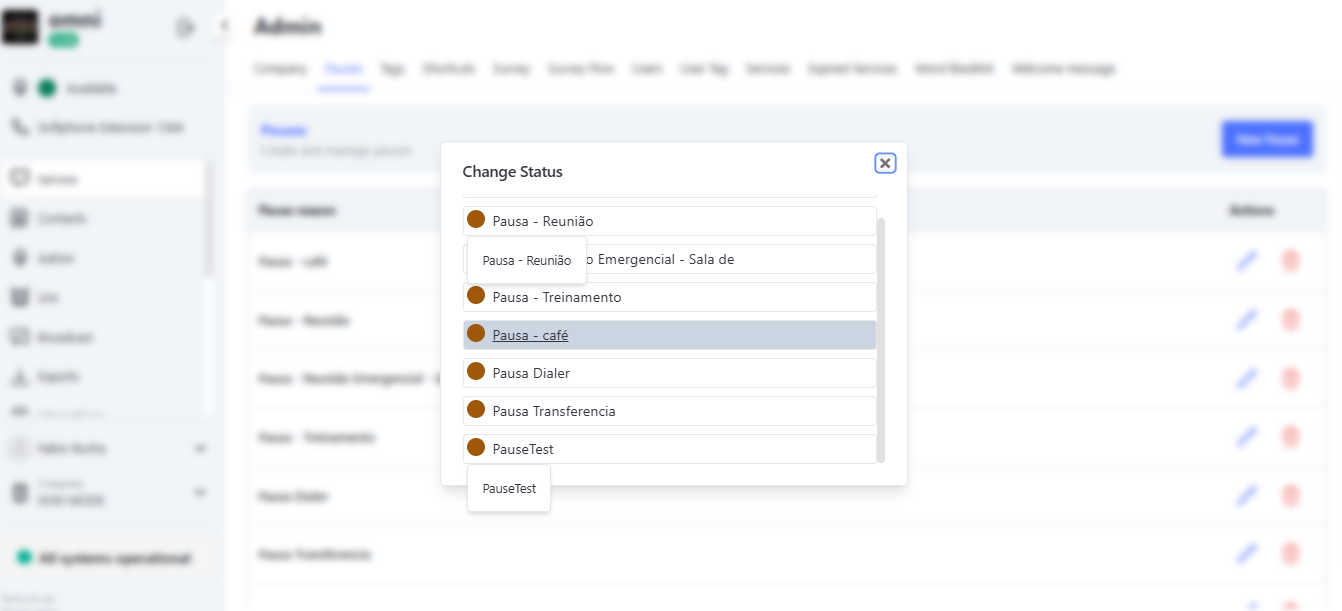
Pause Usage – Agent View Screen
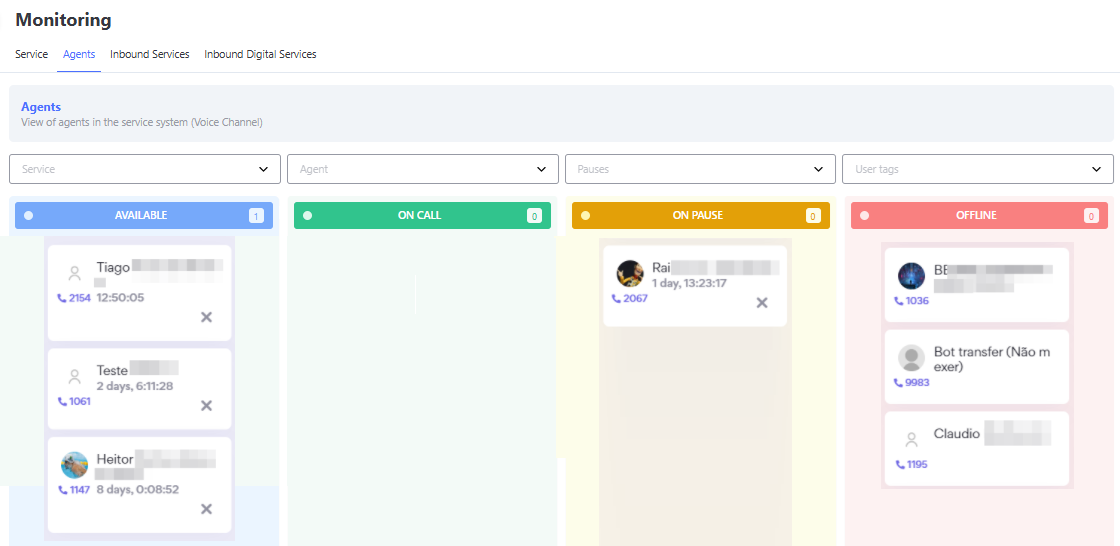
Agent Pauses on the Attendance Monitoring Screen
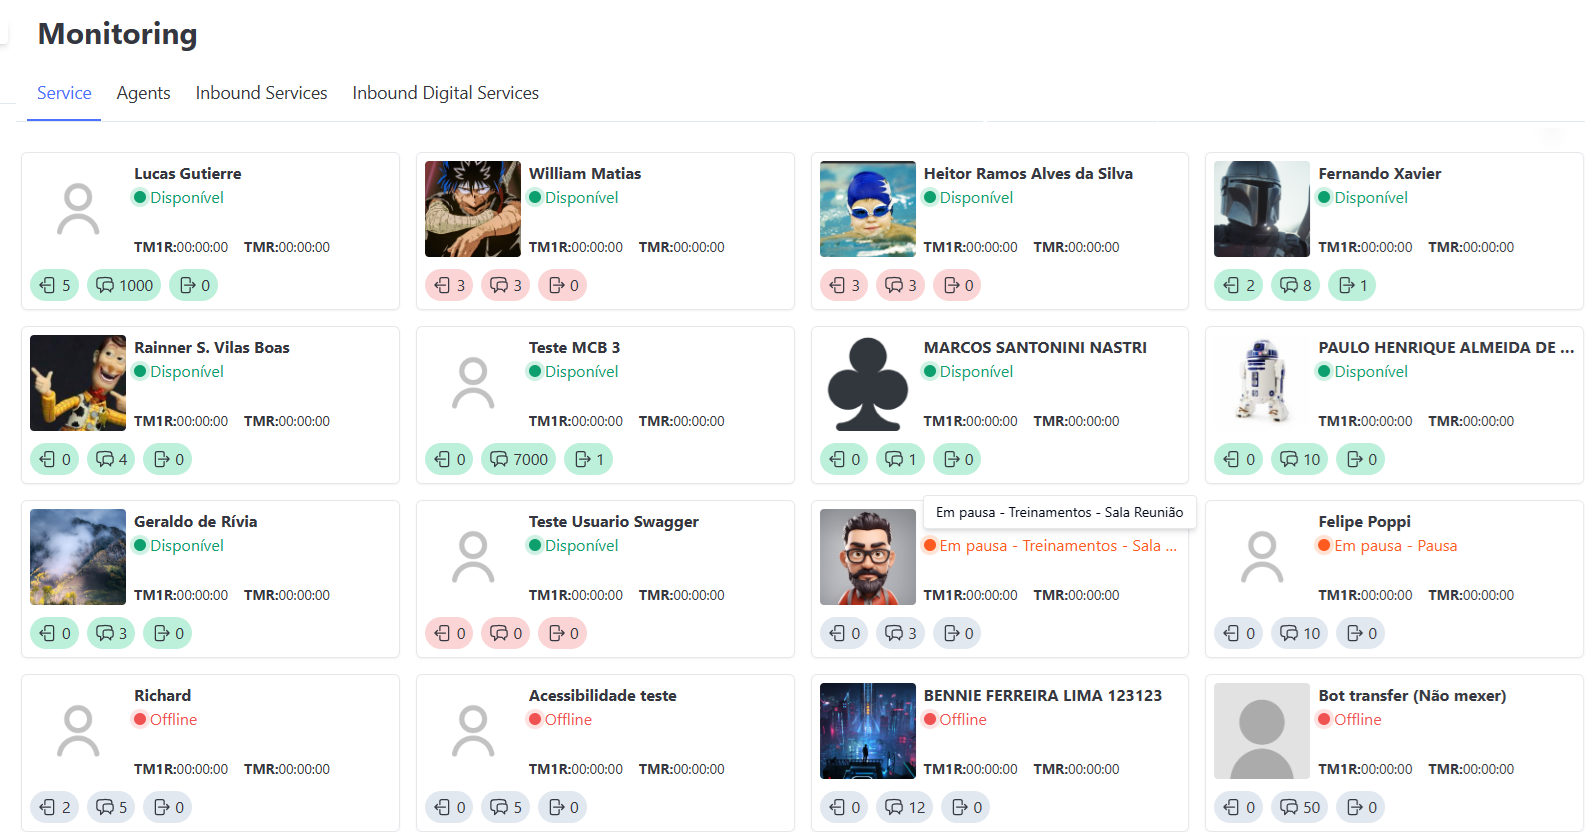
It is also possible to check the agent’s Pause on the attendance monitoring screen through cards.
To enable this, activate the flag Show agent Pause reason in attendance monitoring in the Company menu.
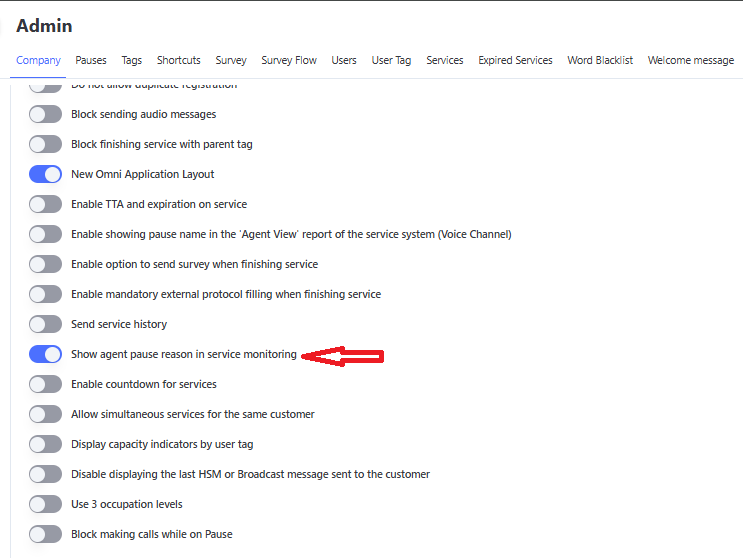
By activating the flag, you will be able to see the name of the Pause as previously registered on the attendance monitoring screen.
If you cannot see it instantly, you can log out and log back in, and the change will be reflected.
Automatic Transfer of Attendances During pauses
The Automatic Transfer During pauses feature is a strategic resource to ensure the flow of attendance. It allows configuring specific types of pauses that, when triggered by the agent, automatically return the attendances to the queue of the current service, removing them from the operator’s screen.
It is important to highlight that the system fully preserves the current status of the attendance during the transfer, including active cases or those on Hold/Personal Queue, whether Inbound or Outbound.
The goal is to prevent clients from waiting for a response while the agent is unavailable (e.g., during long pauses or emergencies), ensuring they are redistributed to other available operators with maximum priority.
🚧 Prerequisite
Activation Required: For the transfer functionality to be available in the company settings, it is mandatory to open a ticket with N3 Support.
The parameter release in the organization is done internally and must be requested before attempting to configure pauses.
⚙️ How to Configure
The activation of this behavior is done individually per Pause. This offers flexibility to define which Pause reasons should keep attendances on screen and which should force their return to the queue.
- Access the Administrative menu.
- Go to Pauses.
- Select Create Pause (for a new one) or Edit (for an existing one).
- Locate and check the option (Flag): Enable attendance transfer.
- Click Save.
⚠️ Attention: This configuration option will only be visible to users who have the specific permission enabled in the system to create and edit pauses and access the respective menu.
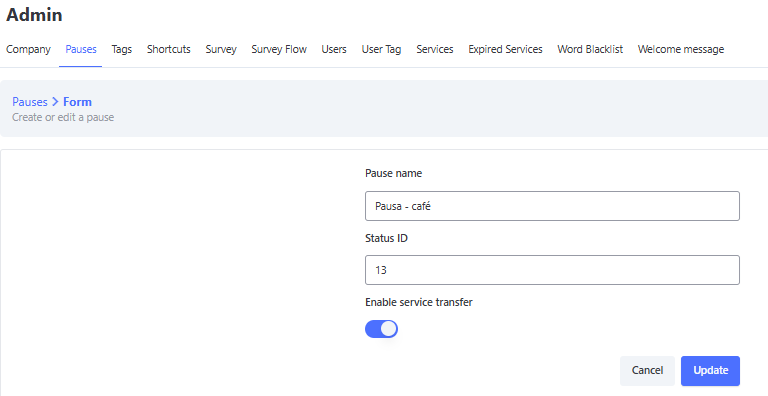
🚦 Distribution and Priority Rules
When a Pause configured with this functionality is triggered, the system performs the following instant actions:
- Return to Queue: All active attendances on the agent’s screen are automatically returned to the queue of the current service.
- 🚀 Maximum Priority (Priority 0): These attendances return to the queue with Priority 0.
- What does this mean? They "skip the line," positioning themselves ahead of new attendances to be distributed as quickly as possible.
- Tie-Breaking Criterion: If multiple attendances are transferred with Priority 0 (several agents entering pauses simultaneously), the system will prioritize the one with the longest total waiting time.
Important: Scope of Priority
The priority rule respects the Media and the Service Queue. This means prioritization occurs only among attendances competing in the same service:
- A WhatsApp attendance with Priority 0 will move ahead only of other WhatsApp attendances waiting in the same queue.
- It does not interfere with other service queues or other media.
🔄 Transfer between Source and Destination Services
In addition to returning to the original queue, the system allows configuring automatic transfer to a different service from the current one. This configuration is optional and should only be performed if the operation requires attendances to change queues when entering pause with transfer.
⚠️ Channel Restriction: This transfer functionality between source and destination services is available exclusively for the Boteria/Chat medium.
📌 Access Prerequisite
For the configuration menu to be visible, the user must have the active permission in the Security > Profile Management menu, within the Administrative role, through the permission: "Configure queue proxy rules".
🛠️ Link Configuration
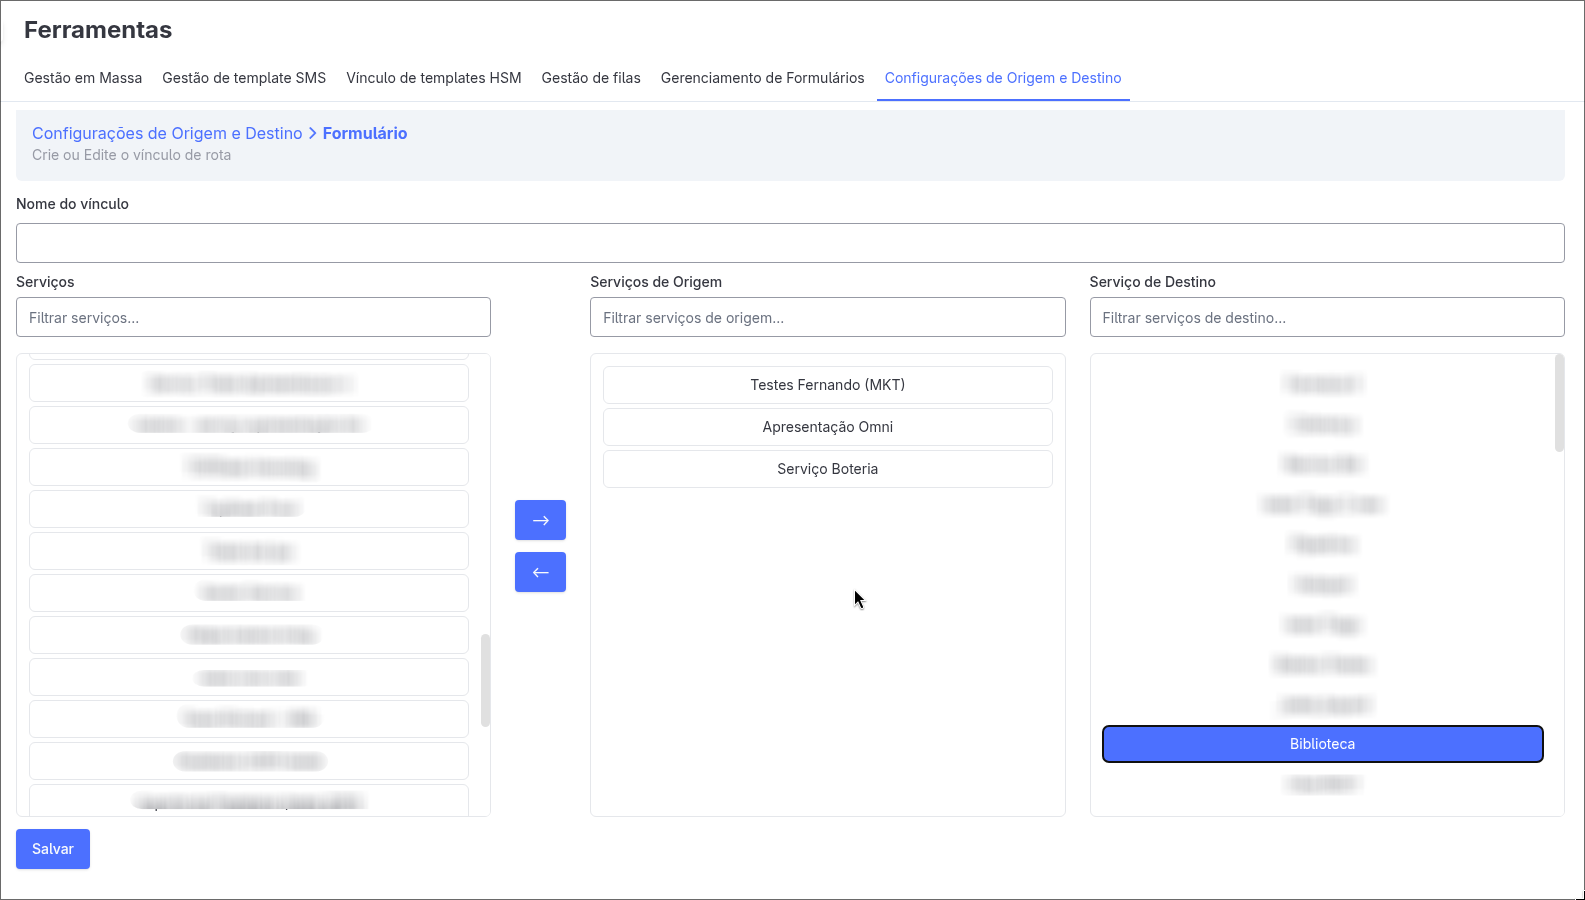
To define a specific destination route, use the tools menu:
- Go to Tools > Source and Destination Settings.
- Create a new link and set a Name.
- In the Services column, select the desired items and move them to Source Services using the ">>" button.
- Note: When a service becomes a "Source," it is removed from the other columns to prevent it from being its own destination.
- In the Destination Service column, choose which queue the attendance should be directed to.
- Click Save.
⚠️ Important Rules
- Exclusivity: Each service can only be linked to a single source rule at a time.
- Optional Use: If the intention is to keep the attendance in the same queue, this configuration is not required; the system will automatically perform the default return.
📱 Behavior for the Agent
For the operator, the process is transparent:
- When selecting the configured pause reason, the attendance screen is cleared immediately.
- The agent’s status changes to Paused.
- Attendances are reallocated without the agent needing to transfer them manually one by one.
📝 History and Traceability
To ensure operation auditing, every automatic transfer performed by this functionality is recorded in the attendance timeline.
The system automatically inserts an Internal Comment (visible only to agents and managers) detailing the action and destination, as shown in the example below:

This allows you to quickly identify whether an attendance changed operators due to a manual action or because a pause was triggered.
✨ Operational Benefits
- 🛡️ SLA Protection: Prevents response times from being exceeded because an attendance was "stuck" on the screen of an unavailable agent.
- 🤝 Customer Experience: The client does not notice the interruption, being served by the next available operator without needing to interact again.
- ⚙️ Process Automation: Eliminates the need for the supervisor to monitor and manually pull attendances from agents who went on pause or ended their shift.
User Tags
On this screen you can register tags for users.
On the home screen, you can view, register, and manage user tags by editing, activating, deactivating, deleting, or adding users to tags.
User Tag Creation
- Click on "New User Tag"
- Enter the tag name
- Click on "Save"
Creating User Tags
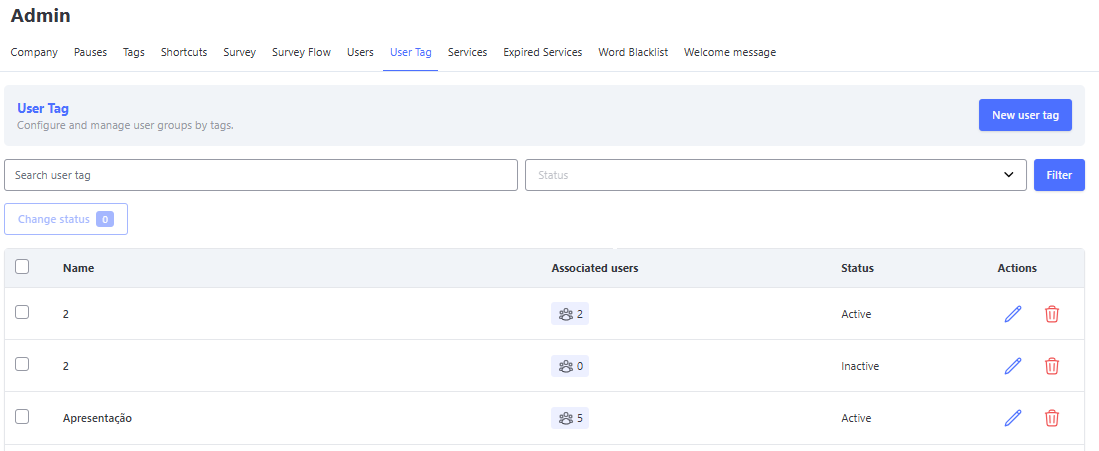
Registering Users in the User Tag
On the tag management screen, you must click on the icon in the "Associated Users" column.
On this screen, you will be able to view and manage the users already registered in the tag.
To add new ones, simply click the "Add Users" button, search by the user’s name, and then click "Add".
You can add as many users as you want at once. After that, just click "Finish", returning to the previous screen and clicking Finish again.
Linking User Tags
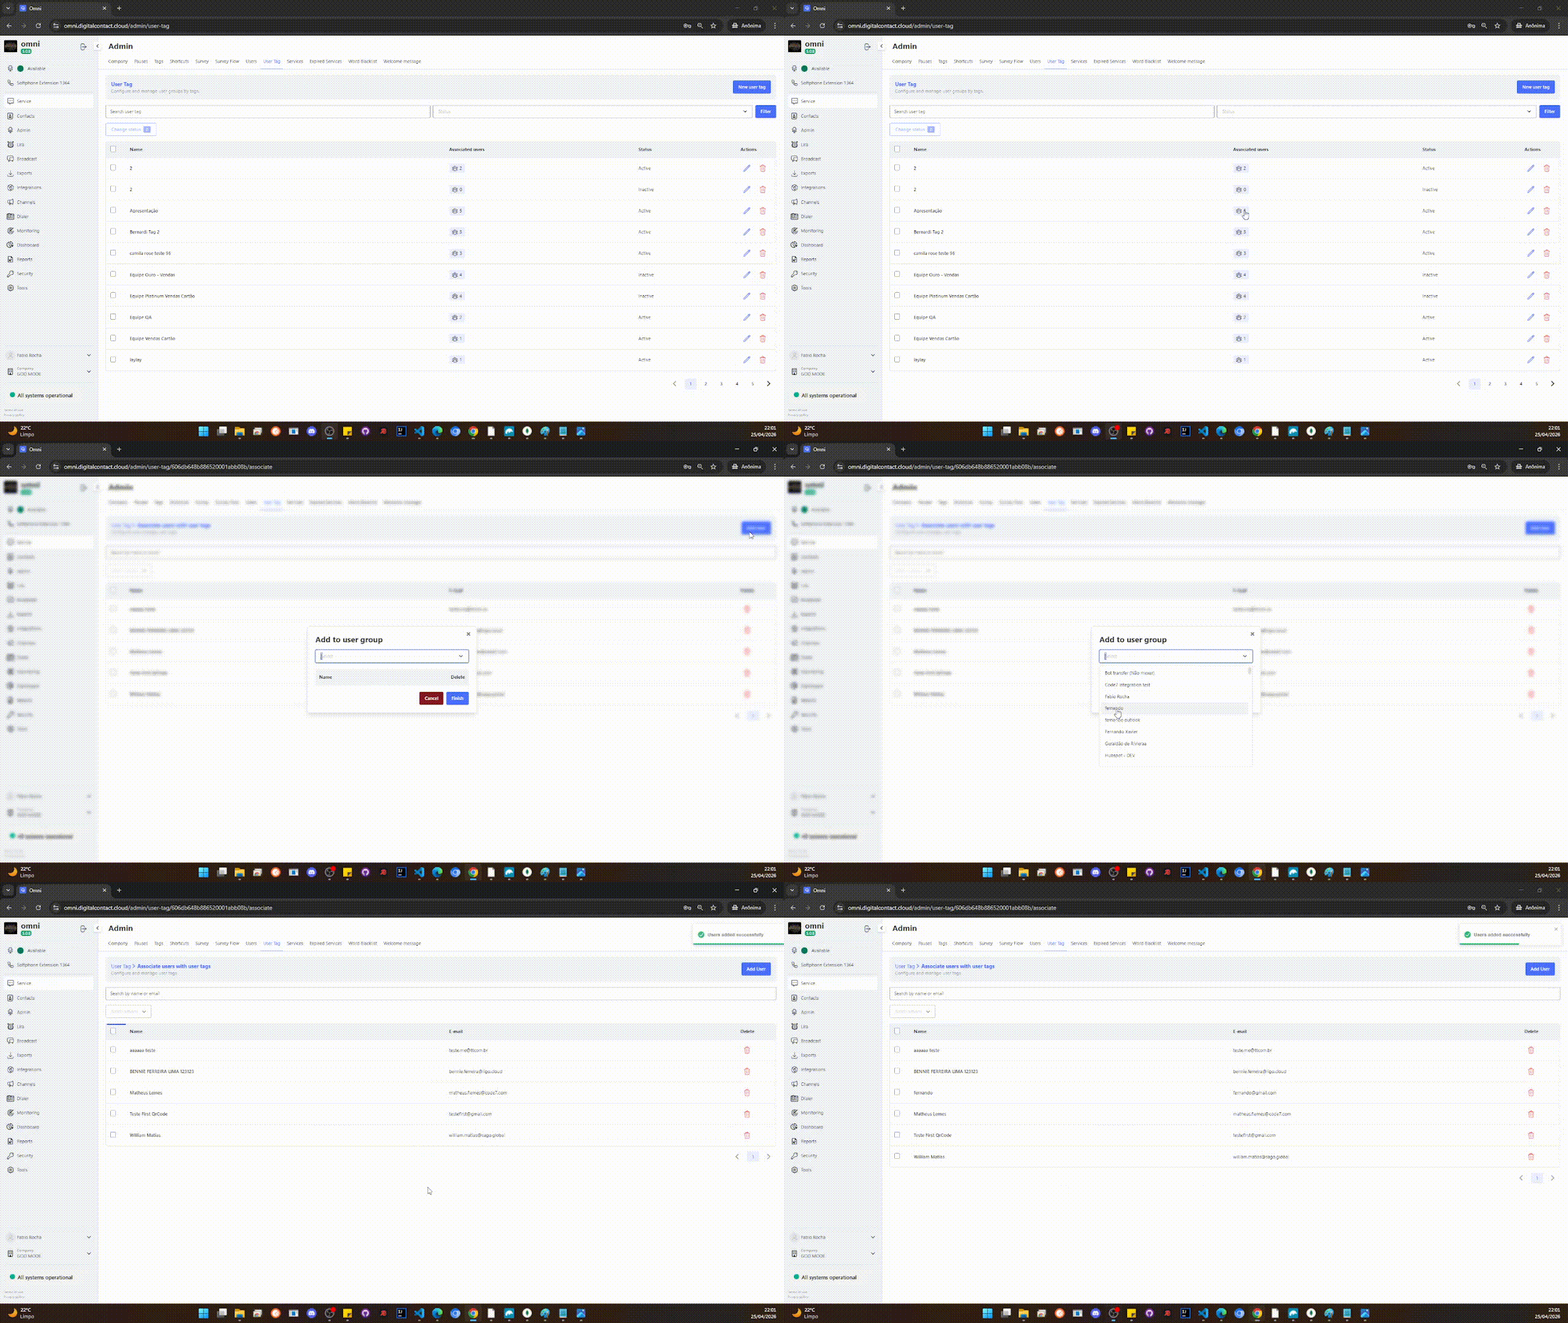
Satisfaction Survey - Flow
The Flow Survey is a feature that allows the creation of interactive and customized surveys, adapting the flow of questions based on the client’s responses. With this dynamic approach, it is possible to guide the questionnaire more effectively, ensuring a smoother and more relevant experience for each user.
In addition, this structure provides greater flexibility in collecting feedback, enabling different paths within the survey to obtain more detailed and precise information according to business needs.
Configuration of Satisfaction Survey Expiration Time
It is now possible to configure the maximum expiration time of the Satisfaction Survey sent after the completion of attendance. Previously, this time was fixed at 24 hours, and if the client did not respond within that period, the survey was considered expired.
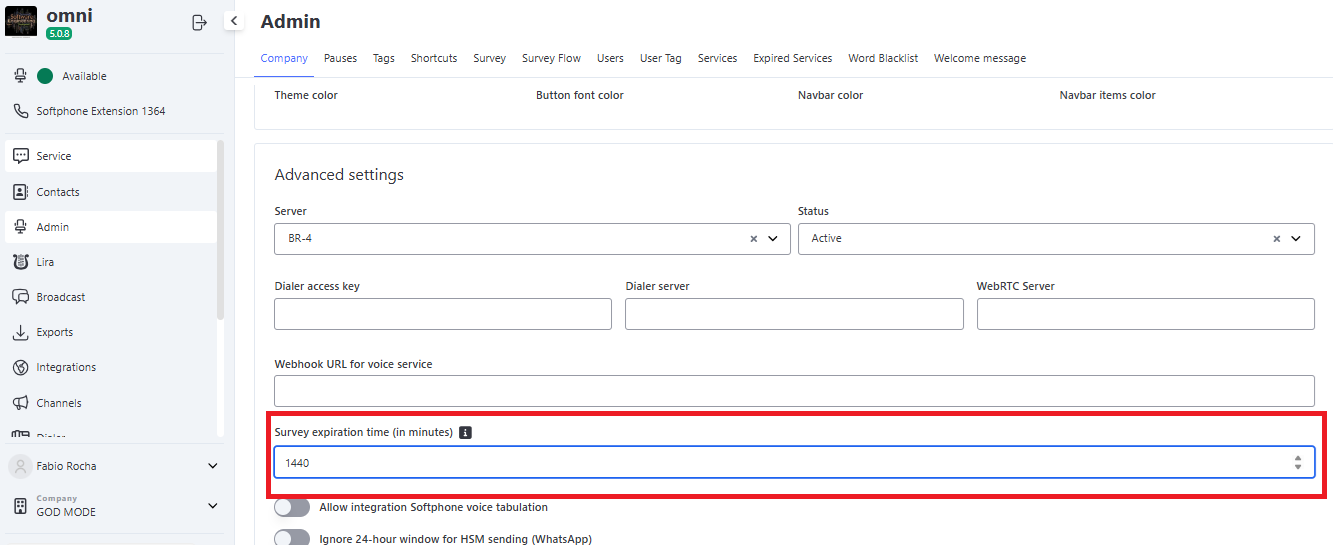
With this update, the user can define a custom expiration time for the survey, choosing a value between 5 minutes and 1440 minutes (equivalent to 24 hours).
How Does It Work?
- After the attendance is completed, the system automatically sends the satisfaction survey to the client.
- The expiration time can be configured in the administrative menu under Companies.
- Changing this time does not affect surveys that have already been sent. Active surveys will follow the previous configuration, while new surveys will use the new expiration time.
- The process that checks and finalizes expired surveys runs every 5 minutes.
- If there is a pending survey for the client, the system will block the sending of Quick Messages and display the following alert:
"This client has an unanswered survey. The deadline is X hours and Y minutes. Repeat the process once the client responds or the deadline expires."
📌 The time shown in the message is dynamic and adjusts according to the remaining time until the survey expires.
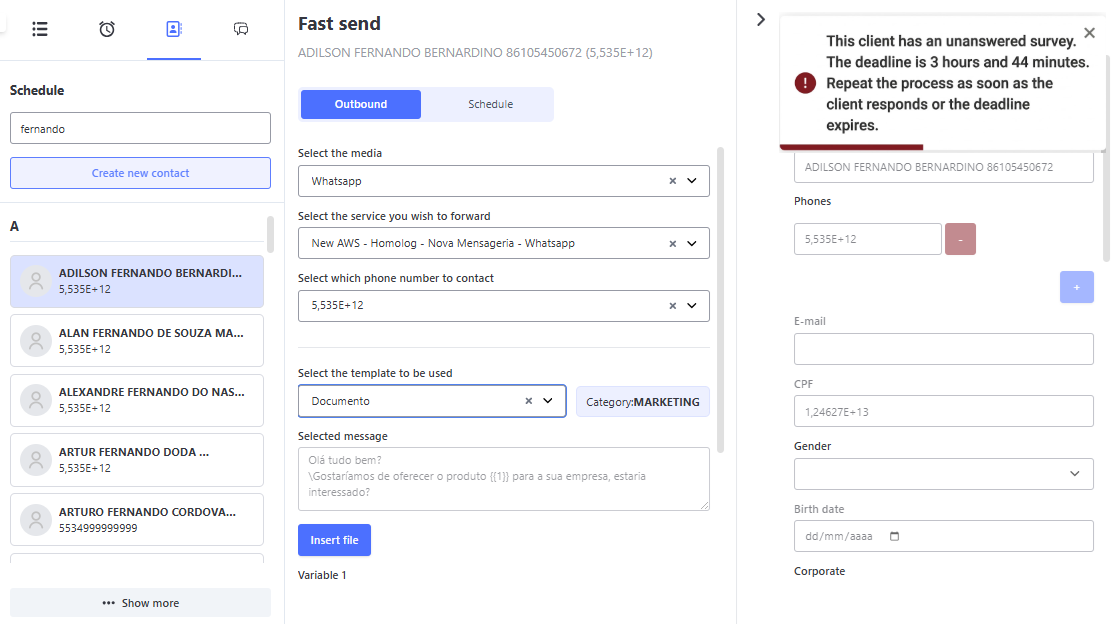
Configuration
- Minimum time: 5 minutes
- Maximum time: 1440 minutes (24 hours)
- Default value: 1440 minutes (24 hours) (if not changed or when creating a new organization)
Impact and Benefits
✅ Greater flexibility in managing the satisfaction survey time.
✅ Allows strategic adjustments according to business needs.
✅ Ensures that ongoing surveys maintain the original configuration, providing predictability in tracking responses.
✅ Guarantees that surveys are sent and expired according to each company’s policy.
✅ Prevents Quick Messages from being initiated while there is an active survey, ensuring that the communication flow follows the established rules.
Customer Satisfaction Metrics
Customer satisfaction is an essential factor for evaluating the quality of services provided and identifying opportunities for improvement. Within the platform, two of the most commonly used metrics for this monitoring are NPS (Net Promoter Score) and CSAT (Customer Satisfaction Score).
Both methodologies allow measuring the level of satisfaction and loyalty of customers, providing strategic insights to optimize the consumer experience and improve the services offered. Below, we detail each of these metrics and their application in the platform.
NPS
The Net Promoter Score (NPS) is a customer loyalty metric aimed at measuring the degree of loyalty of customers across companies in any segment, reflecting their experience and satisfaction. Additional questions can be included to help understand perceptions of various products, services, and business lines. These additional questions help the company assess the relative importance of these other parts of the business in the overall score. This is especially useful to guide resources and address issues that most impact the NPS.
The Net Promoter Score aims to innovate the culture of post-sales surveys so that they can provide a real view of the services offered by the company, consequently helping it evolve and achieve a level of solidity and excellence in the market. NPS stands as an important tool for business expansion and increased return on investment.
CSAT
CSAT stands for Customer Satisfaction Score. As the name suggests, it is a Customer Satisfaction Scale. This type of survey is used to evaluate the consumer’s perception of the brand and considers interaction points such as:
- Service before, during, and after purchase;
- Delivery logistics;
- Product or service;
- Speed in problem resolution;
- The entire sales process.
CSAT is a short-term survey, usually applied through questions such as: “How would you rate your experience with the brand?” It may include questions about each of the points mentioned above, as well as space for additional comments or even justification for the rating.
The creation of the Satisfaction Survey on the platform is carried out quickly, objectively, and simply, where the Organization’s manager can insert the questions and the scoring variable desired for each question.
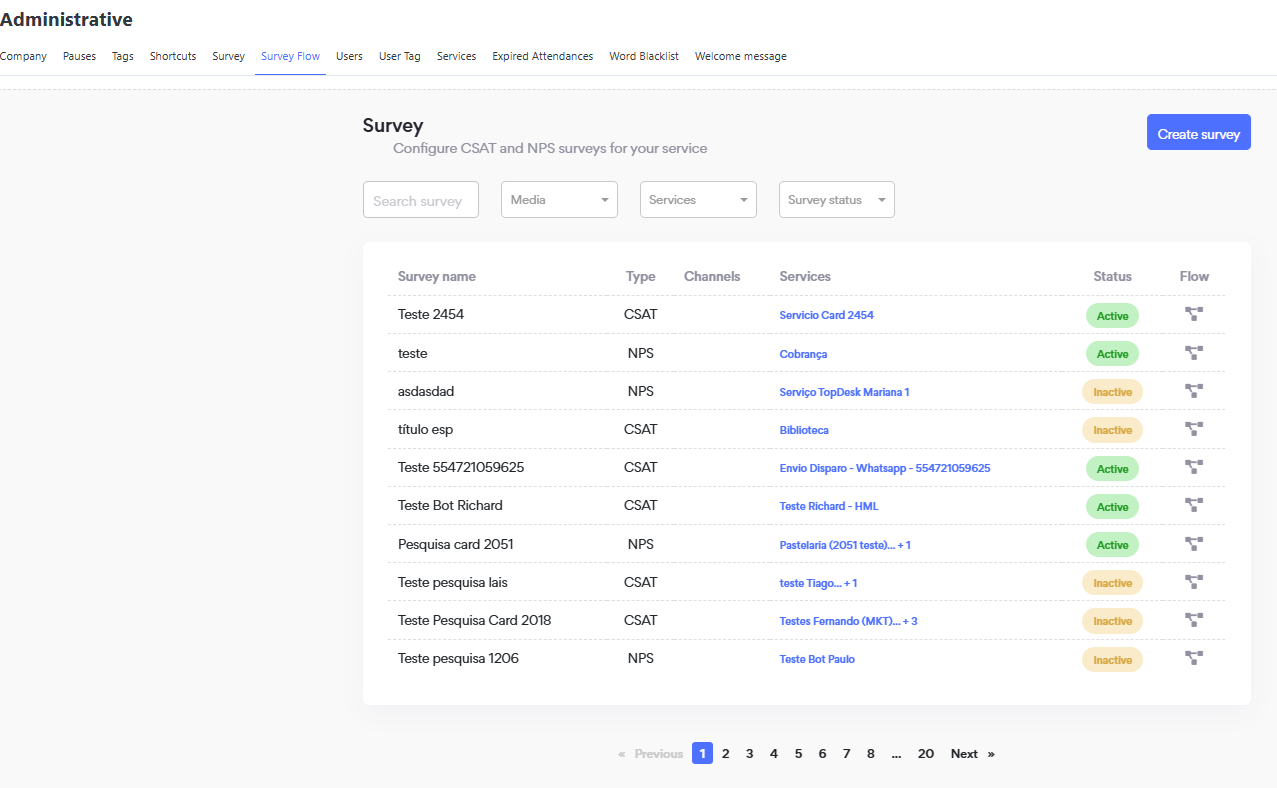
Creating a Flow Survey
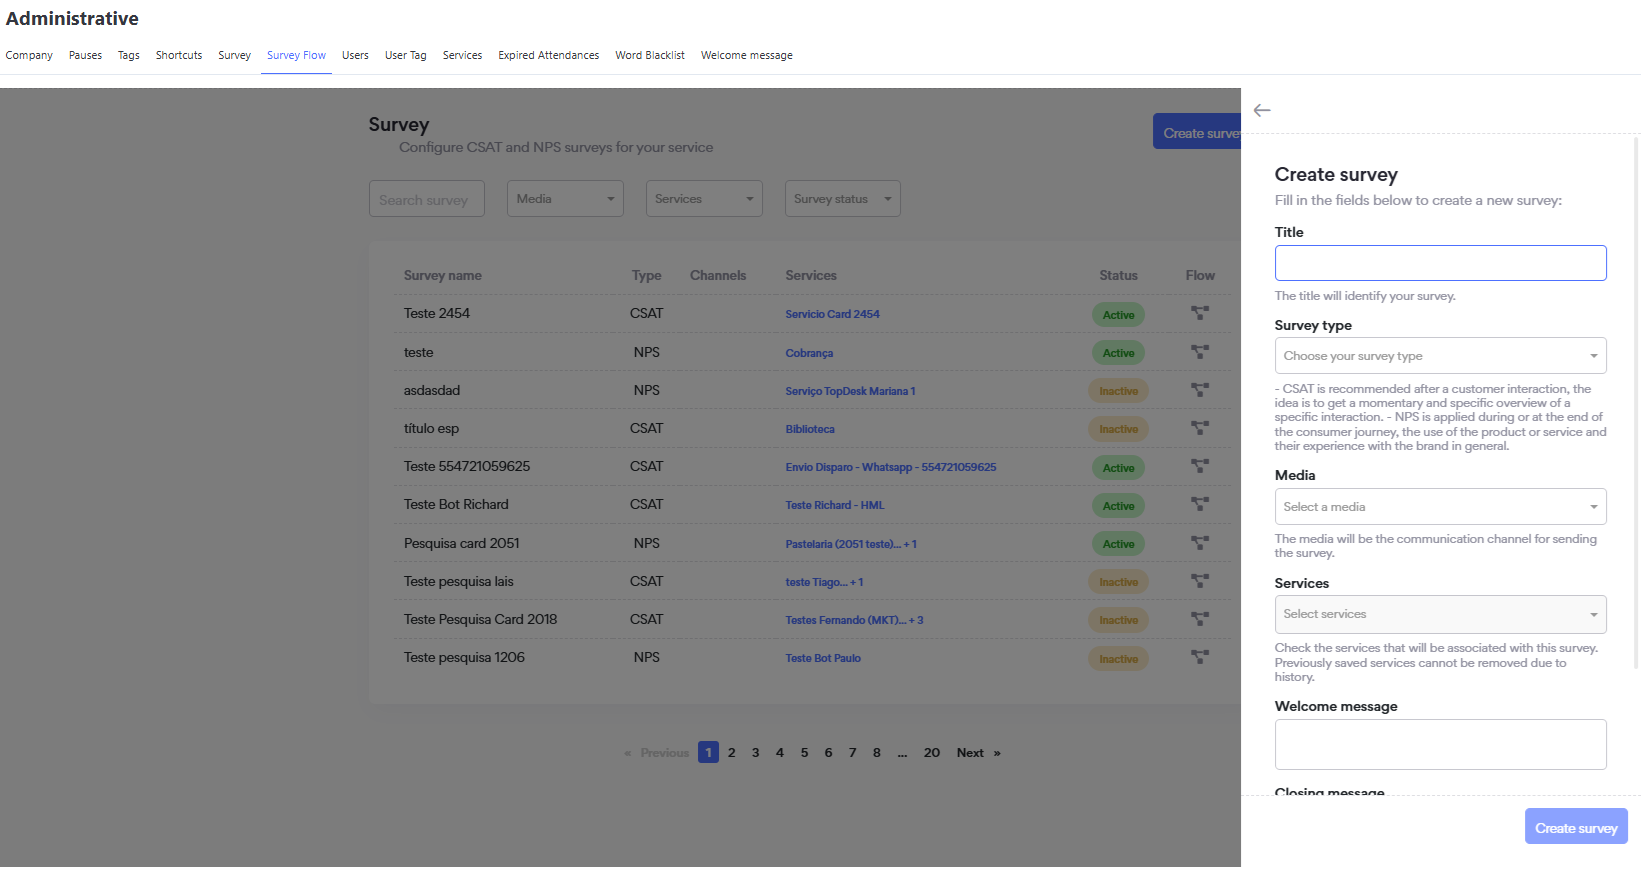
Click the "Create Survey" button in the upper right corner of the screen – a new screen will open where you must fill in the following fields:
- Title – the name that will be given to the Survey
- Survey Type – define whether it will be a CSAT or NPS Survey
- Media – define in which media the Survey will be applied
- Services – define which services will have the Survey
- Start Message – write the introduction or welcome message for the Survey
- End Message – write the closing or thank‑you message for the Survey’s completion
- Activate the survey
- Save by clicking the "Create Survey" button
Creating the Flow of the Flow Survey
After creating the Survey according to the instructions above, on the main screen you must identify the survey and click the flow link to create the questions that will be part of the survey within the desired flow.
Step by Step
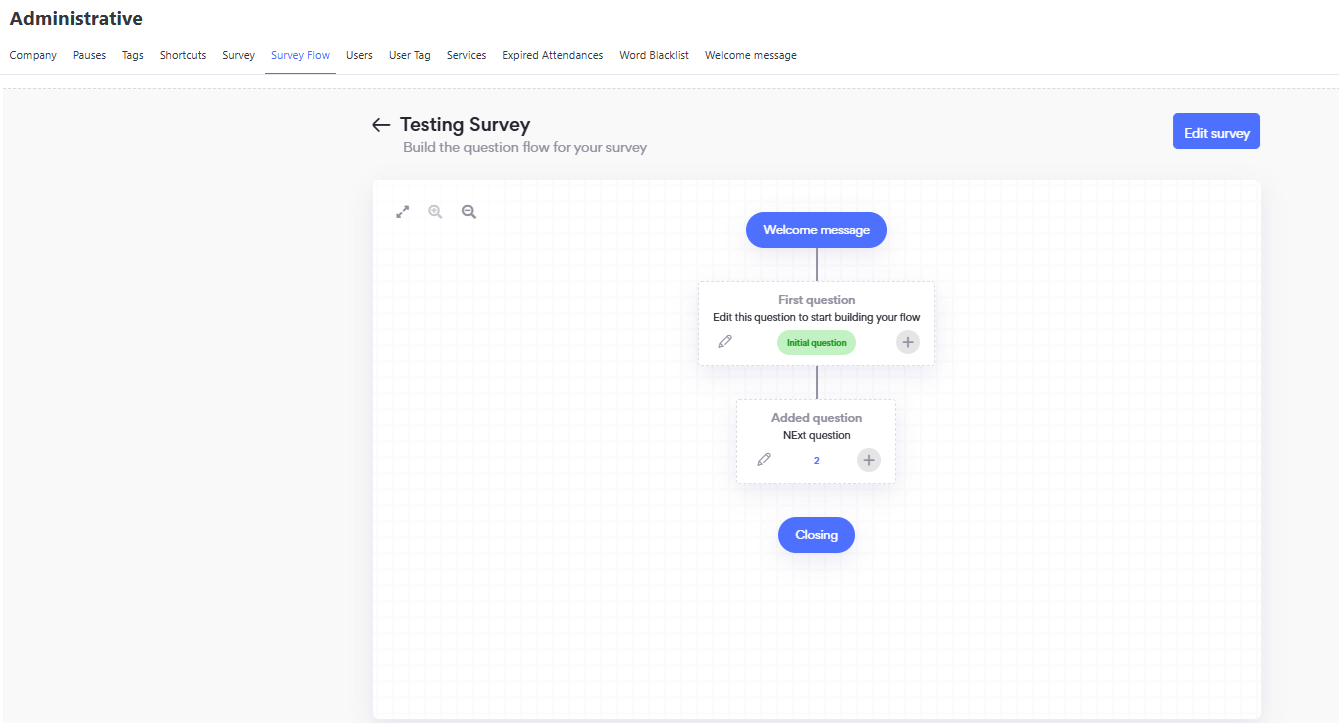
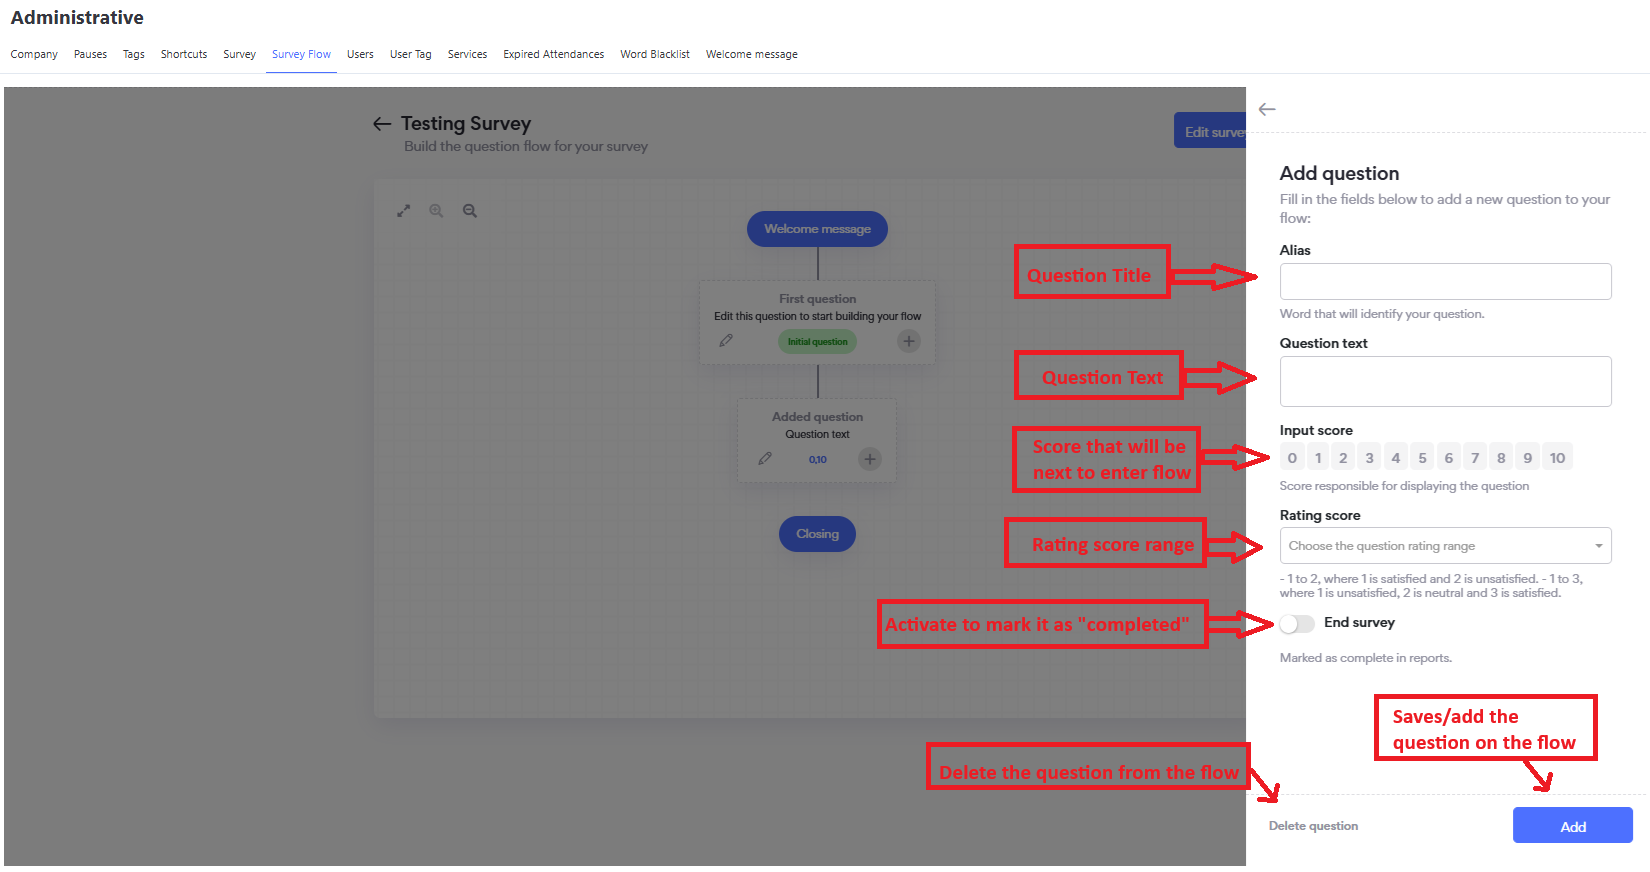
- Click the flow icon – this will open the screen to build the survey’s question flow.
- Click the "+" to create a new question.
- Click the pencil icon to edit an existing question.
- Fill in the Alias field – the title of the question.
- Fill in the Question Text field.
- Choose which scores will be input options for the question being created.
- Enable or disable repetition.
- Enable whether the question can be a closing question.
- Click Add.
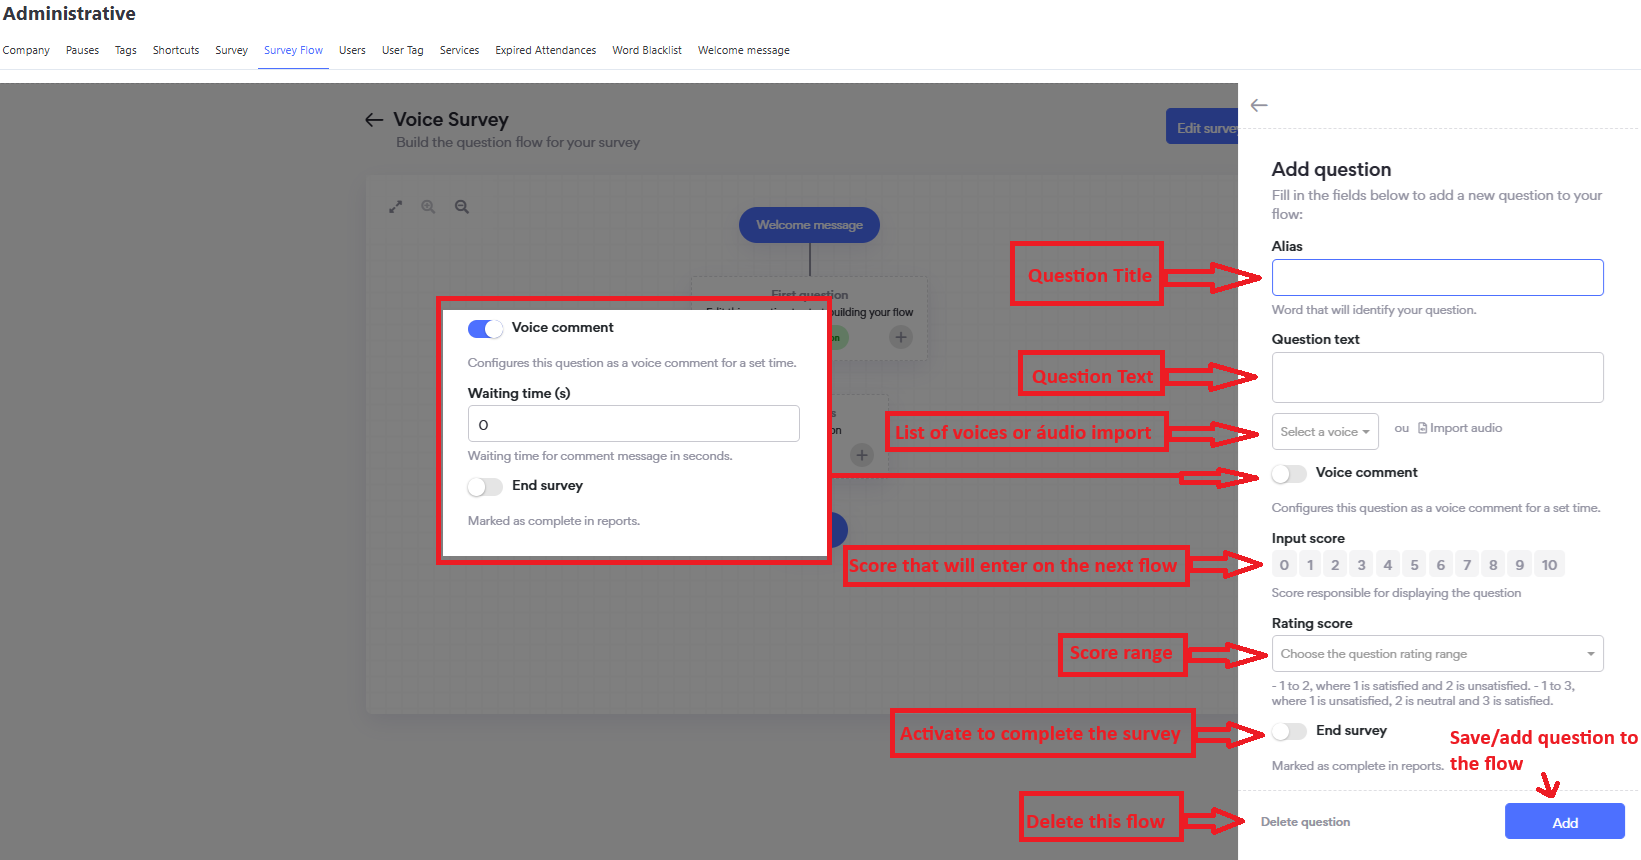
Voice Survey Flow
For surveys created for voice media, there are some particularities such as:
- Choosing a voice or importing audio.
- Defining which IVR (Interactive Voice Response) will be configured for the Survey.
- Defining which flow (inbound, outbound, or both).
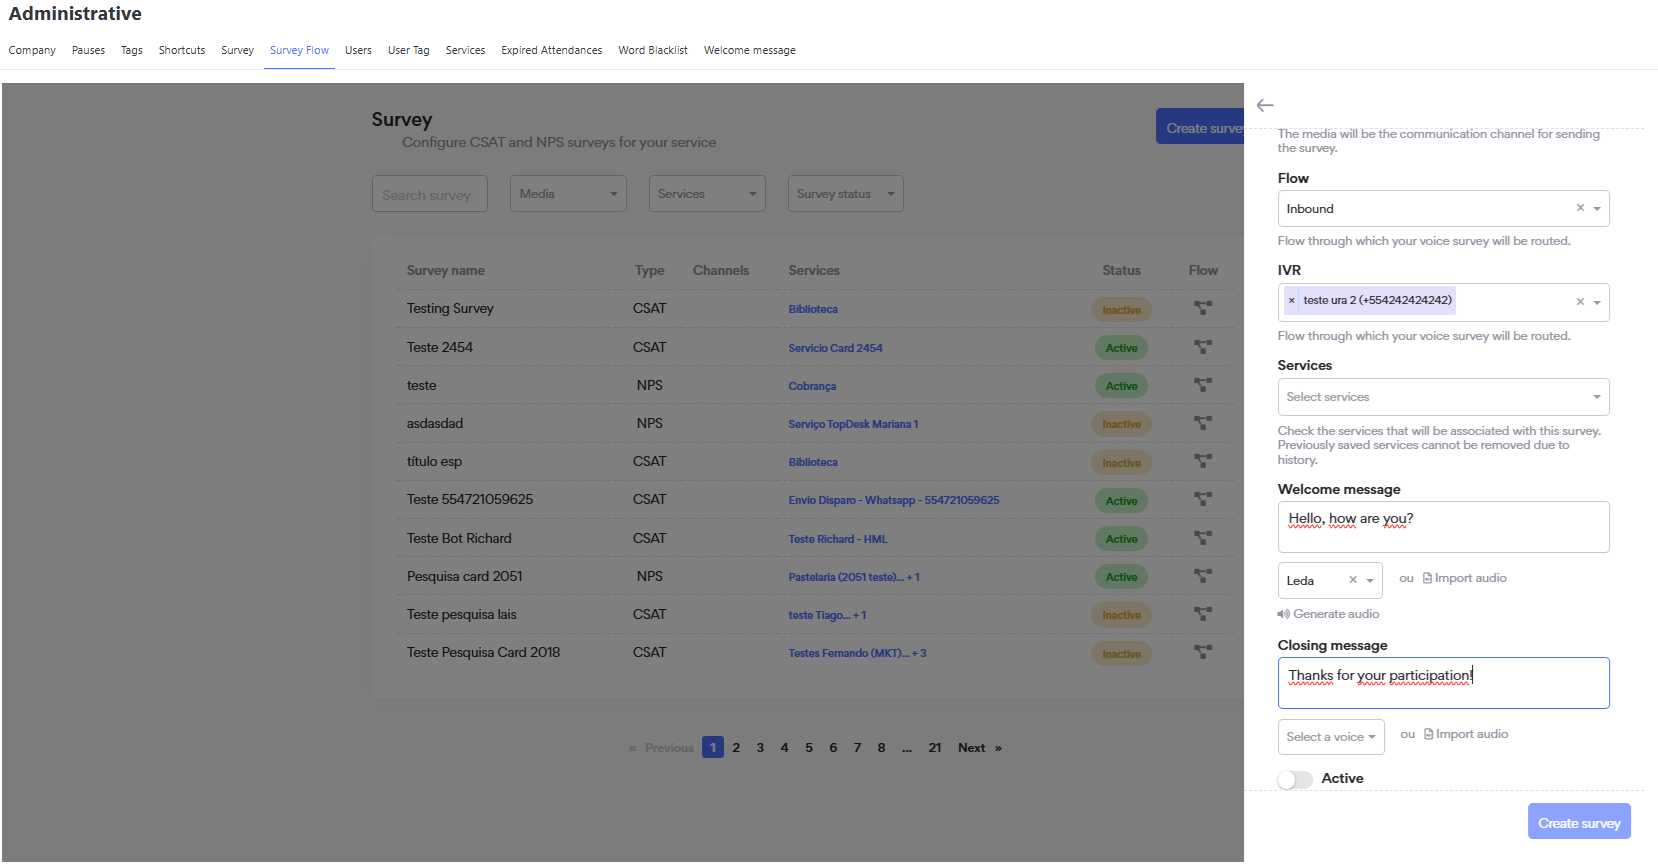
After creating the Survey, you must also configure the question flow.
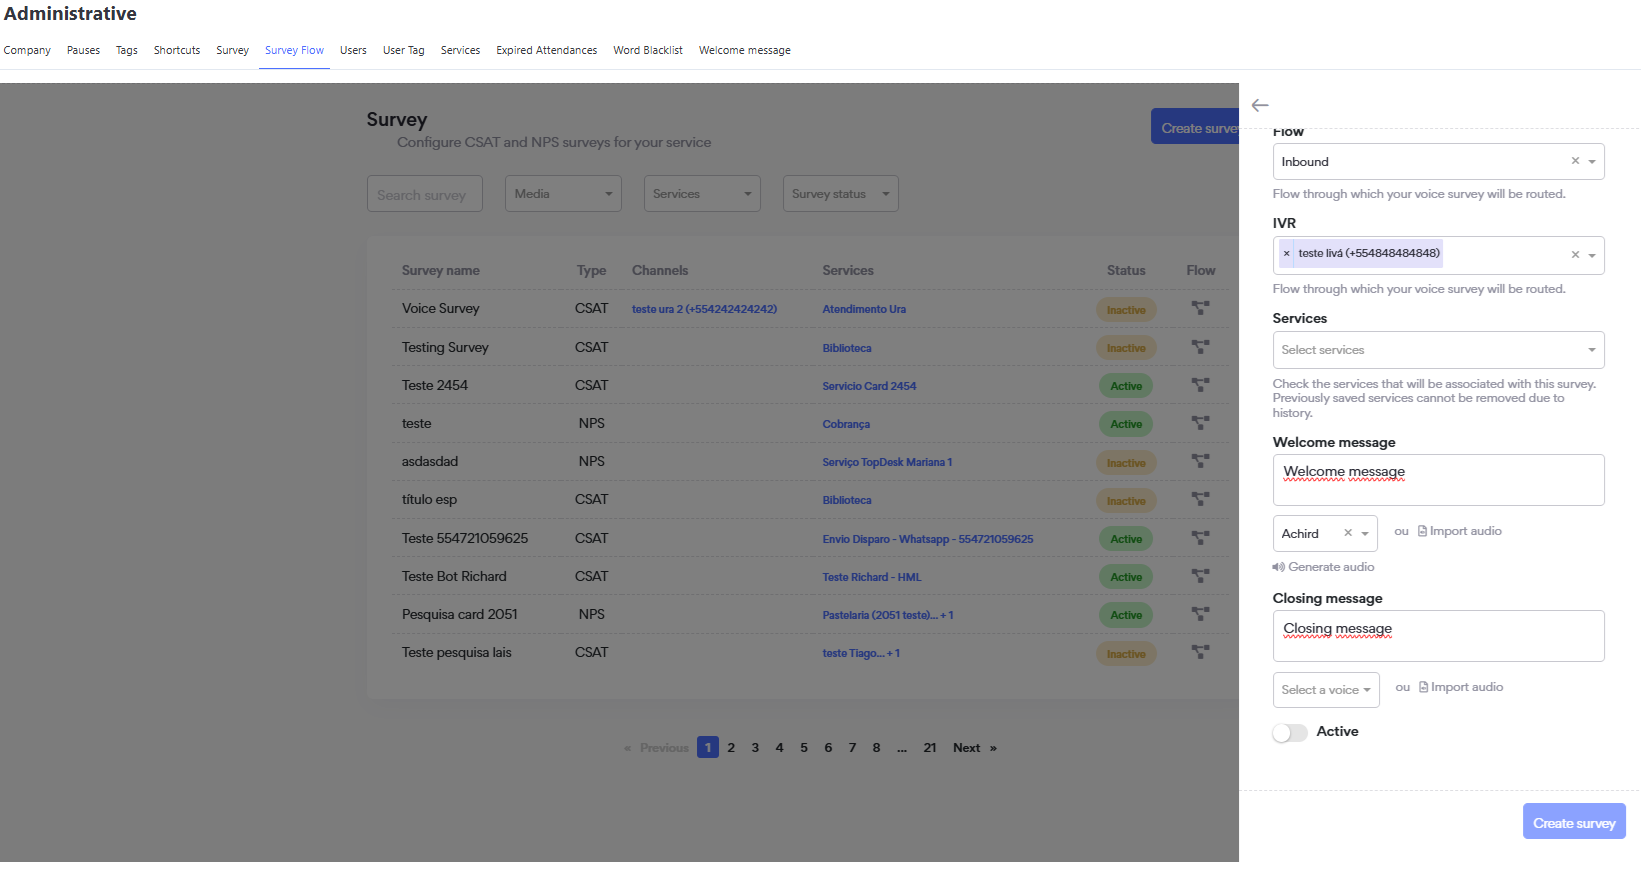
Where the fields must display the information according to the image below:
Research Report
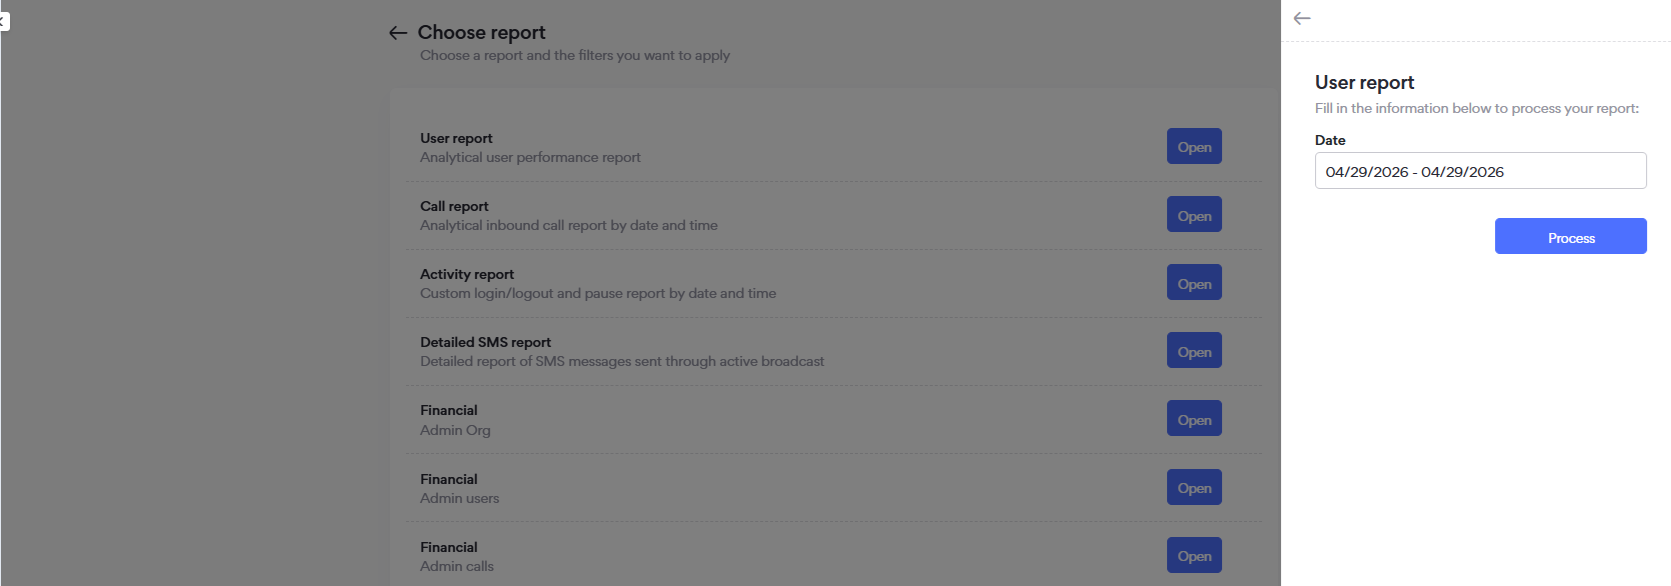
For users who have permission to generate Research reports, simply follow the path:
- Exports
- New Report
- Satisfaction Survey - Analytical Report
- Select which Survey you want the report to be generated for; the screen will display the remaining filters:
- Status
- Survey
- Media
- Channel
- Service
- Alias - title of the question created in the Survey
- Date
After selecting the filters, click "Process"
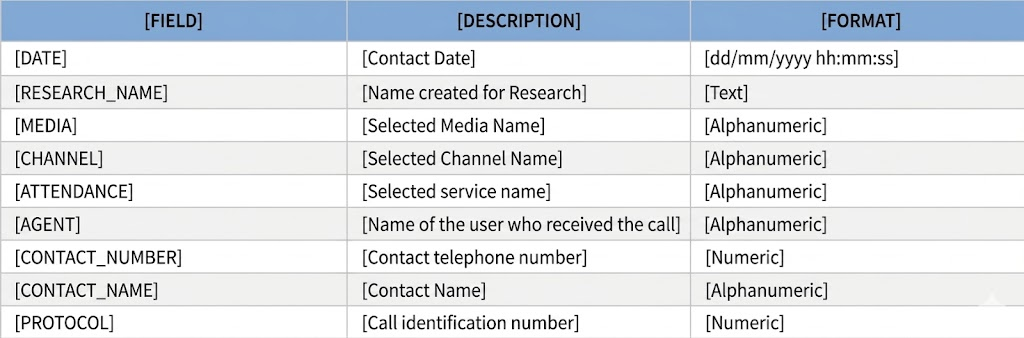
The following table provides the information from the data found in the Analytical Survey Report

Survey Sending
In Omni, it is possible to configure the sending of surveys in two ways.
One is through Mandatory Sending, where the configuration is done by the attendance closing tag. The other way is through the Survey Sending Notification, which allows the agent to choose whether or not to send the survey from the attendance screen. This configuration is managed in the Companies menu.
With this, we have some configuration possibilities:
- Mandatory Sending Enabled: All active surveys will be sent when closing attendance with the tag, regardless of other settings.
- Mandatory Sending Disabled and Survey Sending Notification Enabled: The agent will decide whether the active survey will be sent or not.
- Mandatory Sending Disabled and Survey Sending Notification Disabled: No satisfaction survey will be sent.
Below is how to configure survey sending:
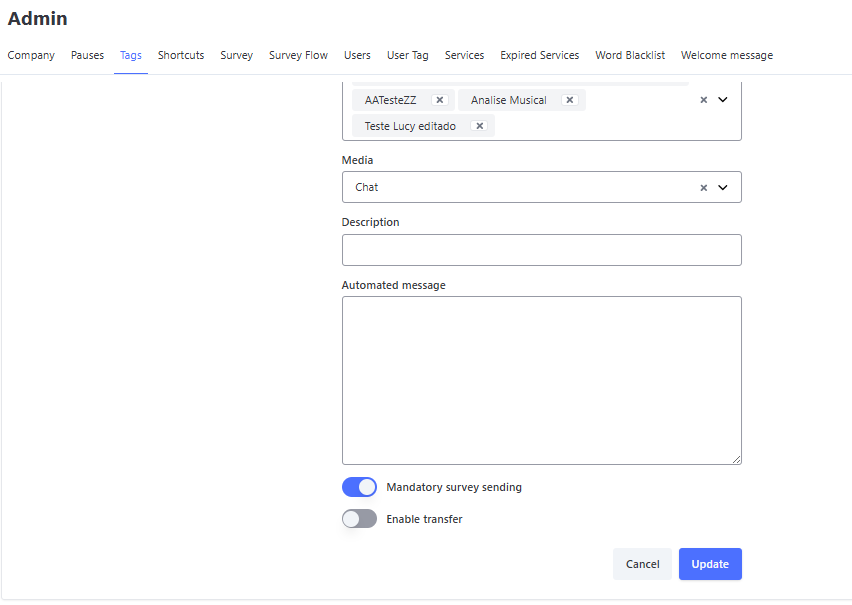
Mandatory Survey Sending
In Omni, the sending of the satisfaction survey is determined by the attendance closing tag.
For the survey to be sent, the closing tag must have the Mandatory Survey Sending flag enabled.
If the option is disabled, the survey will not be sent.
Note: By default, Tags already have the mandatory sending flag enabled.
Survey Sending Notification
This notification allows the agent to choose whether or not to send a satisfaction survey after an attendance.
For this notification to appear on the agent’s screen, it must be enabled in the Companies menu.
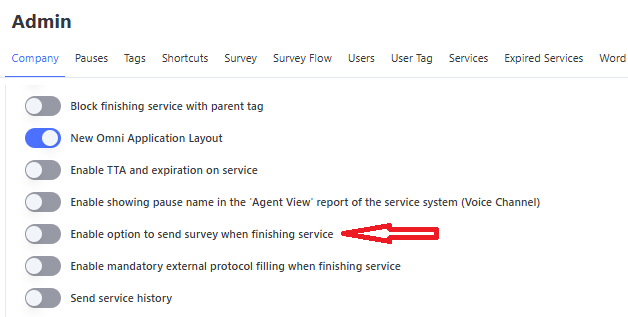
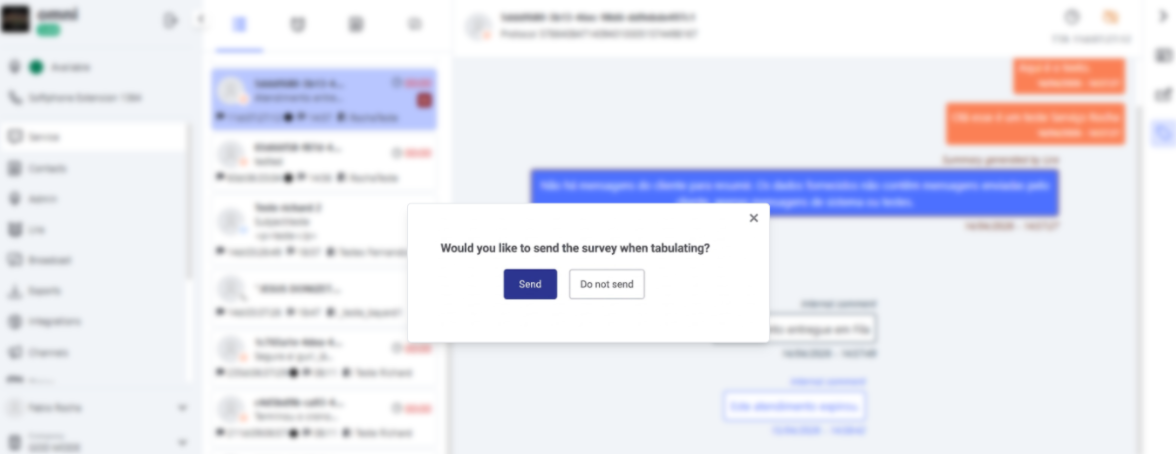
After enabling the option for the agent to send the survey, when the agent closes the attendance this notification will appear:
Expired Attendances
In this menu, it is possible to configure the automatic expiration time of attendances that do not receive a response from the client. This functionality allows you to define deadlines in minutes to alert the client about the closing of the attendance and, subsequently, automatically finalize it if there is no interaction.
This feature is available only for Chat and WhatsApp media.
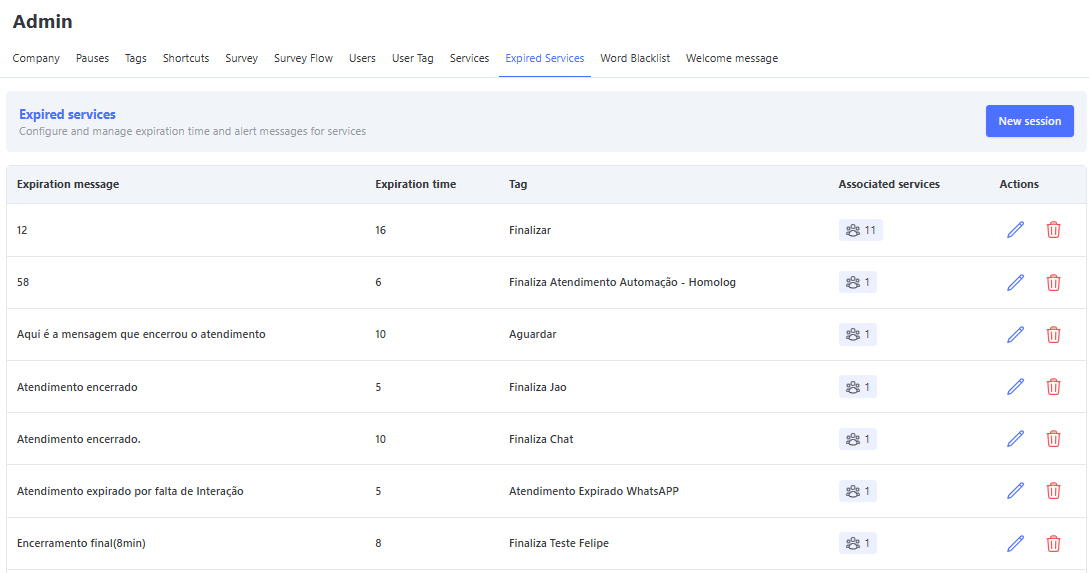
Search Filters
To optimize management and quickly locate registered rules, the interface provides a search engine composed of the following filters:
- Message: Allows a direct search filtering by the textual content of the configured closing messages.
- Service: Selector filter that allows listing rules associated with one or more specific services of the organization.
- Tag: Allows filtering configurations based on the closing/tabulation tag linked to the attendance.
On this screen, you can view the already registered expiration times and their information:
- 📝 Closing Message: Message that will be sent to the client when the attendance expires.
- ⏱️ Expiration Time: Time, in minutes, after which the attendance will be automatically closed.
- 🏷️ Tag: Tag used to finalize the attendance.
- 🛠️ Services: Displays the services linked to the expiration configuration.
- ⚙️ Action and Management Buttons:
- 👥 Associate Services: Allows linking Services directly to the selected expiration configuration.
- ✏️ Edit Button: Opens the parameterization form, allowing changes to times, messages, tags, or services of an already registered configuration.
- 🗑️ Delete Button: Permanently removes the selected expiration rule from the system database.
Registering New Attendance Sessions
- Click the New Session button.
- Select a Tag for closing. It must be previously registered in the Tags menu to be selected.
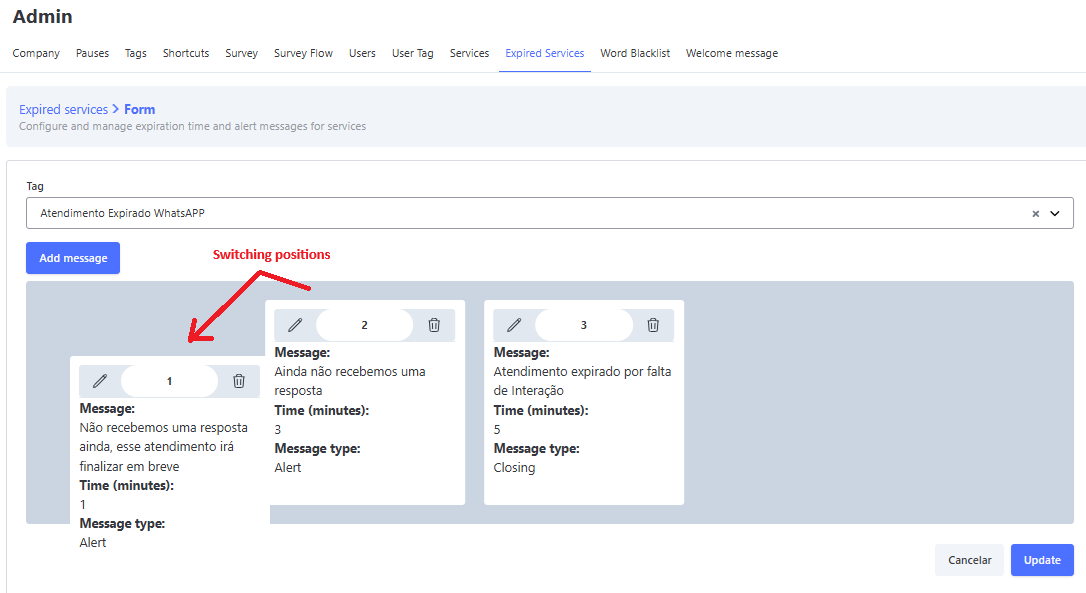
- When creating a new session, you will see a card only for alert messages. However, it is possible to add more cards if necessary. The maximum limit is 9 alert messages and 1 closing message.
- Enter a Message that will be sent to the client to warn that the attendance will expire.
- Fill in the Time field, remembering that the value is calculated in minutes. For example:
- To close the attendance after 1 minute, enter the value 1.
- To close after 1 hour, enter the value 60.
- The entered value must be greater than the one specified in the Time field of the previous card.
- If necessary, reorganize the cards to adjust the order of the messages.
- Click the Save button.
- Note: The value of the Time parameter in the cards must be less than the Attendance Time parameter configured in the Services menu.
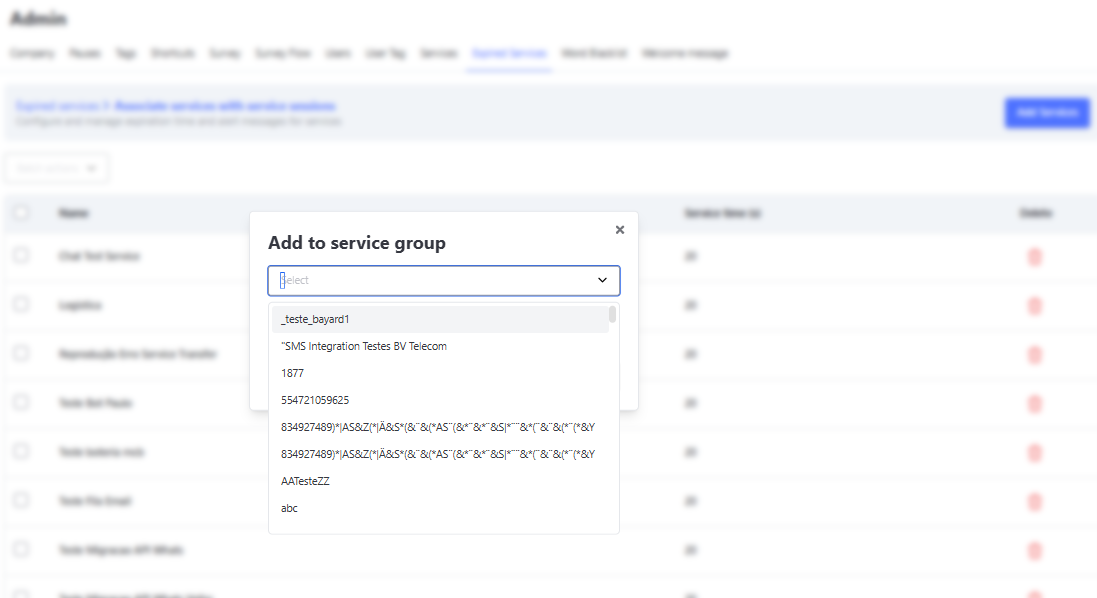
Linking Services
- Click the gear icon in the Services column.
- Select one or more services from the list of already registered services. Depending on the number of services registered, the list may load gradually.
- Click the Add button.
- Click the Finish button.
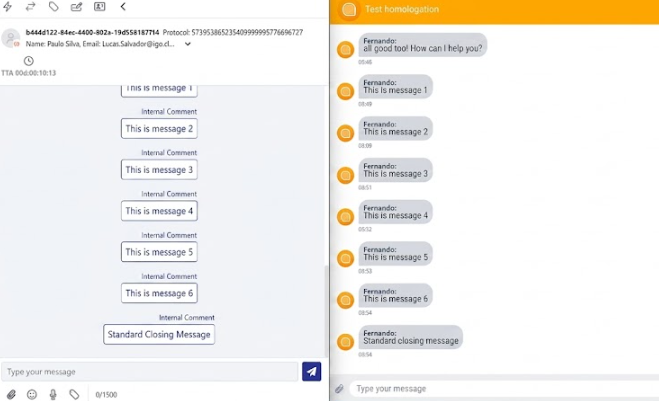
After completing these configurations, the client will receive the alert message, which will also be displayed on the agent’s screen. If there is no further interaction from the client, the attendance will be automatically closed using the selected tag.
Word Blacklist
In Omni, it is possible to include words or terms so that they cannot be sent by agents during an attendance.
Words can be added through the "New Blacklist Word" button, allowing inclusion one by one, or they can be added in bulk using a .CSV file.
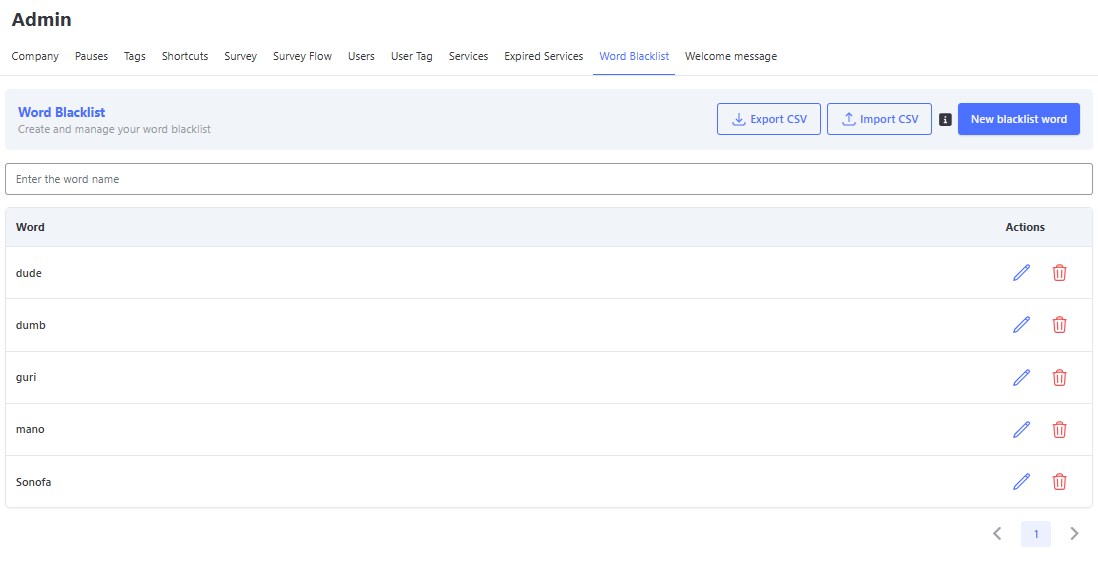
When the words are added, they will be highlighted if used on the attendance screen.
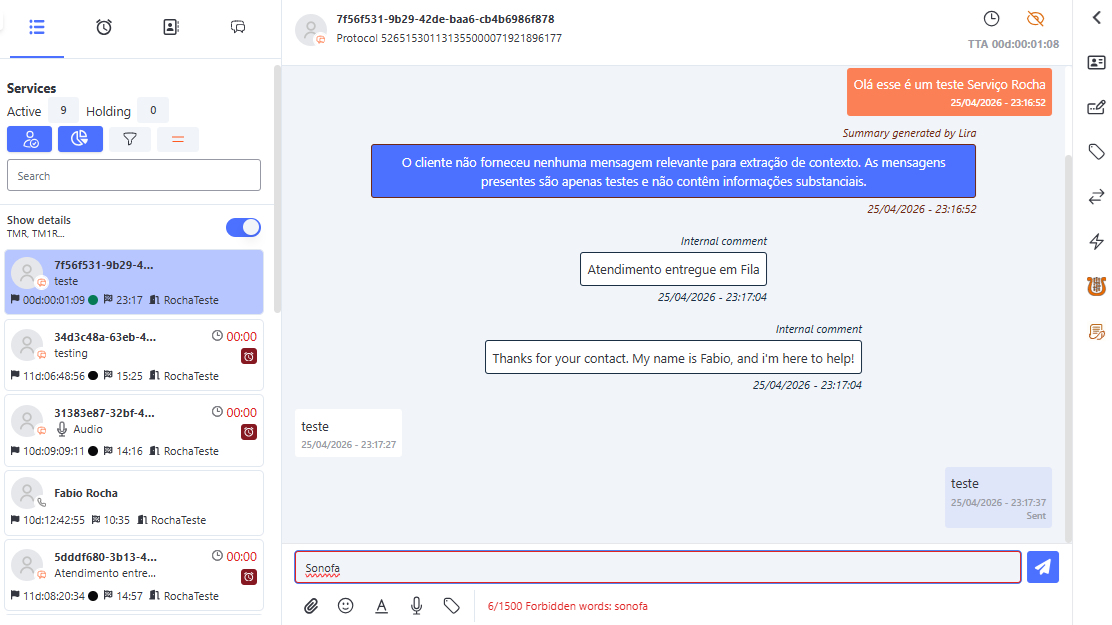
If the agent still tries to send the message, a notification will appear on the screen and the message will not be sent to the client.